'Hacking'에 해당되는 글 266건

  1. 2009.01.26 OllyMoreMenu-v1.3c by CEOinIRVINE
  2. 2009.01.24 DeFixed_Edition_v2 by CEOinIRVINE
  3. 2009.01.24 How to Compile Wall Hack by CEOinIRVINE
  4. 2009.01.24 Asprotect UNPACK by CEOinIRVINE
  5. 2009.01.24 API & DLL by CEOinIRVINE 1
  6. 2009.01.24 W32DASM Disassembler by CEOinIRVINE
  7. 2009.01.24 Intro to Reverse Engineering-Part 2 by CEOinIRVINE
  8. 2009.01.24 Intro to Reverse Engineering - No Assembly Required by CEOinIRVINE
  9. 2009.01.24 ASProtect 1.23 RC4 - 1.3.08.24 by CEOinIRVINE 1
  10. 2009.01.20 Gunz Original Files by CEOinIRVINE

OllyMoreMenu-v1.3c

Hacking 2009. 1. 26. 04:17

This plugin added in ollydbg in the menubar more menu´s with your favorite tools for quickstart.

Use:

Install in the Olly Plugins Folder

- for add new menu entry go in add menu and add you favorite tools if ok add this plugin new menu´s in ollydbg menubar for quickstart
http://forum.tuts4you.com/index.php?showtopic=16287&st=40&p=84161&#entry84161


'Hacking' 카테고리의 다른 글

Imm_PhantOm Plugin 1.54  (0) 2009.01.26
PhantOm Plugin 1.54  (0) 2009.01.26
DeFixed_Edition_v2  (0) 2009.01.24
How to Compile Wall Hack  (0) 2009.01.24
Asprotect UNPACK  (0) 2009.01.24
Posted by CEOinIRVINE
l

DeFixed_Edition_v2

Hacking 2009. 1. 24. 11:39

'Hacking' 카테고리의 다른 글

PhantOm Plugin 1.54  (0) 2009.01.26
OllyMoreMenu-v1.3c  (0) 2009.01.26
How to Compile Wall Hack  (0) 2009.01.24
Asprotect UNPACK  (0) 2009.01.24
API & DLL  (1) 2009.01.24
Posted by CEOinIRVINE
l

How to Compile Wall Hack

Hacking 2009. 1. 24. 10:47
***Updated***

There is a lot of people who was always asking on how to compile
fatboy wallhack source well now....im here to teach you
How to Compile Wallhack
Follow The Instructions:-
1. Download and Install Visual C++ here is a link Downloads.
2. Download Direct SDK Download details: DirectX SDK - (Summer 2004).
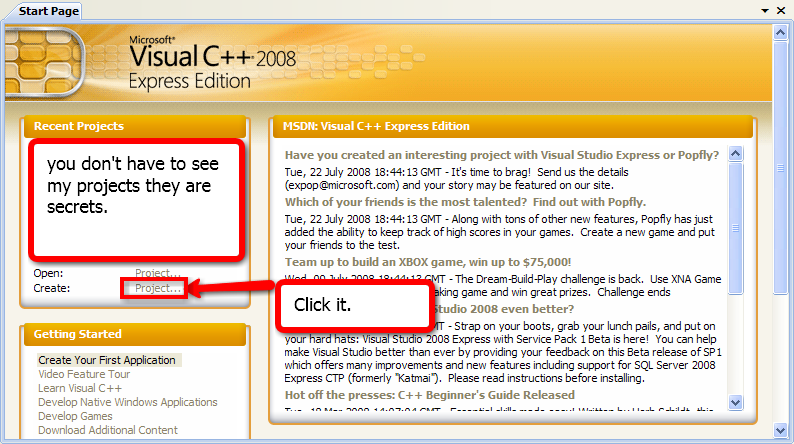
3. Open Visual C++ 2008 Express Edition and Click Create Projects.

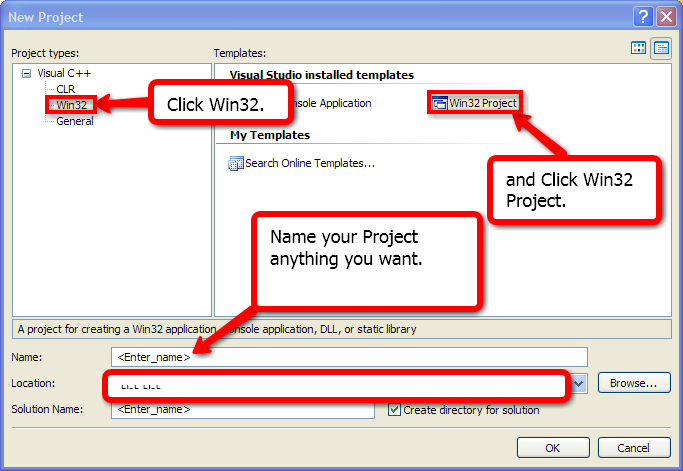
4. In Project types Click on Win32 then on the Right side click Win32 Project then Name Your Project and Click Ok.


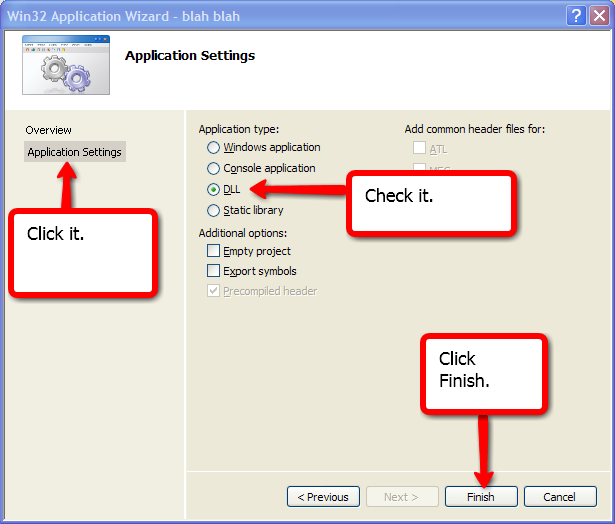
5. Click Application Settings , Click on dll option and Click Finish.


6. Copy the source and Paste it on your Blank page of your project name (.cpp)

name.cpp
Code:
/*creds to me,Roverturbo,Azorbix,Frit0 ,unreal*/


#include <windows.h>
#include <detours.h>
#include <d3d8.h>
#include <d3dx8.h>
#include "log.h"
#include <fstream>
#include <iostream>
#pragma comment(lib, "d3dx8.lib")
#pragma comment(lib, "d3d8.lib")
using namespace std;
static
DWORD dwBeginScene = 0x6D9D9250;
static
DWORD dwEndScene = 0x6d9d93a0;
static
DWORD dwDrawIndexedPrimitive = 0x6d9d73a0;
static
DWORD dwSetStreamSource = 0x6d9d6760;
static
DWORD dwSetViewport = 0x6d9d5b90 ;


int m_Stride;
int texnum;
int nNumVertices;
int nPrimitiveCount;

LPDIRECT3DTEXTURE8 Red,Yellow,Green,Blue,Purple,Pink,Orange;
bool Color = true;
bool Logger = false;
ofstream ofile;
char dlldir[320];
float ScreenCenterX = 0.0f;
float ScreenCenterY = 0.0f;
bool xhair = false;
bool WallHack = false;
bool WallHack2 = false;
HANDLE hand1 =NULL;
HANDLE hand2 =NULL;

DWORD bytes;

//Logger
int texarray[1000];
int arraycounter;
int delarray[500];
int dcount;
unsigned int arrc;
int i=0;


D3DCOLOR redt = D3DCOLOR_XRGB( 255, 0, 0 );


char *GetDirectoryFile(char *filename)
{
static
char path[320];
strcpy(path, dlldir);
strcat(path, filename);
return
path;
}

void __cdecl add_log (const char *fmt, ...)
{
if(
ofile != NULL)
{
if(!
fmt) { return; }

va_list va_alist;
char logbuf[256] = {0};

va_start (va_alist, fmt);
_vsnprintf (logbuf+strlen(logbuf), sizeof(logbuf) - strlen(logbuf), fmt, va_alist);
va_end (va_alist);

ofile << logbuf << endl;
}
}

HRESULT GenerateTexture(IDirect3DDevice8 *pD3Ddev, IDirect3DTexture8 **ppD3Dtex, DWORD colour32)
{
if(
FAILED(pD3Ddev->CreateTexture(8, 8, 1, 0, D3DFMT_A4R4G4B4, D3DPOOL_MANAGED, ppD3Dtex)) )
return
E_FAIL;

WORD colour16 = ((WORD)((colour32>>28)&0xF)<<12)
|(
WORD)(((colour32>>20)&0xF)<<8)
|(
WORD)(((colour32>>12)&0xF)<<4)
|(
WORD)(((colour32>>4)&0xF)<<0);

D3DLOCKED_RECT d3dlr;
(*
ppD3Dtex)->LockRect(0, &d3dlr, 0, 0);
WORD *pDst16 = (WORD*)d3dlr.pBits;

for(
int xy=0; xy < 8*8; xy++)
*
pDst16++ = colour16;

(*
ppD3Dtex)->UnlockRect(0);

return
S_OK;
}


//=================================EndScene_Start=================================================================================//
typedef HRESULT ( WINAPI* oEndScene ) ( LPDIRECT3DDEVICE8 pDevice );
oEndScene pEndScene;

HRESULT WINAPI myEndScene(LPDIRECT3DDEVICE8 pDevice)
{
if(
Color)
{
GenerateTexture(pDevice, &Red, D3DCOLOR_ARGB (255 , 255 , 0 , 0 ));
GenerateTexture(pDevice, &Yellow, D3DCOLOR_ARGB (255 , 255 , 255 , 0 ));
GenerateTexture(pDevice, &Green, D3DCOLOR_ARGB (255 , 0 , 255 , 0 ));
GenerateTexture(pDevice, &Blue, D3DCOLOR_ARGB (255 , 0 , 0 , 255 ));
GenerateTexture(pDevice, &Purple, D3DCOLOR_ARGB (255 , 102 , 0 , 153 ));
GenerateTexture(pDevice, &Pink, D3DCOLOR_ARGB (255 , 255 , 20 , 147 ));
GenerateTexture(pDevice, &Orange, D3DCOLOR_ARGB (255 , 255 , 165 , 0 ));
Color=false;
}

if(
xhair)
{
D3DRECT rec2 = {ScreenCenterX-20, ScreenCenterY, ScreenCenterX+ 20, ScreenCenterY+2};
D3DRECT rec3 = {ScreenCenterX, ScreenCenterY-20, ScreenCenterX+ 2,ScreenCenterY+20};
pDevice->Clear(1, &rec2, D3DCLEAR_TARGET,redt, 0, 0);
pDevice->Clear(1, &rec3, D3DCLEAR_TARGET,redt, 0, 0);
}

//=============================================UnHooK_Start===================================================//

if((GetAsyncKeyState(VK_F5)&1))
{
int end =NULL;
int dip =NULL;
int svp =NULL;
int sss =NULL;


BYTE Unhook[5] = {0x8B,0xFF,0x55,0x8B,0xEC};//Original Function Bytes.
hand1 = GetCurrentProcess();
DWORD dwmodualBase=(DWORD)GetModuleHandle("d3d8.dll");
end = 0x6d9d93a0;
dip = 0x6d9d73a0;
svp = 0x6d9d5b90;
sss = 0x6d9d6760;

WriteProcessMemory(hand1, (void*) end, Unhook, 5, &bytes);
WriteProcessMemory(hand1, (void*) dip, Unhook, 5, &bytes);
WriteProcessMemory(hand1, (void*) svp ,Unhook, 5, &bytes);
WriteProcessMemory(hand1, (void*) sss,Unhook, 5, &bytes);
}
//=========================================UnHook_End=========================================================//

if((GetAsyncKeyState(VK_F1)&1)){xhair=!xhair;}
if((
GetAsyncKeyState(VK_F2)&1)){WallHack=!WallHack;}

return
pEndScene(pDevice);
}
//====================================EndScene_End============================================================================//


//=================================Dip_Start============================================================================================//
typedef HRESULT ( WINAPI* oDrawIndexedPrimitive ) ( LPDIRECT3DDEVICE8 pDevice, D3DPRIMITIVETYPE pType, UINT nMinIndex, UINT nNumVertices, UINT nStartIndex, UINT nPrimitiveCount );
oDrawIndexedPrimitive pDrawIndexedPrimitive;

HRESULT WINAPI myDrawIndexedPrimitive(LPDIRECT3DDEVICE8 pDevice, D3DPRIMITIVETYPE pType, UINT nMinIndex, UINT nNumVertices, UINT nStartIndex, UINT nPrimitiveCount)
{


if(
WallHack)
{
texnum = (nNumVertices*100000)+nPrimitiveCount;
if(
m_Stride==40 &&

(
texnum==7500121 )||(texnum==8500105 )||(texnum==12400168)||(texnum==37000650)||
(
texnum==18000274)||(texnum==8800105 )||(texnum==36900650)||(texnum==19600314)||
(
texnum==21800306)||(texnum==7500121 )||(texnum==8500105 )||(texnum==12400168)||
(
texnum==21800306)||(texnum==36900650)||(texnum==7500121 )||(texnum==37000650)||
(
texnum==18000274)||(texnum==7500121 )||(texnum==8500105 )||(texnum==38000658)||
(
texnum==22100268)||(texnum==62400752)||(texnum==27900456)||(texnum==45700654)||
(
texnum==4800040 )||(texnum==83600752)||(texnum==33400477)||(texnum==38100666)||
(
texnum==2800036 )||(texnum==62400752)||(texnum==29700492)||(texnum==84900778)||
(
texnum==27500442)||(texnum==52100658)||(texnum==62400752)||(texnum==33600552)||
(
texnum==44100646)||(texnum==18000274)||(texnum==37200508)||(texnum==45700654)||
(
texnum==37200508)||(texnum==52100658)||(texnum==52100658) &&


(
nNumVertices == 100 && nPrimitiveCount == 121) || //Foot
(nNumVertices == 105 && nPrimitiveCount == 168) || //Right Arm
(nNumVertices == 132 && nPrimitiveCount == 180) || //Hand
(nNumVertices == 159 && nPrimitiveCount == 200) || //Left Arm
(nNumVertices == 338 && nPrimitiveCount == 534) || //Underbody thanks japennese guy =)
//(nNumVertices == 448 && nPrimitiveCount == 776) || //Head
(nNumVertices == 804 && nPrimitiveCount == 1016) || //Body //SRG Option item
(nNumVertices == 109 && nPrimitiveCount == 110) || //Bulletproof Vest
(nNumVertices == 336 && nPrimitiveCount == 532)) //Battle Pants

{
pDevice->SetRenderState(D3DRS_ZENABLE, D3DZB_FALSE);
pDevice->SetRenderState(D3DRS_ZFUNC,D3DCMP_NEVER);
pDevice->SetTexture(0,Orange);
//pDevice->SetRenderState(D3DRS_FILLMODE, D3DFILL_WIREFRAME );

pDrawIndexedPrimitive(pDevice, pType, nMinIndex, nNumVertices, nStartIndex, nPrimitiveCount);

//pDevice->SetRenderState(D3DRS_FILLMODE, D3DFILL_SOLID );
pDevice->SetRenderState(D3DRS_ZENABLE, D3DZB_TRUE);
pDevice->SetRenderState(D3DRS_ZFUNC,D3DCMP_LESSEQUAL);
pDevice->SetTexture(0,Pink);
}

if(
m_Stride==40 && texnum== 21300174)
{
pDevice->SetRenderState(D3DRS_ZENABLE, D3DZB_FALSE);
pDevice->SetRenderState(D3DRS_ZFUNC,D3DCMP_NEVER);
pDevice->SetTexture(0,Green);//GreenNade
pDrawIndexedPrimitive(pDevice, pType, nMinIndex, nNumVertices, nStartIndex, nPrimitiveCount);
pDevice->SetRenderState(D3DRS_ZENABLE, D3DZB_TRUE);
pDevice->SetRenderState(D3DRS_ZFUNC,D3DCMP_LESSEQUAL);
pDevice->SetTexture(0,Purple);
}


if(
nNumVertices == 158 && nPrimitiveCount == 131)
{
pDevice->SetRenderState(D3DRS_ZENABLE, D3DZB_FALSE);
pDevice->SetRenderState(D3DRS_ZFUNC,D3DCMP_NEVER);
pDevice->SetTexture(0,Red);//GreenNade
pDrawIndexedPrimitive(pDevice, pType, nMinIndex, nNumVertices, nStartIndex, nPrimitiveCount);
pDevice->SetRenderState(D3DRS_ZENABLE, D3DZB_TRUE);
pDevice->SetRenderState(D3DRS_ZFUNC,D3DCMP_LESSEQUAL);
pDevice->SetTexture(0,Yellow);
}

if (
nNumVertices == 171 && nPrimitiveCount == 143)
{

pDevice->SetRenderState(D3DRS_ZENABLE, D3DZB_FALSE);
pDevice->SetRenderState(D3DRS_ZFUNC,D3DCMP_NEVER);
pDevice->SetTexture(0,Red);//GreenNade
pDrawIndexedPrimitive(pDevice, pType, nMinIndex, nNumVertices, nStartIndex, nPrimitiveCount);
pDevice->SetRenderState(D3DRS_ZENABLE, D3DZB_TRUE);
pDevice->SetRenderState(D3DRS_ZFUNC,D3DCMP_LESSEQUAL);
pDevice->SetTexture(0,Yellow);
}


if(
m_Stride==40 &&//face,mask etc...
(texnum==36700612) ||
(
texnum==9600172 ) ||
(
texnum==14200236) ||
(
texnum==37800552) ||
(
texnum==28100486) ||
(
texnum==35500568) ||
(
texnum==2200024 ) ||
(
texnum==16200243) ||
(
texnum==31900466) ||
(
texnum==19300342) ||
(
texnum==36200604) ||
(
texnum==21300290) ||
(
texnum==35700558) ||
(
texnum==22100396) ||
(
texnum==36100604) ||
(
texnum==27100464) ||
(
texnum==11400180) ||
(
texnum==34900580) ||
(
texnum==13200212) ||
(
texnum==34700538) ||
(
texnum==19500352)&&
(
nNumVertices == 448 && nPrimitiveCount == 776))

{
pDevice->SetTexture(0,Blue);
}


{
pDevice->SetRenderState(D3DRS_FOGENABLE,false);
}

/*Logger
if(m_Stride==40){


while(GetAsyncKeyState(VK_NUMPAD1)&1) arrc--; //Used as manual index for adding textures to delarray
while(GetAsyncKeyState(VK_NUMPAD3)&1) arrc++;
bool alrdy=false;
bool inarr=false;

if(texarray[arrc]==texnum)
if(delarray[i]==texarray[arrc])
alrdy=true;
for(int i=0;i<dcount;i++) //sees if said texture is in delarray
if(delarray[i]==texnum)
inarr=true;
if(texarray[arrc]==texnum || inarr){ //If true, color model differently
LPDIRECT3DTEXTURE8 texCol;
DWORD dwOldZEnable = D3DZB_TRUE;
pDevice->SetTexture(0, NULL);
pDevice->GetRenderState(D3DRS_ZENABLE, &dwOldZEnable);
pDevice->SetRenderState(D3DRS_ZENABLE, D3DZB_FALSE);
if(alrdy) //Different colors for selected models that are already being logged (For removal from array)
texCol=Blue;
else
texCol=Red;
pDevice->SetTexture(0, texCol);
pDrawIndexedPrimitive(pDevice, pType, nMinIndex, nNumVertices, nStartIndex, nPrimitiveCount);
pDevice->SetRenderState(D3DRS_ZENABLE, dwOldZEnable);

}
}
if(GetAsyncKeyState(VK_F5)&1) add_log("Logged tesx: %i", texarray[arrc]); //F5 will print currently selected texnum to logfile
if(GetAsyncKeyState(VK_F6)&1) { //For adding/removing textures to array
bool inarr=true;
for(int k=0;k<dcount;k++){
if(delarray[k]==texarray[arrc])
{
inarr=false;//Found selected texture to already exist
delarray[k]=0;//Delete texture
break;//Cancel loop
}
}
if(inarr==true)
{
delarray[dcount]=texarray[arrc];//Add texture
dcount++;
}
}
if(GetAsyncKeyState(VK_F7)&1){
int total=1;
add_log("omfg values?!? {");
for(int x=0;x<dcount;x++)//Loops through all recorded variables and prints them in a nice array based format
if(delarray[x]){
add_log("%i,",delarray[x]); //add_log2==add_log but without endl
total++;
}
add_log("}; %i variables in array",total);
}
bool found = false; //THIS PART CREDITS TO KRYPTEC
for(int y=0; y<arraycounter; y++) //THIS IS HIS LOGGING FUNCTION
{
if(texnum==texarray[y])found=true; //I JUST CREATED AN INTERFACE FOR IT
}
if(!found && arraycounter < 1000)
{
texarray[arraycounter]=texnum;
arraycounter++;
}*/


}
return
pDrawIndexedPrimitive(pDevice, pType, nMinIndex, nNumVertices, nStartIndex, nPrimitiveCount);
}
//=====================================Dip_End===========================================================================//


//=====================================Sss_Start==========================================================================//
typedef HRESULT ( WINAPI* oSetStreamSource ) ( LPDIRECT3DDEVICE8 pDevice, UINT nStreamNumber, LPDIRECT3DVERTEXBUFFER8 pStreamData, UINT nStride );
oSetStreamSource pSetStreamSource;

HRESULT WINAPI mySetStreamSource(LPDIRECT3DDEVICE8 pDevice, UINT nStreamNumber, LPDIRECT3DVERTEXBUFFER8 pStreamData, UINT nStride)
{
if(
nStreamNumber==0)
m_Stride = nStride;

return
pSetStreamSource(pDevice, nStreamNumber, pStreamData, nStride);
}
//====================================Sss_End============================================================================//

//====================================Svp_Start==========================================================================//
typedef HRESULT (WINAPI* oSetViewport)(LPDIRECT3DDEVICE8 pDevice,CONST D3DVIEWPORT8* pViewport);
oSetViewport pSetViewport;

HRESULT WINAPI mySetViewport(LPDIRECT3DDEVICE8 pDevice,CONST D3DVIEWPORT8* pViewport)
{
ScreenCenterX = ( float )pViewport->Width / 2;
ScreenCenterY = ( float )pViewport->Height / 2;

return
pSetViewport(pDevice,pViewport);
}
//===================================Svp_End=============================================================================//

typedef HRESULT ( WINAPI* oBeginScene ) ( LPDIRECT3DDEVICE8 pDevice );
oBeginScene pBeginScene;

HRESULT WINAPI myBeginScene(LPDIRECT3DDEVICE8 pDevice)
{
if((
GetAsyncKeyState(VK_F6)&1))
{
pEndScene = (oEndScene)DetourFunction((PBYTE)dwEndScene, (PBYTE)myEndScene);
pDrawIndexedPrimitive = (oDrawIndexedPrimitive)DetourFunction((PBYTE)dwDrawIndexedPrimitive, (PBYTE)myDrawIndexedPrimitive);
pSetStreamSource = (oSetStreamSource)DetourFunction((PBYTE)dwSetStreamSource, (PBYTE)mySetStreamSource);
pSetViewport=(oSetViewport)DetourFunction((PBYTE)dwSetViewport,(PBYTE)mySetViewport);
}

return
pBeginScene(pDevice);
}


BOOL WINAPI DllMain ( HMODULE hModule, DWORD dwReason, LPVOID lpReserved )
{
DisableThreadLibraryCalls(hModule);

if (
dwReason == DLL_PROCESS_ATTACH )
{

//=========Log==========================//
GetModuleFileName(hModule, dlldir, 512);
for(
int i = strlen(dlldir); i > 0; i--) { if(dlldir[i] == '\\') { dlldir[i+1] = 0; break; } }
ofile.open(GetDirectoryFile("log.txt"), ios::app);
//=========Log=========================//

pBeginScene = (oBeginScene)DetourFunction((PBYTE)dwBeginScene, (PBYTE)myBeginScene);
pEndScene = (oEndScene)DetourFunction((PBYTE)dwEndScene, (PBYTE)myEndScene);
pDrawIndexedPrimitive = (oDrawIndexedPrimitive)DetourFunction((PBYTE)dwDrawIndexedPrimitive, (PBYTE)myDrawIndexedPrimitive);
pSetStreamSource = (oSetStreamSource)DetourFunction((PBYTE)dwSetStreamSource, (PBYTE)mySetStreamSource);
pSetViewport=(oSetViewport)DetourFunction((PBYTE)dwSetViewport,(PBYTE)mySetViewport);

}
return
TRUE;
}
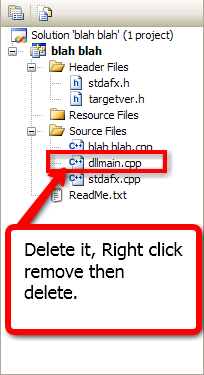
7.Delete dllmain.cpp You don't Need it.

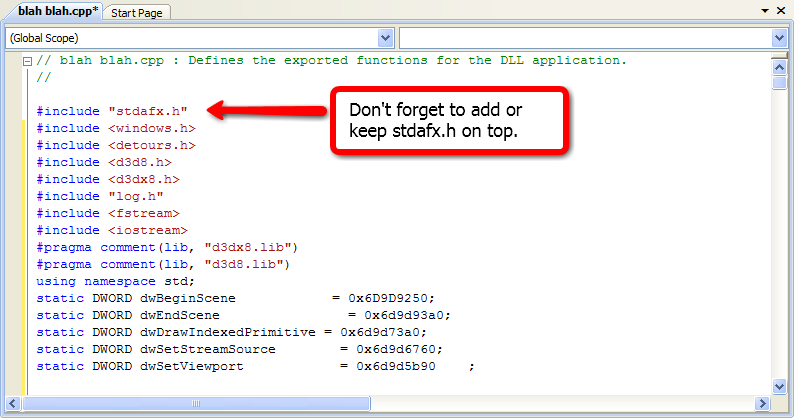
8. Include stdafx.h should be on top of Other Includes.


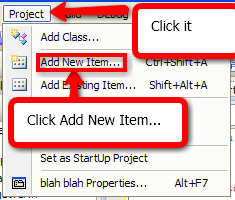
9. Click on Projects on top, Click Add New Item.

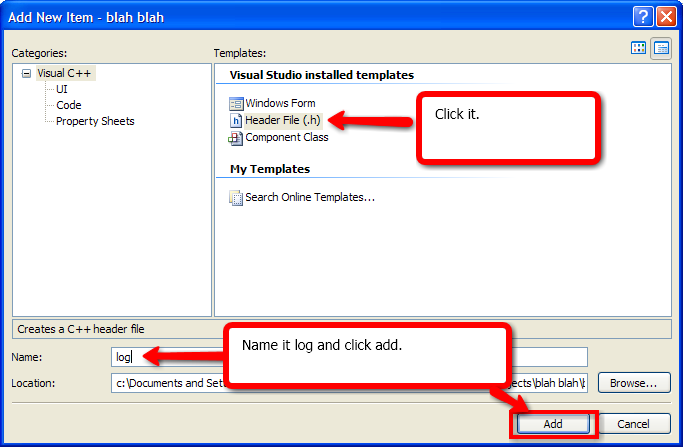
10.Click on Header file (.h), Name it log and Click Add.

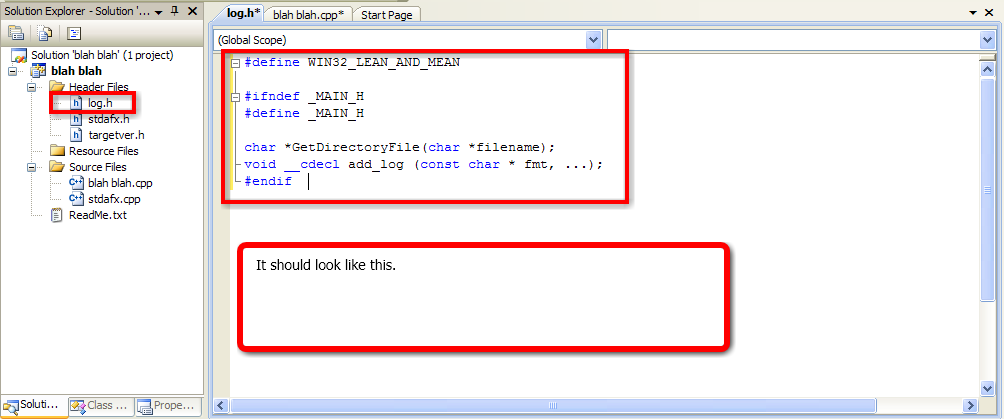
11. Copy and Paste the source on the Header file you Created.
log.h (a header file)
Code:
#define WIN32_LEAN_AND_MEAN

#ifndef _MAIN_H
#define _MAIN_H

char *GetDirectoryFile(char *filename);
void __cdecl add_log (const char * fmt, ...);
#endif


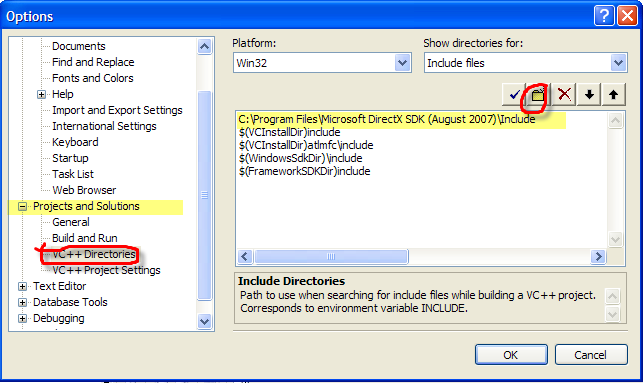
12.go to tools>>option-projects and solution-VC++directories and add direct sdk Summer 2004 includes and library .
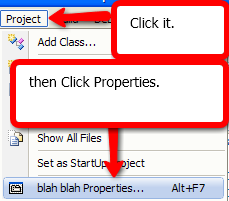
13. Click on Project And then Click Properties.


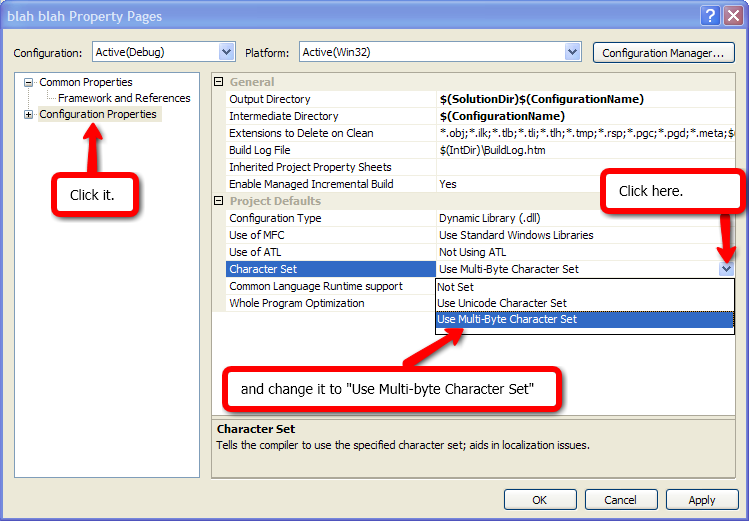
14.Click on Configuration Properties , On the Right side on Character set, Change "Use Unicode Character set" to "Use Multi-Byte Character set" and Click Ok.

15. Download the files i attached in this thread and place the detours.h in your Include folder C:\Program Files\Microsoft Visual Studio 9.0\VC\include and Detours.lib in your Library folder C:\Program Files\Microsoft Visual Studio 9.0\VC\lib.

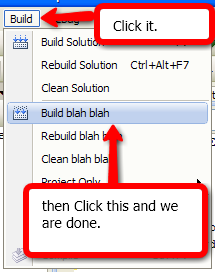
16. Click Build and Build your Project.


17. You will find your DLL file in C:\Documents and Settings\TheIFear\My Documents\Visual Studio 2008\Projects\(name of your dll)\Debug, and you will find your dll.


Credits:-
Fatboy88 for the source.
Legify for helping me.
The1Fear (me) for making This Tutorial.

If you want to Know How to Make Wallhack Undetected go to Wallhacking (making hacks undetected) Credits to Stickleback

FAQ
Q1: When I copy And paste name.cpp It gives me a whole Straight Line What should I do?
A1: Go and copy it From Fatboy Thread Wallhack: Source Code (Developer's Only)


Q2:I have an error "C1083: Cannot open include file: 'detours.h': No such file or directory" What should i do?
A2: Download the file I attached and place Detours.h in your Include folder C:\Program Files\Microsoft Visual Studio 9.0\VC\include
Detours.lib in your Lib folder C:\Program Files\Microsoft Visual Studio 9.0\VC\lib

Q3:I have another error same as detours.h but now it's asking d3dx8.h what should i do?
A3: Redo Step 12 an add Include of Direct SDK Summer 2004.

Q4:I Have an error "LINK: fatal error LNK1104: unable to open the file 'd3d8.lib' " What should i do?
A4: Redo step 12 and add Library of Direct SDK Summer 2004.

Q5: Does this Wallhack works?
A5:Yes it Does and its detected.

Q6: I get so many errors when i compile it about d3d8.h or other headers what should I do?
A6: Go F.U.C.K yourselves (j.k), you didn't copy all of the source perfectly or something might be missing, so you should either check the source if it copied well or check for the header that keeps appearing in the compiler and re download it and everything should work well.

Q7: Does this work for Windows Vista or 7 (new)?
A7: No it doesn't, you should change the vtable so it can work.

Q8: Will you make a Tutorial for how to make it undetected?
A8: No, And **** off and stop ****ing pm about it you ****ing retards.(j.k) but seriously Stop!!.


Here's a Video Tutorial


Here is a little joke,
:: Knock, knock.

> Who's there?

:: Go.

> Go who?

:: Go **** yourselves.


DON'T SAY THANKS PRESS THANKS

'Hacking' 카테고리의 다른 글

OllyMoreMenu-v1.3c  (0) 2009.01.26
DeFixed_Edition_v2  (0) 2009.01.24
Asprotect UNPACK  (0) 2009.01.24
API & DLL  (1) 2009.01.24
W32DASM Disassembler  (0) 2009.01.24
Posted by CEOinIRVINE
l

Asprotect UNPACK

Hacking 2009. 1. 24. 09:10

############################################

미해결 임포트가 있는 Asprotect의 해법입니다.

############################################


대상 : 입문용+

타겟 : Advanced PDF Password Recovery Pro (http://www.elcomsoft.com/apdfpr.html) or here

도구 : Soft-Ice 4.x

       Ice-Dump

       Pe-Editor

       ImportRec & Revergine 1.3

       Hiew 6.x (핵스 에디터)


 안녕하세요? 언팩킹에 재미 좀 붙이셨는지요? 이번엔 미해결 임포트가 있는 경우를 다루어 보겠습니다. 그리고 강좌의 맨 마지막에는 IAT의 원리에 대해서 설명해보려 합니다. 이번에 다룰 것 역시 Asprotect 1.2x입니다. 하지만 같은 1.2x 버전이라고 해서 난이도가 같지는 않습니다. 그럼 숨 크게 들이쉬시고 저와 함께 가보시죠!


1. Pe-Scan으로 확인해보면 Asprotect라고 나온다.


2. OEP를 찾을 차례입니다. 방법은 앞의 두 강좌에서와 동일하다. 우선 Bpx GetModuleHandleA Do "p ret"를 사용해 프로그램 내부로 들어간다. F5를 한번 누르면 다음처럼 나올 것이다.


0167:0065B074  FF95EC314400        CALL      [EBP+004431EC]                     

0167:0065B07A  8985DC304400        MOV       [EBP+004430DC],EAX                 

0167:0065B080  8BF8                MOV       EDI,EAX                            

0167:0065B082  8D9DED304400        LEA       EBX,[EBP+004430ED]    


그럼 TraceX의 상한선을 정해보자.


:map32 apdfprp                                                                  

Owner     Obj Name  Obj#  Address        Size      Type                         

APDFPRP             0001  016F:00401000  0004A000  IDATA RW                     

APDFPRP             0002  016F:0044B000  00002000  IDATA RW                     

APDFPRP             0003  016F:0044D000  0000A000  IDATA RW                     

APDFPRP             0004  016F:00457000  0000E000  IDATA RW                     

APDFPRP             0005  016F:00465000  00006000  IDATA RW                     

APDFPRP   .rsrc     0006  016F:0046B000  00017000  IDATA RW                     

APDFPRP   shrek     0007  016F:00482000  00010000  IDATA RW       ;이 색션의 이름이 좀 웃기네요 WoW  

APDFPRP   .adata    0008  016F:00492000  00001000  IDATA RW   


음. 다행히도 사이즈가 그리 크지 않다.


/TraceX 401000 46B000


그리고 느긋하게 기다리자. 나의 시스템에선(MMX 233, 48RAM) 대략 30분 정도가 걸린다. 아마 여러분의 컴퓨터에선 5분이상 걸리지 않을 것이다. 기다림의 끝에 다음과 같은 화면이 뜬다.


0167:00401014  C3                  RET                                          

0167:00401015  C6B151A08C820A      MOV       BYTE PTR [ECX+828CA051],0A         

0167:0040101C  2845C3              SUB       [EBP-3D],AL                        

0167:0040101F  D304B6              ROL       DWORD PTR [ESI*4+ESI],CL           

0167:00401022  A2E0424855          MOV       [554842E0],AL                      

0167:00401027  2294D12F8E3E9A      AND       DL,[EDX*8+ECX+9A3E8E2F]            

0167:0040102E  D2E6                SHL       DH,CL                              

0167:00401030  40                  INC       EAX                                

0167:00401031  AA                  STOSB                                        

0167:00401032  40                  INC       EAX                                

0167:00401033  90                  NOP                                          

0167:00401034  C20CC3              RET       C30C         


매번 강조하지만 여긴 OEP루틴이 아니다. 다시 명령을 내리고 느긋하게 기다리자. 그러고 나면


--------------------------------------------------------------------------------

EAX=0041B024   EBX=005C0000   ECX=815EFC74   EDX=815EFCB4   ESI=815EFC54        

EDI=00000000   EBP=0060FF78   ESP=0060FE3C   EIP=0041B024   o d I s z a P c     

CS=0167   DS=016F   SS=016F   ES=016F   FS=45F7   GS=0000                       

--------------------------------------------------------------------------------

0030:00046500 674D7440  A82C438A  66457508  085B8B67      @tMg.C,..uEfg.[.      

0030:00046510 75DB0B66  6739EBDE  A833438A  67317501      f..u..9g.C3..u1g      

0030:00046520 891C438B  8B67FE46  46891E43  FA468BFC      .C..F.g.C..F..F.      

0030:00046530 03D20603  7CFE463B  F8468B17  03D40603      ....;F.|..F.....      

0030:00046540 7CFC463B  D38B660B  10EAC166  03EBC38B      ;F.|.f..f.......      

0030:00046550 C999C033  900004CA  66EC8B55  87B81E56      3.......U..fV...      

0030:00046560 66D88E16  0B6C36FF  0676FF66  006A006A      ...f.6l.f.v.j.j.      

--------------------------------------------------------------------------------

0167:0041B024  E917060000          JMP       0041B640                (JUMP  )   

0167:0041B029  0310                ADD       EDX,[EAX]                          

0167:0041B02B  40                  INC       EAX                                

0167:0041B02C  005741              ADD       [EDI+41],DL                        

0167:0041B02F  54                  PUSH      ESP                                

0167:0041B030  43                  INC       EBX                                

0167:0041B031  4F                  DEC       EDI                                

0167:0041B032  4D                  DEC       EBP                                

0167:0041B033  20432F              AND       [EBX+2F],AL                        

0167:0041B036  43                  INC       EBX                                

0167:0041B037  2B2B                SUB       EBP,[EBX]                          

0167:0041B039  3332                XOR       ESI,[EDX]                          

0167:0041B03B  205275              AND       [EDX+75],DL                        

0167:0041B03E  6E                  OUTSB                                        

0167:0041B03F  2D54696D65          SUB       EAX,656D6954                       

0167:0041B044  207379              AND       [EBX+79],DH                        

0167:0041B047  7374                JAE       0041B0BD                           

0167:0041B049  656D                INSD                                         

0167:0041B04B  2E2028              AND       CS:[EAX],CH                        

0167:0041B04E  6329                ARPL      [ECX],BP                           

----------------------------------APDFPRP!+0001A024-----------------------------

WINICE: Free16  Sel=3B47                                                        

ICEDUMP: LOG: CS:EIP: 0167:00664A2A, SS:ESP: 016F:0060FE3C, R0TCB: C99C9A10     

ICEDUMP: LOG: instruction count: 00000000:03A5F284, R0TCB: C99C9A10             


바로 이곳이 대망의 OEP이다. 무슨 jmp명령이 OEP냐고 생각하실 분이 계실 것 같아 설명을 덧붙여보자. 명령창에 나타난 로그를 살펴보자. 664A2A에서 점프해왔다고 적혀있다. 그럼 U 664A2A 해보자. 다음처럼 나올 것이다.


0167:00664A29  61                  POPAD                                        

0167:00664A2A  FFE0                JMP       EAX                  


어라 이것이 무엇인가? 바로 OEP로 점프하는 전형적인 루틴인 것이다. 거의 모든 UPX버전이 이렇게 점프하고 Asprotect의 많은 녀석들도 이런식으로 OEP로 점프한다. 흠 그럼 OEP를 적어두고 다음 단계로 넘어가자.


3. 쌔끈하게 덤프를 해보자. 이미지 사이즈는 93000이다. 따라서


/Dump 400000 93000 c:\pdf_Dump.exe


라고 명령을 내리시면 되겠다.


4. 이제 에디터로 적절하게 수정을 하자.


5. IAT를 리빌드 할 차례이다. 여느때와 같이 ImportRec를 띄워서 필요한 정보들을 수집해보자. 아마 하나의 미해결 임포트를 제외하곤 모두 풀릴 것이다. 덤프한 파일에 덮어씌우고 실행을 시켜보자.


6. 근데 허거덩. 에러가 나리라고 예상은 했지만 뭔가 이상하다. 자자 소프트 아이스를 띄우고 faults on 명령을 주고 닫자. 이 명령은 미리 할당되지 않는 메모리에 접근하려고 할 때 발생하는 에러를 잡아주는 것이다. Asprotect가 임포트 어드레스를 에뮬레이션 해줬는데, 만일 우리가 이녀석을 덤프하고 팩커 대신에 임포트 어드레스를 에뮬레이션 하는 가운데 미해결 임포트가 있다면, 그곳은 아마도 팩커의 영역이기 때문에 할당되지 않은 공간이 되어 에러가 발생하게 될 것이다. 뒤에서 자세하게 설명하겠으니 지금은 이정도로 넘어가자. 자 다시 실행해보면 아마도 여기에서 에러가 날 것이다.


65133C   FFFF   Invalid


그러면 당황하지 말고 r 을 누르자. r 을 누르면 명령입력이 가능해진다. 그리고 U *esp 해서 과연 어디에서 넘어왔는지 알아보자. 제 화면에선 이렇게 나오더군요.


--------------------------------------------------------------------------------

EAX=0060FE24   EBX=000000F4   ECX=0060FD30   EDX=0060FD30   ESI=0060FE24        

EDI=0060FD30   EBP=0060FE2C   ESP=0060FD14   EIP=0065133C   o d I s Z a P c     

CS=0167   DS=016F   SS=016F   ES=016F   FS=40D7   GS=0000                       

-----DF_DUMP1_!+0760------------------------------------------------------------

0030:0044B760 0065133C  00665AF8  00665B04  00665B20      <.e..Zf..[f. [f.      

0030:0044B770 00650EE8  00665B3C  00665B48  00665B58      ..e.<[f.H[f.X[f.      

0030:0044B780 00665B70  00665B7C  00665B98  00665BB0      p[f.|[f..[f..[f.      

0030:0044B790 00665BBC  00665BC8  00665BE4  00665BFC      .[f..[f..[f..[f.      

0030:0044B7A0 00651358  00665C10  00665C1C  00665C34      X.e..\f..\f.4\f.      

0030:0044B7B0 00665C4C  00665C64  00665C7C  00665C8C      L\f.d\f.|\f..\f.      

0030:0044B7C0 00665C98  00665CA4  00665CC0  00665CF0      .\f..\f..\f..\f.      

--------------------------------------------------------------------------------

016F:0041B9B2  2EFF1560B74400      CALL      CS:[0044B760]                      

016F:0041B9B9  89C3                MOV       EBX,EAX                            

016F:0041B9BB  89FA                MOV       EDX,EDI                            

016F:0041B9BD  31C0                XOR       EAX,EAX                            

016F:0041B9BF  E8B4FDFFFF          CALL      0041B778                           

016F:0041B9C4  BAE40C4500          MOV       EDX,00450CE4                       

016F:0041B9C9  FF15580C4500        CALL      [00450C58]                         

016F:0041B9CF  E84C2C0000          CALL      0041E620                           

016F:0041B9D4  89F0                MOV       EAX,ESI                            

016F:0041B9D6  E8F5300000          CALL      0041EAD0                           

016F:0041B9DB  B821000000          MOV       EAX,00000021                       

016F:0041B9E0  E8C7200000          CALL      0041DAAC                           

016F:0041B9E5  FF15980C4500        CALL      [00450C98]                         

016F:0041B9EB  B8FF000000          MOV       EAX,000000FF                       

016F:0041B9F0  E8B7200000          CALL      0041DAAC                           

016F:0041B9F5  5F                  POP       EDI                                

016F:0041B9F6  5E                  POP       ESI                                

016F:0041B9F7  59                  POP       ECX                                

016F:0041B9F8  5B                  POP       EBX                                

016F:0041B9F9  C3                  RET                                          

----------------------------PDF_DUMP1_!+0001A9B2--------------------------------

Break due to Page Fault (0Eh).  Fault=0004                                      

:u *esp                                                                         

:dd 44b760                                                                      


어떤가요? [44B760]을 콜하니 에러가 납니다. 이 주소안을 보면 65133C라는 값이 있죠. 근데 에러가 난 것은 그다지 이상한 일은 아니나, 주변의 주소들을 살펴보면 모두 65xxxx으로 시작함을 볼 수 있습니다. 이 주소는 Asprotect의 주소이니, 현재 Asprotect가 에뮬레이션 해주고 있다는 얘기가 되겠군요. 그러나 우리가 덤프한 파일에는 Asprotect가 없으니 에러가 날 수 밖에요. 그런데 특이하게도 ImportRec가 찾아낸 것들을 보면 분명 제대로 찾긴합니다. 결국 IAT를 추가하는 과정에서 제대로 못해준 것 같습니다. 몇 번의 시도 끝에 포기하고 Revergine을 띄웠습니다. 그리고 동일한 방법으로 임포트를 복구했죠. 이때 미해결된 임포트가 6개 정도 나오는데, ImportRec에서 얻은 결과를 적용해주면 될 것입니다. 그럼 이제 이 파일을 가지고 에러를 잡아나갑시다.


가) 1번째 에러

에러가 뜨고 U *esp 입력하시면 다음과 같이 나올 것입니다.


0167:0041B85C   Call  [44b724]


그럼 44B724안의 주소를 살펴봅시다. dd 44B724 해주면 아마 65139C라고 나올 겁니다. 즉 다시말해 65139C에 있는 내용을 실행하겠단 얘기입니다. 그런데 현재 메모리가 할당되지 않아 FFFF라고 나오니 실행이 안되고 에러가 날 수 밖에요. 따라서 프로그램이 완전히 실행된 후에 이 주소에는 어떠한 값이 있었나 봐야겠습니다. 원본을 실행시켜주시고 bpx ShowWindow do "p ret"를 입력하시고 F5. 그리고 프로그램의 화면에서 Bench Mark라는 것을 눌러보세요. 아마 소아가 뜨면서 프로그램 내부로 들어갈 수 있을 겁니다. 주의하실 점은 쓸데없는 곳에도 걸릴 수가 있는데요. 이때는 F5를 눌러주시면서 빠져나가시면 되겠습니다. 반드시 어떠한 모듈에 걸렸는지를 확인하세요. 그리고 다음과 같이 명령을 줍시다


U 65139C


그럼 아마도 이렇게 나오겠죠.


--------------------------------------------------------------------------------

EAX=00000024   EBX=00620050   ECX=00463D94   EDX=81AC9062   ESI=00000000        

EDI=00400000   EBP=0060FE2C   ESP=0060FD0C   EIP=0041B85C   o d I s z A P c     

CS=0167   DS=016F   SS=016F   ES=016F   FS=0F87   GS=0000                       

--------------------------------------------------------------------------------

016F:00656CE4 04 0A 00 C0 FF FF FF 7F-00 00 40 00 D7 B6 FA FF  .......�..@.....

016F:00656CF4 74 AE 5E 81 00 00 00 00-BC 7C 66 00 48 00 00 00  t.^......|f.H...

016F:00656D04 00 00 00 00 98 5A 66 00-00 00 00 00 00 00 00 00  .....Zf.........

016F:00656D14 00 00 00 00 00 00 00 00-00 00 00 00 FF FF FF FF  ................

016F:00656D24 FF FF FF FF FF FF FF FF-FF FF FF FF FF FF FF FF  ................

016F:00656D34 FF FF FF FF FF FF FF FF-FF FF FF FF B2 FD 48 00  ..............H.

016F:00656D44 E9 7B 31 28 86 FA 0A FE-C4 88 C8 D7 1F A2 7C F5  .{1(..........|.

--------------------------------------------------------------------------------

0167:0065139C  6A00                PUSH      00                                 

0167:0065139E  E8B53DFFFF          CALL      KERNEL32!GetModuleHandleA          

0167:006513A3  FF35E46C6500        PUSH      DWORD PTR [00656CE4]               

0167:006513A9  58                  POP       EAX                                

0167:006513AA  8B05F46C6500        MOV       EAX,[00656CF4]                     

0167:006513B0  C3                  RET                                          

--------------------------------------------------------------------------------

:d 44b724                                                                       

:u 65139c                                                                       

:db 656ce4                                                                      


보는순간 "요 녀석은 GetModuleHandleA구나"하고 생각하시기 쉽습니다. 하지만 그게 아닙니다. 확인해보는 방법은 call [44B724]를 call GetModuleHandleA로 바꾼후 실행해보면 되겠죠. 그러면 그다음 콜에서 이로인해 에러가 납니다. 결국 우린 위의 루틴을 어딘가에 복사하고 그리로 점프시켜야 합니다. 그리고 중요한 것은 656CE4와 656CF4에 담겨져 있는 값입니다. 이 값을 알려면 다시 실행해서 위 루틴으로 들어와 확인해봐야 합니다. 왜냐하면 프로그램이 완전히 실행된 후 확인하면 값이 변해있을 수 있기 때문이죠. 그렇다면 다시 실행해서 41B85C에 중단점을 설정합시다. 그런데 해보신 분들은 아시겠지만 여느 방식의 중단점을 설정하면 듣지를 않습니다. 걍 무시하고 바로 프로그램이 실행되죠. 저역시 고민하다가 다음과 같이 설정해보니 되더군요.


Bpr 41B85C 41B85D If (eip==0x41B85C) Do "U 41B85C"


이렇게해서 각각의 값을 알아낼 수가 있습니다. 위의 데이터 창을 참고하세요. 그럼 이제 이 값들을 우리가 원하는 아무 곳에나 복사해둡시다. 전 44B0F0번지에 넣었습니다. 한가지 주의할 사실은 그대로 넣으면 안되고 mov 명령에서 오퍼랜드의 주소가 달라지므로 기계어 코드도 변한다는 것입니다. 저 같은 경우에 656CE4의 값을 44B100에 넣고, 656CF4의 값을 44B110에 넣고 다음과 같이 작업했습니다.


0041B85C    6A 00           PUSH 0

0044B0F2    E8 9FC6B2BF     CALL KERNEL32.GetModuleHandleA

0041B863    FF35 10B14400   PUSH DWORD PTR DS:[44B110]

0041B869    58              POP EAX

0041B86A    A1 20B14400     MOV EAX,DWORD PTR DS:[44B120]

0041B86F    C3              RETN


그럼 이제 Hiew(헥스 에디터)를 열어 위의 기계어코드를 그대로 옮겨 넣읍시다. 이제 남은 문제는 콜하는 녀석입니다. 사실 이부분을 제대로 말하자면 긴 설명이 필요한데요. 필요한 부분만 간추려서 설명드리겠습니다. 우선 call문을 고쳐서 44B0F0를 콜하게 하는 것은 현명한 방법이 못됩니다. 왜냐하면 말 그대로 임포트를 불러와서 사용하는 것이기 때문에 여기에서만 사용하는 것이 아니라 다른 곳에서도 사용할 수 있기 때문이죠. 따라서 이런 방식을 따른다면 아마 수십번도 넘는 곳에서 에러가 나고, 우리가 일일이 수정해줘야만 합니다. 그러니 임포트라는 것에 착안해서 65139C라는 주소를 44B0F0로 바꾸어 주면 되겠군요. 사실 간단해 보이나 한가지 간과한 사실이 있습니다. 하지만 문제가 되지 않으니 흐름을 위해 나중에 설명하도록 하죠.


나) 2번째 에러


--------------------------------------------------------------------------------

016F:0044B7D4 006513B4  BFF8220E  BFF93507  BFF77E01      ..e.."...5...~..      

016F:0044B7E4 BFFA1E03  BFFA1E26  BFF770B9  BFF9114E      ....&....p..N...      

016F:0044B7F4 BFFA2E28  BFF77A2E  BFFA16B3  BFFC6190      (....z.......a..      

--------------------------------------------------------------------------------

016F:0040765E  2EFF15D4B74400      CALL      CS:[0044B7D4]                      

016F:00407665  89FB                MOV       EBX,EDI                            

016F:00407667  89C2                MOV       EDX,EAX                            


바로 이곳입니다. 주소를 확인해보니 6513B4군요. 이것은 조금전의 미해결 임포트입니다. 사실은 임포트가 아니지만요. 아무튼 원본을 실행해서 원래 있어야 할 것이 무엇인지 보죠.


--------------------------------------------------------------------------------

016F:00656CF4 78 CE 5E 81 00 00 00 00-38 7B 66 00 48 00 00 00  x.^.....8{f.H...

016F:00656D04 00 00 00 00 14 59 66 00-00 00 00 00 00 00 00 00  .....Yf.........

016F:00656D14 00 00 00 00 00 00 00 00-00 00 00 00 FF FF FF FF  ................

016F:00656D24 FF FF FF FF FF FF FF FF-FF FF FF FF FF FF FF FF  ................

016F:00656D34 FF FF FF FF FF FF FF FF-FF FF FF FF B2 FD 48 00  ..............H.

016F:00656D44 E9 7B 31 28 86 FA 0A FE-C4 88 C8 D7 1F A2 7C F5  .{1(..........|.

016F:00656D54 50 F0 D6 4F B6 CB C9 50-19 14 61 7C D7 49 6F 72  P..O...P..a|.Ior

--------------------------------------------------------------------------------

0167:006513B4  55                  PUSH      EBP                                

0167:006513B5  8BEC                MOV       EBP,ESP                            

0167:006513B7  8B05F46C6500        MOV       EAX,[00656CF4]                     

0167:006513BD  8B4508              MOV       EAX,[EBP+08]                       

0167:006513C0  5D                  POP       EBP                                

0167:006513C1  C20400              RET       0004     


이것이군요. 이것 역시 위와 동일한 방법으로 할 수 있습니다. 전 다음과 같이 했습니다.


0044B130    55              PUSH EBP

0044B131    8BEC            MOV EBP,ESP

0044B133    A1 40B14400     MOV EAX,DWORD PTR DS:[44B140]

0044B138    8B45 08         MOV EAX,DWORD PTR SS:[EBP+8]

0044B13B    5D              POP EBP

0044B13C    C20400          RET       0004


그리고 이 녀석의 기계어 코드를 44B130에 기록했습니다. 그러니 6513B4를 44B130으로 바꾸어 줘야겠군요.


다) 마지막 에러


0167:407677   CALL   [44B718]


44B718안에는 6513C4라는 주소가 있습니다. 역시 원본을 띄우고 확인해보면


0167:006513C4  55                  PUSH      EBP                                

0167:006513C5  8BEC                MOV       EBP,ESP                            

0167:006513C7  5D                  POP       EBP                                

0167:006513C8  C20400              RET       0004                                           


이렇게 나오죠. 처음엔 이 루틴을 보고 아무런 기능도 없는 루틴이라 생각하고 해당콜을 없애주려고 했으나, 위에서 언급했다시피 그렇게되면 수십군데를 고쳐주어야 하므로 이 루틴 역시 복사해서 새로이 만들어 주었습니다. 주소에 관계되는 어셈코드가 없으니 위의 코드를 그대로 옮겨심으면 되겠습니다. 전 44B150에 입력했습니다. 그리고 나서 6513C4라는 값을 44B150으로 바꾸어주었습니다.


 자 이제 모든 에러가 잡혔습니다. 뿌듯한 기분으로 실행시켜 보세요. 아마 제대로 하셨으면 별탈없이 실행될 것입니다. 그럼 이제 번외 이야기를 하죠. 제 생각엔 아마도 IAT라는 것이 대체 무엇일까하는 분들이 많으실 것 같은데요. 사실 저도 잘 모릅니다. 하지만 제가 아는 한도내에서 설명드리죠. 우선 보시기전에 저의 PE관한 글을 아직 읽어보시지 않으신 분은 그것을 먼저 읽어보시길 권해드립니다.


 앞에서 제가 설명을 하지 않은 부분이 왜 ImportRec로 IAT를 추가했을 때 에러가 났는지에 관한 것입니다. 저도 명확한 이유는 알 수 없지만 결과를 분석해봅시다. 우선 IAT 중 44B7D8을 가지고 설명해봅시다. 프로그램이 정상적으로 실행되었을 때, 이곳엔 MapViewOfFile의 주소인 BFF8220E가 있어야 합니다. 사실 Revergine으로 해줬을땐 이렇게 됩니다. 그런데 ImprotRec로 해줬을땐, 엉뚱한 주소가 들어가있습니다. 그리고 그 값이 66xxxx입니다. 즉 이것은 여전히 팩커가 IAT를 에뮬레이션 해줌을 뜻하는 거죠. 그러나 덤프한 파일엔 팩커가 없으니 당연히 에러가 날 수 밖에요. 이해가 잘 안가시는 분은 원본 프로그램을 실행하신뒤, 동일한 주소에 대해서 살펴보세요. 아마 주소가 66xxxx로 시작하며, 이 주소로 가보시면 어떤 함수가 있는지를 아실수 있을 것입니다.


 그런데 특이하게도 헥스에디터를 열어 각각의 파일에서 44B7D8을 보면 두 개모두 665D0C라는 값이 들어있습니다. 왜 그럴까요? ImportRec는 그렇다치더라도 Rervergin은 제대로 된 값이 들어있어야 하는데 말이죠. 그런데 조금만 생각해보면 알 수 있습니다. 만약에 예를들어 위와 같은 임포트 리빌더로 알아낸 값들이 하드코딩된 형태로 들어간다고 생각해봅시다. 그러면 다른집 컴퓨터에선 실행이 안될 확률이 높음은 물론이며 DLL이 업그레이드 될 때마다 하드코딩된 주소를 다시 바꿔줘야만 합니다. 이 얼마나 번거로운 일입니까? 따라서 컴퓨터는 프로그램을 로딩하면서 동적으로 주소를 채워넣는 것입니다. 그래서 위에서 처럼 에러를 잡을 때 IAT를 하드코딩된 형태로 넣을 수 있는 것입니다. 어떻게 생각하면 상당히 모순된 이야기처럼 들리는데요. 그 원리는 이렇습니다. 만일 임포트 리빌더가 팩커가 에뮬레이션 해주는 것을 완벽하게 재현한다면 모든 IAT가 로딩될 때마다 채워지겠죠. 즉 우리가 하드코딩해서 넣은값은 무효가 되는 거죠. 하지만 임포트 리빌더가 위에서처럼 전혀 찾지를 못하거나 미해결 임포트로 남겨놓는다면, 이말은 임포트 리빌더가 IAT를 다시 쓰지 못한다는 것과 동일하죠. 왜냐하면 임포트 리빌더가 못해서 원래의 팩커역할로 남겨놓았는데 우리가 덤프한 파일엔 팩커가 없기 때문이죠.


 마지막으로 임포트 리빌더의 도움을 받지 않고 어떻게 접근할 수 있나를 살펴보죠. 어디까지나 이해를 위한 것이지 이렇게 하실 필요는 전혀 없습니다. 우선 덤프한 파일을 faults on한 상태에서 실행한다. 그리고 에러가 나면 어디에서 불려왔는지를 확인한다. 대부분 call [xxxxxx]의 꼴로 나타난다. 혹은 call yyyyyy의 형태로 나타나는데, 이때 yyyyyy로 가보면 십중팔구 jmp [xxxxxx]로 나타나 있을 것입니다. 즉 call [xxxxxx]와 동일한 것이죠. 이때 xxxxxx가 바로 임포트할 함수의 주소를 담고 있는 곳이다. 이 IAT 영역을 잘 기억해둔다. 그리고 나서 원본 프로그램을 띄워 동일한 영역을 살펴본다. 그러면 아마 주소가 BFxxxxxx으로 시작하지 않고, 팩커의 주소로 나타나 있을 것입니다. 따라서 그 주소를 가보시면 대충 어떠한 함수가 있는지를 알 수 있죠. 데이터 창에 나타난 값들을 복사해서 기록해둡니다. 이 값을 덤프한 파일에 덮어쓴다. 그리고 기타 에러를 잡는다. 이렇게 하시면 아마 될 것입니다. 문제는 주소가 하드코딩된 형태로 들어가므로 배포가 어렵다는 것입니다.


 끝입니다. 어떠신가요? 제 글솜씨가 부족해 다소 지루하셨으리라 생각됩니다. 하지만 직접 해보시면 아마 색다른 재미를 느끼실 수 있을 것입니다. 요즘들어 하는 생각인데 내가 왜 예전에 쉘코드 짜는 걸 힘들었했나하는 바보같은 생각을 합니다. 물론 윈도우용 쉘코드는 어렵지만 리눅스용은 그다지 어려운 것이 아니거던요. 지금에 와서 생각해보니 아마도 욕심만 앞서고 실제 해보지 않아서 그랬던 것 같습니다. 여러분들도 제글을 읽는 차원에서 머무르지 마시고 직접 해보심이 어떨런지요 *^^* 분명 훌륭하게 해내시리라 믿습니다. 허거덩 밤 꼴딱새고 아침 8시네요. 밥먹고 한숨 잘랍니다. 그럼 다음 강좌에서 보아엽 WoW


; Syntax for each function in a thunk (the separator is a TAB)

; ------------------------------------------------------------

; Flag   RVA   ModuleName   Ordinal   Name

;

; Details for <Valid> parameter:

; ------------------------------

; Flag:  0 = valid: no  -> - Name contains the address of the redirected API (you can set

;                            it to zero if you edit it).

;                          - Ordinal is not considered but you should let '0000' as value.

;                          - ModuleName is not considered but you should let '?' as value.

;

;        1 = valid: yes -> All next parameters on the line will be considered.

;                          Function imported by ordinal must have no name (the 4th TAB must

;                                                                          be there though).

;

;        2 = Equivalent to 0 but it is for the loader.

;

;        3 = Equivalent to 1 but it is for the loader.

;

; And finally, edit this file as your own risk! :-)


Target: C:\PROGRAM FILES\APDFPRP\APDFPRP.EXE

OEP: 00001000   IATRVA: 0004B000        IATSize: 000008EC


FThunk: 0004B4A4        NbFunc: 00000005

1       0004B4A4        advapi32.dll    00D8    RegCloseKey

1       0004B4A8        advapi32.dll    00DB    RegCreateKeyA

1       0004B4AC        advapi32.dll    00DC    RegCreateKeyExA

1       0004B4B0        advapi32.dll    00F7    RegQueryValueExA

1       0004B4B4        advapi32.dll    0103    RegSetValueExA


FThunk: 0004B4BC        NbFunc: 00000002

1       0004B4BC        comctl32.dll    0011    InitCommonControls

1       0004B4C0        comctl32.dll    0010    CreateUpDownControl


FThunk: 0004B4C8        NbFunc: 00000001

1       0004B4C8        user32.dll      029F    wsprintfA


FThunk: 0004B4D0        NbFunc: 00000008

1       0004B4D0        shell32.dll     00CD    DragAcceptFiles

1       0004B4D4        shell32.dll     00CE    DragFinish

1       0004B4D8        shell32.dll     00CF    DragQueryFile

1       0004B4DC        shell32.dll     0109    SHBrowseForFolder

1       0004B4E0        shell32.dll     011D    SHGetMalloc

1       0004B4E4        shell32.dll     011F    SHGetPathFromIDList

1       0004B4E8        shell32.dll     0142    ShellExecuteA

1       0004B4EC        shell32.dll     0148    Shell_NotifyIcon


FThunk: 0004B4F4        NbFunc: 00000019

1       0004B4F4        gdi32.dll       0072    BitBlt

1       0004B4F8        gdi32.dll       0088    CreateCompatibleBitmap

1       0004B4FC        gdi32.dll       0089    CreateCompatibleDC

1       0004B500        gdi32.dll       008A    CreateDCA

1       0004B504        gdi32.dll       008F    CreateDIBitmap

1       0004B508        gdi32.dll       0096    CreateFontIndirectA

1       0004B50C        gdi32.dll       00A1    CreatePen

1       0004B510        gdi32.dll       00A5    CreateRectRgn

1       0004B514        gdi32.dll       00AA    CreateSolidBrush

1       0004B518        gdi32.dll       00AD    DeleteDC

1       0004B51C        gdi32.dll       00B0    DeleteObject

1       0004B520        gdi32.dll       00FA    GetDeviceCaps

1       0004B524        gdi32.dll       011A    GetObjectA

1       0004B528        gdi32.dll       0129    GetStockObject

1       0004B52C        gdi32.dll       0134    GetTextExtentPoint32A

1       0004B530        gdi32.dll       013A    GetTextMetricsA

1       0004B534        gdi32.dll       0146    LineTo

1       0004B538        gdi32.dll       0149    MoveToEx

1       0004B53C        gdi32.dll       0172    SelectClipRgn

1       0004B540        gdi32.dll       0173    SelectObject

1       0004B544        gdi32.dll       017A    SetBkMode

1       0004B548        gdi32.dll       0192    SetPixel

1       0004B54C        gdi32.dll       019C    SetTextColor

1       0004B550        gdi32.dll       01A7    StretchBlt

1       0004B554        gdi32.dll       01AC    TextOutA


FThunk: 0004B55C        NbFunc: 00000003

1       0004B55C        version.dll     0001    GetFileVersionInfoA

1       0004B560        version.dll     0002    GetFileVersionInfoSizeA

1       0004B564        version.dll     000C    VerQueryValueA


FThunk: 0004B56C        NbFunc: 00000059

1       0004B56C        user32.dll      0007    AppendMenuA

1       0004B570        user32.dll      000C    BeginPaint

1       0004B574        user32.dll      002E    CharToOemA

1       0004B578        user32.dll      0033    CharUpperBuffA

1       0004B57C        user32.dll      0036    CheckDlgButton

1       0004B580        user32.dll      003F    CloseClipboard

1       0004B584        user32.dll      0049    CopyRect

1       0004B588        user32.dll      0051    CreateDialogIndirectParamA

1       0004B58C        user32.dll      005C    CreatePopupMenu

1       0004B590        user32.dll      005D    CreateWindowExA

1       0004B594        user32.dll      0081    DefDlgProcA

1       0004B598        user32.dll      0087    DefWindowProcA

1       0004B59C        user32.dll      008E    DestroyIcon

1       0004B5A0        user32.dll      008F    DestroyMenu

1       0004B5A4        user32.dll      0090    DestroyWindow

1       0004B5A8        user32.dll      0093    DialogBoxParamA

1       0004B5AC        user32.dll      0095    DispatchMessageA

1       0004B5B0        user32.dll      00A5    DrawEdge

1       0004B5B4        user32.dll      00A8    DrawFrameControl

1       0004B5B8        user32.dll      00AA    DrawIconEx

1       0004B5BC        user32.dll      00A9    DrawIcon

1       0004B5C0        user32.dll      00AD    DrawStateA

1       0004B5C4        user32.dll      00AF    DrawTextA

1       0004B5C8        user32.dll      00B4    EmptyClipboard

1       0004B5CC        user32.dll      00B7    EnableWindow

1       0004B5D0        user32.dll      00B9    EndDialog

1       0004B5D4        user32.dll      00BB    EndPaint

1       0004B5D8        user32.dll      00D4    FillRect

1       0004B5DC        user32.dll      00DD    GetActiveWindow

1       0004B5E0        user32.dll      00E8    GetClassLongA

1       0004B5E4        user32.dll      00ED    GetClientRect

1       0004B5E8        user32.dll      00F8    GetCursorPos

1       0004B5EC        user32.dll      00F9    GetDC

1       0004B5F0        user32.dll      00FE    GetDlgItem

1       0004B5F4        user32.dll      00FF    GetDlgItemInt

1       0004B5F8        user32.dll      0100    GetDlgItemTextA

1       0004B5FC        user32.dll      0103    GetFocus

1       0004B600        user32.dll      0104    GetForegroundWindow

1       0004B604        user32.dll      0117    GetMenu

1       0004B608        user32.dll      0125    GetMessageA

1       0004B60C        user32.dll      0128    GetMessageTime

1       0004B610        user32.dll      0131    GetParent

1       0004B614        user32.dll      013E    GetSysColor

1       0004B618        user32.dll      0141    GetSystemMetrics

1       0004B61C        user32.dll      014E    GetWindowDC

1       0004B620        user32.dll      0150    GetWindowLongA

1       0004B624        user32.dll      0155    GetWindowRect

1       0004B628        user32.dll      0157    GetWindowTextA

1       0004B62C        user32.dll      0173    InflateRect

1       0004B630        user32.dll      017C    InvalidateRect

1       0004B634        user32.dll      018C    IsDlgButtonChecked

1       0004B638        user32.dll      0190    IsRectEmpty

1       0004B63C        user32.dll      0196    KillTimer

1       0004B640        user32.dll      0197    LoadAcceleratorsA

1       0004B644        user32.dll      019B    LoadCursorA

1       0004B648        user32.dll      019F    LoadIconA

1       0004B64C        user32.dll      01A1    LoadImageA

1       0004B650        user32.dll      01AF    MapDialogRect

1       0004B654        user32.dll      01B7    MessageBoxA

1       0004B658        user32.dll      01C8    OemToCharA

1       0004B65C        user32.dll      01CC    OffsetRect

1       0004B660        user32.dll      01CD    OpenClipboard

1       0004B664        user32.dll      01D9    PostMessageA

1       0004B668        user32.dll      01DB    PostQuitMessage

1       0004B66C        user32.dll      01E2    RegisterClassA

1       0004B670        user32.dll      01E3    RegisterClassExA

1       0004B674        user32.dll      01F1    ReleaseCapture

1       0004B678        user32.dll      01F2    ReleaseDC

1       0004B67C        user32.dll      01F8    ScreenToClient

1       0004B680        user32.dll      01FC    SendDlgItemMessageA

1       0004B684        user32.dll      0201    SendMessageA

1       0004B688        user32.dll      020A    SetCapture

1       0004B68C        user32.dll      020D    SetClassLongA

1       0004B690        user32.dll      0210    SetClipboardData

1       0004B694        user32.dll      0217    SetDlgItemInt

1       0004B698        user32.dll      0218    SetDlgItemTextA

1       0004B69C        user32.dll      021C    SetForegroundWindow

1       0004B6A0        user32.dll      0239    SetTimer

1       0004B6A4        user32.dll      0240    SetWindowLongA

1       0004B6A8        user32.dll      0243    SetWindowPos

1       0004B6AC        user32.dll      0245    SetWindowTextA

1       0004B6B0        user32.dll      0250    ShowWindow

1       0004B6B4        user32.dll      0257    SystemParametersInfoA

1       0004B6B8        user32.dll      0262    TrackPopupMenu

1       0004B6BC        user32.dll      0265    TranslateAcceleratorA

1       0004B6C0        user32.dll      0268    TranslateMessage

1       0004B6C4        user32.dll      0274    UpdateWindow

1       0004B6C8        user32.dll      0296    WinHelpA

1       0004B6CC        user32.dll      0299    WindowFromDC


FThunk: 0004B6D4        NbFunc: 00000067

1       0004B6D4        kernel32.dll    00A0    CloseHandle

1       0004B6D8        kernel32.dll    00B6    CreateEventA

1       0004B6DC        kernel32.dll    00B9    CreateFileA

1       0004B6E0        kernel32.dll    00BA    CreateFileMappingA

1       0004B6E4        kernel32.dll    00C6    CreateProcessA

1       0004B6E8        kernel32.dll    00CD    CreateThread

1       0004B6EC        kernel32.dll    00D6    DeleteCriticalSection

1       0004B6F0        kernel32.dll    00D8    DeleteFileA

1       0004B6F4        kernel32.dll    00E1    EnterCriticalSection

1       0004B6F8        kernel32.dll    00F8    ExitProcess

1       0004B6FC        kernel32.dll    00F9    ExitThread

1       0004B700        kernel32.dll    0118    FindClose

1       0004B704        kernel32.dll    011C    FindFirstFileA

1       0004B708        kernel32.dll    0121    FindNextFileA

1       0004B70C        kernel32.dll    0123    FindResourceA

1       0004B710        kernel32.dll    0130    FreeEnvironmentStringsA

1       0004B714        kernel32.dll    0133    FreeLibrary

1       0004B718        kernel32.dll    0135    FreeResource

1       0004B71C        kernel32.dll    0138    GetACP

1       0004B720        kernel32.dll    013E    GetCPInfo

1       0004B724        kernel32.dll    01DC    GetVersion

1       0004B728        kernel32.dll    014A    GetCommandLineW

1       0004B72C        kernel32.dll    0158    GetCurrentDirectoryA

1       0004B730        kernel32.dll    015A    GetCurrentProcess

1       0004B734        kernel32.dll    015C    GetCurrentThread

1       0004B738        kernel32.dll    015D    GetCurrentThreadId

1       0004B73C        kernel32.dll    015E    GetDateFormatA

1       0004B740        kernel32.dll    016A    GetEnvironmentStrings

1       0004B744        kernel32.dll    0177    GetFileSize

1       0004B748        kernel32.dll    0179    GetFileType

1       0004B74C        kernel32.dll    0181    GetLastError

1       0004B750        kernel32.dll    0182    GetLocalTime

1       0004B754        kernel32.dll    0183    GetLocaleInfoA

1       0004B758        kernel32.dll    018B    GetModuleFileNameA

1       0004B75C        kernel32.dll    018C    GetModuleFileNameW

1       0004B760        kernel32.dll    018D    GetModuleHandleA

1       0004B764        kernel32.dll    0196    GetOEMCP

1       0004B768        kernel32.dll    0199    GetPrivateProfileIntA

1       0004B76C        kernel32.dll    019F    GetPrivateProfileStringA

1       0004B770        kernel32.dll    01A3    GetProcAddress

1       0004B774        kernel32.dll    01A6    GetProcessHeap

1       0004B778        kernel32.dll    01BB    GetStdHandle

1       0004B77C        kernel32.dll    01C2    GetSystemDirectoryA

1       0004B780        kernel32.dll    01C4    GetSystemInfo

1       0004B784        kernel32.dll    01CC    GetTempFileNameA

1       0004B788        kernel32.dll    01CE    GetTempPathA

1       0004B78C        kernel32.dll    01D2    GetThreadPriority

1       0004B790        kernel32.dll    01D6    GetTickCount

1       0004B794        kernel32.dll    01D7    GetTimeFormatA

1       0004B798        kernel32.dll    01D9    GetTimeZoneInformation

1       0004B79C        kernel32.dll    01DD    GetVersionExA

1       0004B7A0        kernel32.dll    01DC    GetVersion

1       0004B7A4        kernel32.dll    01E6    GlobalAlloc

1       0004B7A8        kernel32.dll    01ED    GlobalFree

1       0004B7AC        kernel32.dll    01F1    GlobalLock

1       0004B7B0        kernel32.dll    01F2    GlobalMemoryStatus

1       0004B7B4        kernel32.dll    01F7    GlobalUnlock

1       0004B7B8        kernel32.dll    020A    InitializeCriticalSection

1       0004B7BC        kernel32.dll    0215    IsBadReadPtr

1       0004B7C0        kernel32.dll    0228    LeaveCriticalSection

1       0004B7C4        kernel32.dll    0229    LoadLibraryA

1       0004B7C8        kernel32.dll    022E    LoadResource

1       0004B7CC        kernel32.dll    0230    LocalAlloc

1       0004B7D0        kernel32.dll    0235    LocalFree

0       0004B7D4        ?               0000    006513B4

1       0004B7D8        kernel32.dll    0249    MapViewOfFile

1       0004B7DC        kernel32.dll    0251    MulDiv

1       0004B7E0        kernel32.dll    0252    MultiByteToWideChar

1       0004B7E4        kernel32.dll    0270    QueryPerformanceCounter

1       0004B7E8        kernel32.dll    0271    QueryPerformanceFrequency

1       0004B7EC        kernel32.dll    027E    ReadFile

1       0004B7F0        kernel32.dll    028E    ResumeThread

1       0004B7F4        kernel32.dll    02B6    SetConsoleCtrlHandler

1       0004B7F8        kernel32.dll    02C1    SetCurrentDirectoryA

1       0004B7FC        kernel32.dll    02C7    SetEnvironmentVariableA

1       0004B800        kernel32.dll    02C8    SetEnvironmentVariableW

1       0004B804        kernel32.dll    02CA    SetEvent

1       0004B808        kernel32.dll    02CF    SetFilePointer

1       0004B80C        kernel32.dll    02D4    SetLastError

1       0004B810        kernel32.dll    02E0    SetStdHandle

1       0004B814        kernel32.dll    02EB    SetThreadPriority

1       0004B818        kernel32.dll    02EE    SetUnhandledExceptionFilter

1       0004B81C        kernel32.dll    02F5    SizeofResource

1       0004B820        kernel32.dll    02F6    Sleep

1       0004B824        kernel32.dll    02FD    TerminateProcess

1       0004B828        kernel32.dll    02FE    TerminateThread

1       0004B82C        kernel32.dll    0302    TlsAlloc

1       0004B830        kernel32.dll    0304    TlsFree

1       0004B834        kernel32.dll    0306    TlsGetValue

1       0004B838        kernel32.dll    0307    TlsSetValue

1       0004B83C        kernel32.dll    0310    UnhandledExceptionFilter

1       0004B840        kernel32.dll    0314    UnmapViewOfFile

1       0004B844        kernel32.dll    0319    VirtualAlloc

1       0004B848        kernel32.dll    031B    VirtualFree

1       0004B84C        kernel32.dll    0320    VirtualQuery

1       0004B850        kernel32.dll    0325    WaitForMultipleObjects

1       0004B854        kernel32.dll    0327    WaitForSingleObject

1       0004B858        kernel32.dll    032B    WideCharToMultiByte

1       0004B85C        kernel32.dll    0336    WriteFile

1       0004B860        kernel32.dll    033B    WritePrivateProfileStringA

1       0004B864        kernel32.dll    035A    lstrcpyA

1       0004B868        kernel32.dll    0360    lstrlenA

1       0004B86C        kernel32.dll    0361    lstrlenW


FThunk: 0004B874        NbFunc: 00000002

1       0004B874        comdlg32.dll    006E    GetOpenFileNameA

1       0004B878        comdlg32.dll    0070    GetSaveFileNameA


'Hacking' 카테고리의 다른 글

DeFixed_Edition_v2  (0) 2009.01.24
How to Compile Wall Hack  (0) 2009.01.24
API & DLL  (1) 2009.01.24
W32DASM Disassembler  (0) 2009.01.24
Intro to Reverse Engineering-Part 2  (0) 2009.01.24
Posted by CEOinIRVINE
l

API & DLL

Hacking 2009. 1. 24. 08:54

Inside Of MS Windows

API & DLL

 API라함은 특정기능을 수행하는 함수를 뜻합니다. 예를들어 CreateWindow는 윈도우를 생성시켜주죠. 그런데 이러한 API들은 어디에 있는 걸까요? 바로 DLL안에 있습니다. 무슨 말인지 모르시겠다면 지금 당장c:\windows\system32 라는 디렉토리를 열어보세요. 무수히 많은 DLL파일을 볼 수 있을겁니다. 그럼 대체 이 DLL은 어떻게 사용하는 걸까요? 바로 프로그램이 실행될 때 동적으로 불러와서 메모리에 맵핑시킨답니다.

 로드시킬 때 사용되는 API는 LoadLibrary와 GetModuleHandle이 있습니다. 또한 이 API에 대한 인자로 필요한 것이 EP입니다. 이 EP의 값을 알아내는 것이 GetProcAddress입니다. 그런데 이런 API는 누가 알려주는 걸까요? 바로 문서입니다. 인터넷을 뒤져보면 API레퍼런스가 있을 겁니다. 디버깅시 궁금한 API가 분명 있을 겁니다. 그럴 때 이 문서를 참조하세요.


Where are DLLs Mapped?

 이런 DLL은 어디에 위치하게 될까요? 저번 메모리 강좌에서 마지막에 보여드린 DLL 색션이 생각나시나요? DLL은 거기에 위치합니다. 따라서 여러분은 앞으로 디버깅시 B0000000~BFFFFFFF 사이에 있으면 '난 지금 DLL안에 있구나'라고 생각하시면 됩니다. 추후에 기회가 되면 이 공유메모리 영역을 가지고 재밌는 작업을 해보도록 하죠. 그전에 내공을 부지런히 쌓으셔야 합니다.


3-Major DLLs

 윈도를 이루고 있는 핵심 DLL이 3개 있습니다. 그것은 kernel32.dll,  GDI32.dll,  user32.dll입니다. kernel32는 시스템과 관련된 작업, GDI는 그래픽, user32는 유저 인터페이스를 다룹니다. 그런데 이 DLL안에 어떠한 것이 있는지 확인할 방법이 없을까요? dumpbin이라는 유틸을 이용하시면 됩니다. 유용한 유틸이니 구해서 쓰세요. 비슷한 기능이 W32dasm에도 있습니다.


Ansi VS Wide

 W32dasm으로 메모장을 디스어셈블한 후 import function이라 적힌 곳을 가보세요. 3~40개의 API들이 나옵니다. 바로 메모장은 이러한 API들이 모여서 만들어진 프로그램이죠. 어디 어떤 DLL들이 임포트되었나 보죠. 제것에는

SHELL32.dll

KERNEL32.dll

USER32.dll

GDI32.dll

comdlg32.dll

ADVAPI32.dll


 이란 것들이 나오는 군요. 그럼 API는 어떤가요? API는 DLL안에 들어 있습니다. Kernel32.dll 은 어떤 API를 가지고 있는지 볼까요?


Addr:BFFA0AB3 hint(02D5) Name: _lwrite

Addr:BFFA1CD1 hint(005F) Name: DeleteFileA

Addr:BFF9B7BF hint(02D0) Name: _lclose

Addr:BFF7753A hint(02D3) Name: _lopen

Addr:BFFA0CDA hint(01C0) Name: LocalUnlock

....

....

....

Addr:BFF76E9B hint(017E) Name: GlobalUnlock

Addr:BFF77564 hint(02D4) Name: _lread

Addr:BFF76E57 hint(0178) Name: GlobalLock

 이러한 API들이 사용되었군요. 그럼 각각의 API가 어떤 용도로 쓰이는지 알아봅시다. DeleteFileA라는 것을 API레퍼런스에서 찾아보죠. 에구 그런데 DeleteFile 은 있는데 DeleteFileA란 것은 없지요?

 여기서 뒤에붙은 A는 Ansi의 약자입니다. 영어권에서 쓰는 것으로 한음절이 한 바이트가 되도록 한거죠. 그런데 이렇게 하면 우리나라말처럼 한음절이 두바이트가 되는 나라는 어떻하나요? 그래서 탄생한 것이 Unicode입니다. 이럴 경우엔 뒤에 W가 붙습니다

'Hacking' 카테고리의 다른 글

How to Compile Wall Hack  (0) 2009.01.24
Asprotect UNPACK  (0) 2009.01.24
W32DASM Disassembler  (0) 2009.01.24
Intro to Reverse Engineering-Part 2  (0) 2009.01.24
Intro to Reverse Engineering - No Assembly Required  (0) 2009.01.24
Posted by CEOinIRVINE
l

W32DASM Disassembler

Hacking 2009. 1. 24. 08:22

'Hacking' 카테고리의 다른 글

Asprotect UNPACK  (0) 2009.01.24
API & DLL  (1) 2009.01.24
Intro to Reverse Engineering-Part 2  (0) 2009.01.24
Intro to Reverse Engineering - No Assembly Required  (0) 2009.01.24
ASProtect 1.23 RC4 - 1.3.08.24  (1) 2009.01.24
Posted by CEOinIRVINE
l
Intro to Reverse Engineering - Part 2 PDF E-mail
assembler.jpg

In Part 1, Intro to Reverse Engineering - No Assembly Required, we extended the series of coding articles for non-programmers with an area of high interest in the infosec community. We're proud to be able to bring you the highly anticipated follow-up complete with screen shots, sample code and applications. This one is long and detailed, so strap yourselves in for some great educational content.

This paper is designed to outline some essential reverse engineering concepts, tools and techniques - primarily, debuggers and using the debugging process to reverse engineer application functions and algorithms. It is assumed you have knowledge of basic assembly and C programming. An understanding of Win32 programming and API calls is also helpful. This tutorial does not necessarily have to be read in order (although it is strongly advised), as some sections do not contain information that directly relates to subsequent sections. However, if you begin skipping around and find that you have trouble understanding a concept, or feel like you missed an explanation, it would be best to go back to previous sections of the tutorial and read them first.  

Active Image
Active Image del.icio.us

Discuss in Forums

Before we begin... 

The Windows platform was chosen as the focus of this paper. Because of Window's wide-spread use and its closed-source nature, RCE is performed most often on Windows applications. This tutorial is time-consuming and intense, so let's do a quick overview of the topics that will be covered:

  1. Introduction to debuggers, specifically, OllyDbg.
  2. Finding the beginning of the actual code (i.e., the main() function as opposed to code generated automatically by the compiler).
  3. Identifying how source code is translated into assembly instructions.
  4. Locating specific functions and API calls.
  5. Identifying and un-packing basic packers.
  6. Real-time debugging and patching.
  7. Serial fishing.
  8. Self-key generation.
  9. Translating disassembled functions and algorithms into higher-level languages (aka, creating key-generation programs the right way).
  10.  Identifying and exploiting stack-based buffer overflows in closed source programs.

Helpful Resources

There are two directories inside the tutorial's zip file: apps, and source. The apps folder contains the pre-compiled programs we will be working with, and the source folder contains the applicable source code for all programs which I have written for this tutorial.

Several tools will be used throughout this tutorial. While it is helpful to have them all, it is really only necessary to have OllyDbg, as you are expected to be tracing through the example programs as they are being presented in the text; this will facilitate your understanding of the text and code.

1. Olly Debugger - For debugging and disassembly.

2. OllyDump - Plugin for Olly.

3. PeID - For identifying packers/encryptors.

4. Dev-C++ - For compiling source with GCC.

5. ActiveState Perl - For creating some exploit code.

Index

  1. A 30-Second Intro to OllyDbg - Getting to Know Your Debugger

A quick one page introduction to the basic commands for using Olly.

  1. Finding Main() - Compiler Code vs Developer Code

Here we look at some different ways to find the main() function, and also examine the differences between program entry points when they are compiled by different compilers.

  1. EXE Patching

How to temporarily modify assembly instructions in Olly, as well as saving them permanently.

  1. Intro to Keygens and Un-packing

Learn some basics about executable packers, do some more patching, and create our first keygen.

  1. Reversing Key Generation Algorithms - Writing a Real Key Generator

Here we completely reverse a key-validation algorithm, and write a full-fledged key generator in C.

  1. Discovering and Exploiting Buffer Overflows

In the final section of this tutorial, we analyze a program for BOF vulnerabilities, and write some exploit code that allows us to take control of the EIP.

A 30-Second Intro to OllyDbg - Getting to Know Your Debugger

Knowing what tools to use, and how to use them, is critical when reversing software. The tool that will most commonly be used throughout this paper is OllyDbg, a popular Win32 debugger. Olly has many plug-ins and advanced features, but we will learn just the essential commands here.

For those unfamiliar, a debugger allows you to view the assembly instructions of a program as they execute: you can set breakpoints on specific instructions to pause execution, single step through the program one instruction at a time, or just let the program run normally. To get a feel for this, open up test.exe in Olly:

1.jpg

The highlighted instruction ('PUSH EBP') is the entry point of the program. There are four main windows in Olly: the code window in the center, the register window on the right, the stack window in the bottom right hand  corner and the memory dump window in the bottom left corner.

Instructions and data in the code and memory dump windows can be manipulated by highlighting the desired data and pressing the space bar. Stack and register contents can be modified by right clicking them and selecting 'Modify'. To single step one instruction at a time, press the F8 key: you will see that the highlighted line goes to the next instruction, 'MOV EBP,ESP'. If you want to step into a function call, press the F7 key. The F2 key allows you to set a breakpoint on an instruction, and F9 runs the program normally (still 'inside' of Olly though); to pause the program, press F12. The use of these functions will become clearer as we work through some examples; for now, play around with them, and make note of how each instruction manipulates the stack, registers, and memory.


Finding Main() - Compiler Code vs Developer Code

If you look at the code at the EP of test.exe and compare it with the source code in test.c, you'll notice that they look nothing alike. The code immediately after the EP has several function calls to APIs like __set_app_type and atexit. That is because when source code is compiled, the compiler adds some code to the beginning of the program in order to properly initialize the application before executing the code written by the programmer. Different compilers will do drastically different things, so you can usually identify what compiler was used as soon as you see the EP. This particular program was compiled with Dev-C++ which uses the GCC compiler; however, in the vast majority of cases, you don't care much about the compiler code - you want to see what the programmer wrote. So, let's see how we can identify when the switch from compiler code to developer code is made.

Press F8 a several times to single step through the first few instructions, and you will notice that after you execute the 'CALL test.00401100' instruction, the program runs normally. That is because the main program loop (or a call leading to the main program loop) is located at 0041100. Because we pressed F8 to execute the call instruction, Olly executed everything inside that call instruction, and because our program waits for user input before returning from the main loop, the call instruction has not completed yet. To remedy this, restart the program in Olly (Ctl+F2), press F8 until the next instruction to be executed is 'CALL test.00401100'; this time, press F7 to step into the instruction, and you will be at the first instruction of the function at 00401100:

2.png

Let's take a moment to examine this function before executing anything...calls to SetUnhandledExceptionFilter and __getmainargs? This still doesn't look like our main function, so the main function is probably called from inside of this one. Scroll down in the code window until you see this code:

CALL test.00401290

MOV EBX,EAX

CALL <JMP.&msvcrt._cexit>

MOV DWORD PTR SS:[ESP],EBX

CALL <JMP.&KERNEL32.ExitProcess

Notice there is a call to _cexit followed by a jump to ExitProcess. Well, if ExitProcess is being called, then the call to our main function has to occur before this. Most of the function calls are located in msvcrt.dll (the '&msvcrt' before the function name is a dead give away), but look at the call just before the call to _cexit ('CALL test.00401290'). It is referenced by a memory address rather than an API function name. Select the 'CALL test.00401290' instruction and press F2 to set a breakpoint on it. Now, press F9 to let the program run normally; when the code execution reaches the breakpoint the application will pause on it before executing the instruction. When Olly breaks there, press F7 to step into the call. We are now at memory address 00401290, and the function here looks like our main loop - one call to printf(), followed by one call to getchar(), followed by a return:

3.png

In general, the compiler code will call the main loop just before a call to _cexit/ExitProcess, so looking for those two functions can help in finding the start of the main function. The Visual C++ compiler code is a bit more complicated, so we will take a look at how that differs from GCC, but first let's examine our main loop while we're here. There is a lot of data moving in and out of EAX just before the call to prinf(), so let's see if we can figure out what's going on.

Press F8 until you arrive at the instruction 'MOV EAX, DWORD PTR DS:[403000]'. This instruction is moving the contents located at the memory address of 00403000 into the EAX register. The very next instruction moves the contents of EAX into a local variable on the stack starting 28 bytes below EBP. Well, let's see what is located at 00403000: select the memory dump window in the lower left hand side and press 'Ctl+G'. Enter '403000' (no quotes) at in the text box and click OK. Starting at address 00403000, we see our text string that is displayed by the printf() function:

4.png

Since the EAX register can only hold four bytes at a time, only the first four bytes of our string have been copied into the local variable; the subsequent instructions move the rest of the string into the variable's address space four bytes at a time. Finally, the address of the local variable is loaded into EAX, and EAX and the "%s" string are placed on the stack as arguments to the printf() function.

Why did the program go through all the trouble of copying the string in four byte increments onto the stack, when it could have just referenced the original memory address where the string was located (00403000)? Well, because we told it to. In the source code, test.c, you can see that we declared a variable named 'string', and set it equal to the string we wanted passed to printf(). Since a 32-bit processor can only move 32 bits at a time, it had to copy the string from the data section of memory into the string variable four bytes at a time. If we had made the string variable a pointer, the program would have only needed to copy the 4 byte memory address of where the string was located into the variable (the pointer would then point to address 00403000). This would have required only two mov instructions rather than sixteen; it also would have eliminated the need for the LEA instruction. That's almost a 200% decrease in the number of instructions contained in our main function. Granted, this is a very simple program and CPUs are very fast these days, so no measurable difference is seen by the end user. But it is a good example of how disassembly can be used to further our knowledge of high-level programming and help us to develop more efficient applications.

I mentioned earlier that different compilers will produce different assembly instructions for the same source code. Since VC++ is the most commonly used compiler for Windows applications, I've compiled the code in test.c using VC++, and saved it as test_vc.exe. Opening test_vc.exe in Olly reveals a vastly different set of assembly instructions that we saw in test.exe:

5.png

You may have been wondering why you received a warning message from Olly that test_vc.exe had an entry point outside of the code section. Without delving too much into the subject of PE (Portable Executable) headers, each Windows program has a PE header which, among other things, identifies which sections of the program contain the code, which sections contain data, etc.

Here, we see that our EP is actually a jump to 00411840, but before we go there, let's take a look at the surrounding jumps. There are a lot of jumps to a lot of different functions, including printf()...right-click the code window and select 'Search for -> All intermodular calls'. This brings up a window that shows all of the function calls in test_vc.exe that are external to the program (i.e., API functions). Comparing the list of functions here with the list of jumps in the code window, we see that there is a jump for nearly every inter-modular function, as well as several functions that are listed only by address (these are internal to the program). The way this works is, whenever a function call is made within the program, instead of calling the memory address where the actual function is located, it calls the memory address where the jump to the function is located. For example, the jump to printf() is located at 0041118B, so wherever there is a call to printf() within the program, it will actually call 0041118B, which in turn jumps to the actual location of the printf() function. The advantage of this is that if you have a function that is called from multiple locations in your code, and the memory address of that function changes, you only have to change where the jump points to, rather than every single call to that function. It should be noted that depending on compiler options that have been set, the EP code may differ, and in fact, you will normally not see an EP that looks like this when debugging a real-world application; however, this was compiled using the default settings for VC++ 2005.

Press F8 to jump to the first function; this is a very short function which calls two functions then returns, so our main function must be somewhere inside one of those function calls:

PUSH EBP

MOV EBP,ESP

CALL test_vc.00411050

CALL test_vc.00411860

POP EBP

RETN

Press F8 until you reach the first function call, then press F7 to step into it. Notice that we are back at the jump table, and that the actual function is located at 00412AB0:

6.png

Press F8 again to follow the jump to the actual function. Here we see a lot of calls to functions like GetCurrentProcessID and GetCurrentThreadID, but no calls to any exit functions. The call to the main function is probably not located here, so press F8 until you return from this function, and you will be sitting at the second call which points to 00411860. As before, press F7 to step into it, and notice that it does not take us to the jump table, but rather directly to the function itself. Scrolling down in the function code, we see a call to exit(), and a few instructions above that a call to an internal function located at 00411136:

7.png

Set a breakpoint on the function call to 00411136 and press F9 to run the program. When it breaks, press F7 to step into the call; this again takes us to the jump table, so press F8 to get to the start of the function:

8.png

Now that looks more like it! There is a reference to our string (or at least part of it), and calls to printf() and getchar(). But getting here was kind of a pain, and there's an easier way. Notice how the call to the main function was made just before calls to exit() and _cexit(), and in the previous program that was compiled with GCC, the call to the main function was located just before a call to _cexit()? And remember how we were able to view all of the inter-modular calls? Well, right click the code window and again select 'Search for -> All intermodular calls':

9.png

Hmmm, there are two calls to _cexit() and one to exit(). Double click on the first call to _cexit() and Olly will take you to back to the code window and you will be located at 004118F6, which obviously is a call to _cexit(). Scroll up just a few instructions and there is the call to our main function located at 00411A01.


EXE Patching

One of the great functions of a decent debugger is that it allows you to modify instructions and data, and Olly is no exception. patchme.exe is a simple program that prints the text "This is the wrong text!" to the screen, and is very similar to the test.exe program we worked with earlier. The only differences are that no source code is supplied for patchme.exe, and the object of this program is to make it print "This is the right text!". Depending on how the program was coded, there may be several different ways to accomplish this, so let's open it up with Olly and see what we can find.

Once opened in Olly, find the main function for patchme.exe; it should look like this:

10.png

As we've seen previously, everything through the two function calls at 004012B0 and 004012B5 is generated by the compiler; the real code starts at 004012BA, where zero is moved into a local variable (we'll call it var1). Next, the memory address 0040301A is moved into another local variable, var2. In the memory dump window, go to the address 0040301A and you will see that it is our "This is the wrong text!" string; so we know that var1 is set equal to zero, and var2 is a pointer to the text string. Next, var1 is compared to 1, and if they are not equal (which we know they aren't), the program jumps down to 004012E5, where var2 is pushed onto the stack and printf() is called.

But look, there are two calls to printf(); because var1 didn't equal 1, the first one was skipped. Looking at the next instruction after the conditional jump (JNZ), we see that the memory address DS:[00402000] is placed into EAX, and then EAX is placed on the stack as an argument to printf(). To find out what is located at DS:[00402000], set a breakpoint on 004012BA (where var1 is set equal to zero), restart the application and press F9 to run it. When Olly breaks at 004012BA, press the space bar to change the assembly code:

11.png

Change the 0 to a 1, click 'Assemble' and then 'Cancel' to close the window. Now that we have changed the code to set var1 equal to 1, F8 through the next few instructions and notice that this time, the jump to 004012E5 is not taken. When you get to the 'MOV EAX,DWORD PTR DS:[402000]' instruction, notice that the information bar below the code window indicates that DS:[00402000] is the address 00403000. Take a look at this address in the memory dump window:

12.png

Well how about that...the string we want to print ("This is the right text!") is located there, just above the "wrong text" string. So, if var1 is set equal to 1, then the "right text" string is printed...to test this, press F9:

13.png

Bingo! Now if we want to permanently patch the program, all we have to do is go back into Olly, right-click the code window, select 'Copy to executable -> All modifications' and click the 'Copy All' button when prompted. Right click inside of the new window that appears and select 'Save File'. Save it as patched.exe, exit Olly, and run the new program - you'll be greeted with the "right text" string.


Intro to Keygens and Un-packing 

Writing  Key Generators

Why write a keygen? Because while patching a file is useful, you don't learn nearly as much about reverse engineering than you do when writing a key generator. In many cases it is not desirable to permanently patch an executable, so it is necessary to completely reverse a function or algorithm; writing key generators is good practice in performing in-depth code analysis.

For this part of the tutorial, we will be examining KeygenMe3 by Tanatos, and ArealApp.exe (both included in the apps directory). In KeygenMe3, we will learn how to un-pack a compressed executable, do some serial fishing, and trick the program into becoming its own key generator.

ARealApp is a "keygen-me" program which uses a key generation algorithm that I reversed from a real-world shareware application. For legal purposes I did not want to identify the shareware program, so I wrote ARealApp using the exact same algorithm used in the shareware executable. Here we will completely reverse engineer the algorithm used for key validation, and write our own keygen in C.

Executable Compression & Dumping

Let's focus first on KeygenMe3 first; open it up in Olly, click through any warning messages, and take a look at what we have:

14.png

As we saw in part one of this tutorial, most functions begin with a prelude which manipulates the EBP and ESP values accordingly; this program starts out with the PUSHAD instruction which pushes the contents of all the registers onto the stack. This is a sure sign of a packer, usually UPX or ASPack (opening the executable with PEiD does in fact identify this program as being packed with UPX). If you are unfamiliar with packers, they simply compress the executable file so that it takes up less space on the disk, and add a de-compression routine to the beginning of the executable in order to un-compress the program when it is loaded into memory. The basic layout of most of these simple routines is:

PUSHAD

/*de-compression routine here*/

POPAD

JMP OEP

We want to find the jump to the OEP (Original EP) so that we can view the original assembly code; since this jump is made only after the executable code has been decompressed, we will have no trouble viewing it. We could trace through the de-compression routine, but there's an easier way. Notice that the first instruction is PUSHAD (which saves all the register values onto the stack), and the last instruction before jumping to the OEP is POPAD (which restores the previously saved data from the stack to the registers). The routine does this to ensure that the register values will be set up properly for the program; in other words, it doesn't want the original code to have any idea that extra code has been run before arriving at the OEP, because the instructions there are expecting certain values, and wouldn't know how to handle any errors that might result from variations in the register values. This means that the only instruction that will touch the values placed on the stack by PUSHAD is the final POPAD instruction. If we place a hardware breakpoint on those values after they have been pushed, then the next time they are accessed (which will be by the POPAD instruction), we will be sitting at the JMP OEP instruction.

Press F8 to execute the PUSHAD instruction; notice how the value of ESP changes to reflect the fact that new data has been pushed onto the stack:

15.png

Right-click the ESP value, and select "Follow in Dump". The memory dump window now shows the values at that address:

16.png

The first four bytes are the same bytes located in the EDI register, since it was the last register to be pushed onto the stack by the PUSHAD instruction. Note also that each byte of each register has been pushed in reverse order. Now, select those first four bytes in the dump window, right click and select "Breakpoint -> Hardware, on access -> Word". Press F9 and Olly will break right after those four bytes are accessed by the POPAD instruction:

17.png

Press F8 to execute the JMP instruction (this is the jump to the OEP that we were looking for!), and the code should look much more friendly now:

18.png

Now that we have let the program un-compress itself, we will save it in its un-compressed state. The easiest way to do this is with the OllyDump plugin. Right click the code window and select "Dump debugged process". In the window that pops up, click 'Dump', and save the file as tknm3_dump.exe:

19.png

Olly will correct the entry point address, import function addresses, and anything else that needs to be fixed; run tknm3_dump.exe, and it should run normally.

If you are not planning on permanently modifying a program, it is not necessary to actually save it in its de-compressed form. However, since we will need to make modifications to this executable, this final step was required.

Self-Keygens

Self key generation is the act of patching the target application in such a way that it reveals the correct serial key to the end user. This is most often done by finding the memory address that the calculated correct key is stored at, and replacing the text in the standard "Incorrect serial number" message box with the correct serial number. And that is exactly what we will be doing with tknm3_dump.exe.

But I'm getting ahead of myself. Let's assume that we know nothing of this program (other than the original executable was packed with UPX of course); the first thing we should do is open it up in Olly and run it! We have a dialog box asking for our name and registration key:

20.png

Clicking the 'Check' button without entering any information results in a message box telling us to enter a name that is at least three characters long; this is interesting, because it means that the serial is probably generated based on the name entered. So, put in a three character name (I used 'aaa') and click the 'Check' button again. What's this? We get the same error message. In fact, we have to enter a name that is at least four characters long in order to pass this first check - obviously a programming error, and it is always good to note such errors as they may come in useful while disassembling the code (in this case, it doesn't however).

Now that we've entered a valid name, we get another message box telling use we forgot to enter a serial number. So, put in something random like '12345' and click 'Check' again. We now get a "Wrong serial! Try again" message. Now, this message box is obviously the negative result of running our entered serial number through the serial validation algorithm, so if we can find where this message box was called from we can trace back from there and find the algorithm and/or comparison in question. In Olly, press F12 to pause the program, then press Alt+K to view the call stack. Here we see recently called functions, among them, two calls to MessageBox:

21.png

The second one, called from 00401172, is the one we are looking for. We know this because anything with very high memory addresses, like 77D8054B, is usually located in a DLL file, and the second message box was called from a memory address that resides inside the target program's memory range. So back in the code window of Olly, press Ctl+G and go to address 00401172:

22.png

Interesting, no? A few instructions above the address in question, we see there is a call to GetDlgItemTextA, followed by a call to 0040120D. The return value of 0040120D is compared using a TEST operation, and if EAX is zero, the serial error information is pushed to the message box function; if it is not zero, then the "Registered" text is pushed to the message box function. The function at 0040120D definitely warrants some more investigation, but let's look at a few more things first. If you scroll up a little further, you'll see that our entered serial number is stored at 0040B420, our entered name is located in 0040B1E0, and there is an unknown number (it will be '3825205248' if you have used the name 'aaaa') stored in 0040B300. Now, let's set a breakpoint (F2) at the first argument that is supplied to the GetDlgItemTextA call ('PUSH 32' located at 0040112F), and restart the program in Olly.

Run the program again, supplying the same name and registration key, and click 'Check'. The first item that is pushed is the number 0x32 - this is the maximum size of the string, so we know that our serial can't be more than 50 characters long. The next item that is pushed is the address to store the string in, and you can see that this value is indeed  0040B420, where we found our serial number stored the last time. The other two values are the control ID and dialog box handle, neither of which are important for our purposes. Step through the code until the call to GetDlgItemTextA has been executed. The next three instructions are important: there are two values pushed onto the stack, and then a call to the mysterious function located at 0040120D. Looking at the two values that are pushed, the first is 0040B300 (remember that "strange" string we saw earlier?) and 0040B420, which is the address where our entered registration key is located. Press F7 to trace into the function call.

This is a small function, consisting of a single loop:

23.png

First, the unknown string address is moved into EDX, while the address of our serial number is moved into ECX. The value of ESI is pushed onto the stack, and ESI is then set to 1. EDX+1 is then loaded into the EAX register; this is interesting because it means that the first character of the unknown string will NOT be examined. Then, the SECOND byte of our registration key is moved into DL (again, the first character is ignored), and DL and the first character of the unknown string are compared. If they do not match, then the function jumps down to 00401231 where EAX is set to zero, the original value of ESI is restored, and the function returns. However, if they do match, then ESI is incremented, EAX is incremented, and if ESI is not greater than 4, then the function loops back to 0040121E where the next two bytes in each of the strings are are compared with each other. If ESI is greater than 4, then EAX is set to 1, ESI is restored, and the function returns.

If that seemed a little confusing, don't worry, it's just my lack of communication skills; the function is quite simple actually. The relevant pseudo code looks like this:

//EDX points to the unknown string

EDX = *unknown_string

//ECX points to the serial number we entered

ECX = *entered_serial

//ESI is initialized to one

ESI = 1

//EAX points to EDX+1, aka, the unknown string starting at the SECOND byte

EAX = EDX+1

/*this next instruction is just some math to make it easier to reference the unknown_string and the entered_serial...the unknown string is at the memory address stored in EAX, and the entered_serial is at EAX+ECX. Also, since EAX actually points to the second byte of unknown_string, EAC+ECX actually points to the second byte in entered_serial as well. */

ECX = difference between ECX and EDX

//loop four times

while ESI <=  4

            //do the bytes in unkown_string and entered_serial match?

            if (ECX+EAX) == EAX

                        //increase ESI for loop purposes

                        ESI++

                        //increase EAX, aka, look at the next byte in each string

                        EAX++

            else

                        //if they don't match, set return value to 0 and return

                        EAX = 0

                        return

            end

end

//if we've gotten here, then all comparisons were successful, so set return value to 1 and return

EAX = 1

return

To recap, we know the following:

  1. If the return value of  0040120D is 0, then we get the bad serial message; else, we get a good serial message.
  2. 0040120D compares our entered serial with a string that is located at  0040B300.
  3. 0040120D ignores the first byte of both our serial number and the string at  0040B300.
  4. Only bytes 2-5 in each string are compared (the loop only runs four times).

So, we can conclude that the valid serial number is located at 0040B300, but only bytes 2-5 are relevant. So, a valid serial has to be at least 5 bytes long; the first byte can be anything we want, but the next four must match with the respective bytes in the string at 0040B300. Note the string value at 0040B300 (I used a name of 'aaaa', so my value is '3825205248'). Restart the program, enter the same name, and for the registration key enter the first five numbers of previously noted value, replacing the first number with whatever you like (in my case I entered '08252'):

24.png

Bingo! Now we just need to patch a few instructions in order to turn this program into a handy little key generator for itself.

We know that the registration key is located at 0040B300, so all we have to do is change the memory address pushed to the MessageBox function from 0040A0A4 ("Wrong serial! Try again") to 0040B300 (the correct serial number):

25.png

This way, when an incorrect serial number is entered, you will get a message box that shows you the correct serial number:

26.png

Save your changes to the executable and the keygen is done!


Reversing Key Generation Algorithms - Writing a Real Key Generator

Some people consider the previous keygen project cheating because we didn't actually reverse the key generation algorithm. If our only object was to create a keygen then this is fine, but from a purely RE perspective, they are right. So in this next installment, we will be completely reversing a registration key validation algorithm, and writing a key generator in C. The target application, USP.exe, has been written in C and uses a key-validation algorithm found in the wild (i.e., this was used in an actual shareware program). I have included the source code for both USP and the USP keygen, but don't peek at them until we've disassembled the binaries...that would take all the fun out of it.

First, let's run the USP to see what we have (yes, I was lazy and made it a CLI program). We see it prompts for a user name and a registration key...let's enter some fake credentials, say, 'test' for our name and '12345' for our key. We receive an "Invalid Registration Key!" message - not entirely unexpected. Now let's open USP up in Olly and see if we can find the code that accepts the user name and password, then subsequently validates (or in our case, invalidates) them. Since this is a simple program, we'll start by finding the main function, since there probably aren't too many nested functions we'll have to follow to find what we're looking for. In a real-world application we would probably have to use the trick we learned earlier of pausing the program then examining the call stack to find the section of code we are interested in. We find the main function at 00401380:

27.png

Note that the main function uses printf() and gets() to prompt for and retrieve the user name and registration key. Also of note is the function immediately above the main function (at 0040135D) which prints the "Invalid Registration Key!" text, then exits; this is our "bad" function. The gets() function takes one argument: the address to store the retrieved text into. Examining the above code shows that the user name we enter is stored at 004040D0, and the registration key at 004040B0. Strlen() is then called to determine the length of the registration key we entered (we know this, because the address where the registraiton key is stored is passed to the strlen() function), and the value returned is compared to 0x17 (23 in decimal notation). If the value in EAX is equal to 0x17, then a jump to 004013FC is made, but if not, then the function at  0040135D (the "bad" function!) is called. This tells us the first piece of information we need to know about the registration key; it must be exactly 23 characters in length.

The purpose of the rest of the code may not be so obvious when viewed in a dead listing, so let's see what happens when we enter a key of 23 characters in length. Set a breakpoint on 004013FC since we should land here if our key is the correct length, and run the program. Enter some fake credentials again, ensuring that your key is 23 characters long (I used '12345678901234567890123'), and Olly will pause at our breakpoint:

28.png

Now, this is interesting; the code is moving one byte of data from the memory address 004040B5 into the EAX register, then comparing that byte to the byte stored at 00402025. Now, we know that the registration key we entered is stored at 004040B0, so these instructions are actually comparing the 6th byte of our registration key with some other byte at 00402025. Taking a look at the information window just below the code window confirms that the byte pointed to is in fact the 6th byte of our registration key:

29.png

The question is, what is this byte being compared to? Press F8 to execute the MOVZX instruction, and again we can use the information window to see what is stored at 00402025:

30.png

Our 6th byte gets compared to a hyphen, and the following JNZ instruction shows that if they are not equal, then a jump is taken to 004014F3, which happens to be a call to the "bad" function at 0040135D. So we know that our 6th byte must be a hyphen - but look, this same comparison is performed on bytes 004040BB (the 12th byte in our registration string) and 004040C1 (the 18th byte in our registration string). This tells us that every 6th character in the string must be a hyphen. The registration key format now looks like:

12345-12345-12345-12345

Let's restart the program in Olly and enter in our new registration key ('12345-12345-12345-12345') so that we can pass this validation check as well, and we see that we do. Now we find our selves at 00401435, where two local variables, EBP-C and EBP-4 are set equal to zero before entering a loop which also contains a nested loop:

31.png

As you can see, I've added some comments in Olly (this can be done by pressing the semicolon key). We have three local variables here, all integers: var1 and var2 are used to count the number of iterations performed by the primary and nested loops respectively; var3 is incremented each time the nested loop is executed, and based upon the value of var3, the function at 00401290 is called with different arguments. Note that var3 is also incremented each time the primary loop is executed, but only after the if statements.

We can also see that the primary loop is executed 23 times, and the nested loop is executed 5 times and is doing something with the registration key we entered. This is particularly interesting, because we know that a valid registration key is 23 characters long, and that it consists of four sets of 5-character strings, each set being separated by a hyphen. We can assume then, that these loops are either performing some type of calculations on the key as a whole, or on each of the four hyphen-separated strings that compose the key, or both.

To get a better idea of what is going on, let's start single-stepping through the code and see if we can determine what type of calculations it is performing. The first few instructions in the primary loop serve only to check if var1 is greater than 22 and to set var2 equal to zero. The nested loop is rather interesting however; here is another screenshot where I have added some more notes regarding the nested loop:

32.png

There doesn't seem to be any data located at 00404090 (yet), but we know that the registration key we entered is stored at 004040B0. We also know that var2 and var3 are initialized to zero, and incremented each time the nested loop executes, and that the nested loop loops five times. Here is some pseudo code to help clear things up:

var2 = 0;

5.times do

            //move one byte from our registration key into a variable located at 00404090

            00404090[var2] = 004040B0[var3];

            //increment var2 and var3 so that the above instruction will point to the next byte in each string

            var2++;

            var3++;

end

So, the first time the nested loop executes, it places the first five characters (i.e., the first of the hyphen-separated sets) of our registration key into a variable at 00404090. Each time this loop is called var2 is set to zero, so the values stored in 00404090 from the previous loop iteration will be overwritten each time the loop is called. Remember that we previously noted how var3 was also incremented once after the nested loop finishes executing? That is because the program wants to skip the hyphens in our registration string. For example, let's say that our registration key is '12345-67890-ABCDE-FGHIJ'. The first time the nested loop executes, it will copy '12345' into the variable at 00404090, the second time it is called, it will copy '67890' into 00404090, etc.

It appears that the program examines each 5-character set in our registration key individually, so let's try and find out what it does with them. The rest of the primary loop consists of if statements, comparing the value of var3 (which indicates how many characters of our registration key have been copied into 00404090) to several hard-coded values:

33.png

Again, let's create some pseudo code to help understand what is going on:

if var3 == 5

func_at_00401290(43,string_at_00404090);

else if var3 == 11

func_at_00401290(23,string_at_00404090);

else if var3 == 17

func_at_00401290(17,string_at_00404090);

else

func_at_00401290(53,string_at_00404090);

endif

var3++;

var1++;

For each if statement, the function located at 00401290 is called, and takes two parameters: an integer value, and the address of the variable that contains one of the hyphen-separated strings that make up our registration key. However, depending on which of those hyphen-separated strings is currently located at 00404090, a different integer value is passed to the function at 00401290. For the first string set, the value 43 is pass; for the second, 23, the third, 17, and for the fourth and final set , 53.

Once this primary loop is complete, the code immediately prints the "Thank you for registering" message; but, we know that we do not get that message when we enter an invalid registration key, so something is happening in the function at 00401290 that prevents the loop from completing. Put a breakpoint on the first call to 00401290 and press F9. When Olly breaks, take a quick look at the stack values that have been pushed; you will see the value 0x2B, and the memory address 00404090, which contains the first five characters of our registration key (from here out this will be simply called "the string"). Press F7 to step into the function call:

34.png

Again I have added some notes in Olly to help follow the assembly code, however, the first thing I want to look at is the ASCII string located at 00402000:

"2YOPB3AQCVUXMNRS97WE0IZD4KLFGHJ8165T"

If you notice, this string is 36 bytes long and contains all of the alpha-numeric characters. If you examine the code in Olly, you see that we have a primary loop with a nested loop, very similar to the previous loops we examined. In fact, the loops themselves function almost identically as the previous loops, so the loop structure should be familiar enough for you to figure out on your own. I have labeled six global variables which are used throughout the loop (gvar1-6); gvar2 and gvar3 are used to count loop iterations for the primary and nested loops respectively. If you skip the examination of the loops temporarily, you will see that gvar6 must be evenly divisible by the numerical value passed to the function. This is why we never completed the previous loop: if gvar6 is not evenly divisible, then it calls our "bad" function, which prints the "Invalid registration key" text and immediately exits the program. The trick now is to find out how gvar6 is calculated.

The primary loop's only function here is to loop five times, once for each character in the string that has been passed to the function; the inner loop loops 36 times (recall how the ASCII string of alpha-numeric characters is 36 bytes long?). So we already have a pretty good idea that each character in "the string" is compared to each character in the ASCII string: this is done using the CMP instruction at 004012E2. If the characters are not equal, then the program simply jumps down to 00401236, increments gvar3 (the inner loop counter), then runs the next iteration of the loop. However, if they are equal, the values in gvar1 (which is initialized to zero before the loops) and gvar3 (the number of times the nested loop has run, aka, the position of the character in the ASCII string that matches the character in "the string") are added together, and the sum saved in gvar4. Next, gvar1 is multiplied by 8, then added to itself (i.e., gvar1+gvar1*8) and the result stored in gvar5. Finally, gvar5 is multiplied by 4 and added to gvar4; the result is saved in gvar6. Now we know how gvar6 is calculated, but there is one more detail; after gvar6 has been calculated, gvar1 is set equal to gvar6. This means that subsequent loops will be affected, because gvar6 is not re-set to zero before other characters in "the string" are calculated. In other words, if "the string" was '44444', the resulting gvar6 value for each character in "the string" will be different because one of the variables used to calculate gvar6 (gvar1 to be precise) changes each time there is a match between the character in "the string" and a character in the ASCII string.

All of this is much easier to comprehend if you single-step through the code in Olly and examine the above notes I have taken on each instruction. However, to further simplify, here's some pseudo-C code:

int key_check_function(int divisor, char the_string[])

{

//initialize gvar1 to zero

gvar1 = 0;

                        //the primary loop which iterates through each character in the_string

                        for(gvar2=0;gvar2<5;gvar2++){

                                    //nested loop that compares the current character in the_string to every character in ascii_string

                                    for(gvar3=0;gvar3<36;gvar3++){

                                                if(the_string[gvar2] == ascii_string[gvar3]){

                                                            //if the two bytes match, calculate gvar6 for that particular byte

                                                            gvar4 = gvar1+gvar3;

                                                            gvar5 = gvar1+gvar1*8;

                                                            gvar6 = gvar4+gvar5*4;

                                                            gvar1 = gvar6;

                                                }

                                    }

                        }

                        //the final gvar6 value is divided by the divisor integer passed to the function

                        mod = gvar6 % divisor;

                        //if gvar6 is not evenly divisible, then call the "bad" function; else, return 0

                        if(mod != 0) {

                                    bad_function();

                        }

            return 0;

That's a bit much, so if you're still struggling with understanding how it all fits together, don't worry (I didn't get it right away either ;)...just step through the code in Olly some more, observe what is happening with the various values, and refer back to my Olly notes and/or the above pseudo code until you do.

Get it? Good, because now we are going to write a keygen for this. Unfortunately the mathematical force is not strong with me, so I couldn't figure out a way to create a reverse algorithm for this function; the problem of course is that you have to choose a value that is divisible by the particular divisor (remember how the key_check_function is called with different values for the divisor each time), then work backwards from there. It just seemed like way to much work...so instead, I wrote a keygen that brute forces each of the four 5-character sets in the registration key (remember that they are examined individually too). To do this, I generated a random set of four alpha-numeric characters, then iterated through each character in the ASCII string, checking to see if it would create a valid key set if plugged in as the fifth character. If so, then that value was used; if not, then another four character string was calculated, and the process was done over again. The resulting code is listed in the usp_key_gen.c file in the source directory.


Discovering and Exploiting Buffer Overflows

Now that we have sufficient practice in reversing closed source programs, it's time to examine buffer overflows. For this final section of the tutorial, we will be exploiting weird.exe which is a crack-me program included with Security Warrior. This program, as well as others used in the book, is available for download from O'Reilly Publishing (it is also included in the apps directory in this tutorial's zipped file). It is assumed that you have a basic knowledge of buffer overflows and stack operations.

Examining the Program

As usual, before doing anything else, let's run weird.exe and see what we are working with. We are prompted for a serial number, so enter whatever you like (I used the usual '12345'), and hit enter. We are taken to a new line and nothing else happens. Hit enter again and the program quits. Well, we didn't get much information to work with there, so let's take a look at it in Olly. Looking around in the code a bit, we find the function that prompts us for our serial located at 00401108:

35.png

We see that there are several references to ASCII strings...the first three we saw when running the program, but the fourth string reference (located at 00401177) looks like what we want to see when we enter a serial. Notice that it is pushed as an argument to the function at 00404B38, which is also the function used to print the first three strings to the screen - essentially the equivalent of printf(). Furthur, we see that the function at 0040479C is called immediately after prompting for our serial, so we can assume that this function is similar to gets(). However, examining the code that is executed between the call to 0040479C and the "w00! congrats" string reference, we see that there are no jumps to 00401177. In fact, all of the jumps explicitly jump over that string reference and the subsequent call to 00404B38. This means that even if we did enter a valid serial, we would never actually validate. So it looks like we'll have to find a way to take over the EIP and redirect the program's execution to the line at 00401177.

Some Quick BOF Information

For those already familiar with buffer overflows, skip to the next part of this section. As a quick refresher for everyone else, here are some basic rules about buffer overflows:

  1. The primary goal is to manipulate the value stored in the instruction pointer (EIP). Depending on the position and usage of variables in the program, there may be other ways to exploit a buffer overflow, but this is the holy grail.
  2. The EIP register can not be directly manipulated. For example, you can't do something like 'pop eip', or 'mov eip,eax'. However, when a function is called, the function must know how to return to the code that called it. This is done by automatically pushing a return address (the next instruction to be executed) onto the stack whenever a function is called. When the called function returns (the RETN instruction), it automatically pops the return address off the stack and into the EIP register.
  3. The above is the basis of your standard stack-based buffer overflow; when user-supplied data is copied into a location on the stack without any bounds checking, we may be able to supply a sufficiently long string of data that will overwrite the return value that was pushed onto the stack when the function was called. When the function returns, it will return to whatever memory address we overwrote the original return value with.
  4. To accomplish this, remember how data is pushed onto the stack. As data is pushed onto the stack, the stack grows downwards, from high memory addresses to low memory addresses. However, space is allocated for local variables on the stack as well, and when those variables are filled with data, the data grows UP. Suppose we have a function that defines three local char variables (one byte each):

char a,b,c;

For example purposes, the program will allocate three bytes on the stack for these variables, and the stack will look like this:

Return address  (4 bytes)

Saved EBP         (4 bytes)

char a               (1 byte)

char b               (1 byte)

char c                (1 byte)

Now, if we write one byte to char c, then the byte allocated for the c variable will be filled. But if we try to write two bytes to c, then the c variable will get the first byte, and the second byte will overflow into char b's memory address. If we write three bytes, the third byte will overflow into char a's memory address. If we write seven bytes into c, then we will fill the four bytes that contain the saved EBP value; if we write 11 bytes into c, then we will also fill the four bytes that contain the return address. So you can see that while the stack grows down, data written to the stack grows up.

Locating a Buffer Overflow

Before we can try to exploit a buffer overflow, we must first find one. We can start by looking for obvious vulnerabilities, such as the use of gets(), strcpy() and the like; this can be done by right clicking the code window in Olly and selecting 'Search for -> All intermodular calls'. This reveals some known calls, but nothing like what we are looking for; judging from the fact that proprietary functions have been used in place of printf() and gets(), the programmer has probably done this throughout the application.

Now let's examine avenues of attack; in other words, what data do we control? The only data that we control in this program is the serial number, so let's take a look at what is done with that serial number after we hit the enter key. We have already identified that the function at  0040479C retrieves the text that we enter, so let's breakpoint on that and step into it when Olly breaks:

36.png

As usual, I've included some notes. This function takes one argument, which is a memory address (the argument is located at EBP+8). The address of the argument is loaded into EBX; then the program jumps down to 004047C6, where another function at 0040408A4 is called; it is supplied with the memory address 0040D19C. This is the actual function that retrieves our registration text, and it places it in 0040D19C. But, we needn't examine this function, because there is something interesting happening immediately in the current function code. Note how the loop starts copying the retrieved text one byte at a time onto the stack? While the function at 0040408A4 placed the string in a memory address, this loop is copying it into the address that was passed to the function as its one and only argument. Taking a look at the stack, we see that the address that our string is being copied into is 0012FF40, and the return address for this function (ideally the one we want to overwrite) is located at 0012FF38:

37.png

As you step through the loop however, you will notice that the string text is growing away from the return address at 0012FF38. Why? Recall that the stack grows down, but data grows up...the function was given an argument that contained the memory address to copy the string into, but that memory address (0012FF40) is located above the return address of the current function. However, not all is lost; the stack also contains return addresses for other functions, and these are located above 0012FF40. Let's trace through this current function until we return. We are now back in the first function that we examined. Let's trace through until the end of that function, and stop when we get to the RETN instruction at 0040118C. Take a look at the stack window:

38.png

Located at 0012FF90 is the return address for this function. We need the return address to read 00401177 in order for the program to jump back up to the instructions that print the "w00!" text. Some quick math tells us that 0012FF90 is 80 bytes above 0012FF40, where our registration text begins to be copied into. So, the 81st byte would overwrite the first byte of the saved return address, the 82nd would overwrite the second byte, and the 83rd would overwrite the third, etc. We can test this by supplying 84 bytes of text as a registration key:

39.png

Now let's look at the stack when we reach the RETN instruction for the first function:

40.png

0x41 is the hex value for the ASCII letter 'A' - now that we know we can control the EIP through this return instruction, it's time to code an exploit.

We don't want the function to return to 0x41414141, we want it to return to 0x00401177, so the last four bytes will need to be changed so that when they overwrite the saved return address with this value. For this, we will write a simple perl script:

#print 'A' 80 times to fill up the space between 0012FF40 and 0012FF90

print "A"x80;

#print the last three bytes of our desired return address in little-endian order

print "\x77\x11\x40";

What's going on with that last line you ask? Why are there only three bytes, and why are they in reverse order? The x86 architecture uses what is called little-endian byte order; in other words, data is written to the least-significant bytes first. So, as the loop writes each byte of our string into the stack, the data is written in this order (assume that the string 'ABCD' has been entered):

00000000         No bytes copied

00000041         First byte (A) copied

00004241         Second byte (B) copied

00434241         Third byte (C) copied

44434241         Fourth byte (D) copied

As you can see, 'A', the first byte in our string, is copied into the lowest byte in the buffer. The second byte, 'B' is copied into the second-lowest byte, and so on. So, in order for our return address to read '00401177', we need to enter a string that supplies 0x77 first, 0x11 second, and 0x40 third. Which brings us to our second question, why are we ignoring the highest-order byte, 0x00? Well, all text strings in a program must be null terminated (i.e., they must end with 0x00); user-supplied strings are no different, so when you supply your registration key, the 0x00 is automatically added on to the end of the string for us!

OK, now, the test. Run the perl program:

41.png

And copy/paste the output into the input of weird.exe. Press enter twice, and:

42.png

Whew!! That's a lot of information for a beginner. So let's let that sink in for a while, and we'd be more than happy to continue the conversation in the forums. Be sure to use that little cartoon bubble at the top of this article to get there.

Hope you're enjoying this continuing series on programming for the non-coding security professional. As always, send me your feedback on what we've already done as well as topics you'd like to see covered in future articles.

'Hacking' 카테고리의 다른 글

API & DLL  (1) 2009.01.24
W32DASM Disassembler  (0) 2009.01.24
Intro to Reverse Engineering - No Assembly Required  (0) 2009.01.24
ASProtect 1.23 RC4 - 1.3.08.24  (1) 2009.01.24
Gunz Original Files  (0) 2009.01.20
Posted by CEOinIRVINE
l
Intro to Reverse Engineering - No Assembly Required PDF E-mail

assembler.jpgLast time we went over the C programming language in an introductory article specifically focusing on getting the security professional on the road to coding (or at least the road to understanding). This time around we extend the series of coding articles for non-programmers with an area of high interest in the infosec community, reverse engineering.

This paper is intended as an introduction to reverse engineering for someone who has no experience whatsoever on the subject. You should have some basic knowledge of C programming, and access to a Windows or Linux box (preferably both) using the x86 architecture (i.e., your average computer). No knowledge of assembly code, registers, or the like is assumed, although it helps. The "Introduction" section of the paper is intended for the newcomer who has little or no understanding of what reverse engineering is and may be skipped by those looking for more technical details.

Active Image
Active Image del.icio.us

Discuss in Forums

Table of Contents

1) Introduction
    An introduction to reverse engineering and some basic RE concepts.

2) Assembly Basics
    Introduction to assembly programming language and process memory.

3) The Stack In Detail
    Detailed workings of stack operations.

4) Reverse Engineering a Program 
    Disassemble and reverse engineer two programs; one with the source code, one without.

 Introduction

What is Reverse Code Engineering?
"Reverse engineering (RE) is the process of discovering the technological principles of a mechanical application through analysis of its structure, function and operation"(Wikipedia).  Basically, Reverse Code Engineering (RCE) is the application of the reverse engineering process to software - in other words, analyzing a program in order to understand how it works. Because reverse engineering is most commonly used to analyze closed-source programs, it is largely focused on the Windows platform; however, reversing under Linux is also popular for inspecting buffer overflows, closed-source Linux applications, and hostile Windows programs (without the risk of running them).

Why Reverse Engineer?
There are many reasons to reverse engineer a program.  Have you ever wished that your favorite Windows program had xyz functionality? Want to dissect malware or viruses? Look for and analyze a buffer overflow? Figure out how that hardware driver works so you can write one for Linux? Maybe you're just curious how a particular program works, but you don't have access to the source code? All of these are common reasons for reverse engineering an application, and as such, there are many varied facets of RCE that one may choose to focus on, each of which can take a substantial amount of knowledge and experience to become an expert in. This paper will give you with the basic knowledge to get started in RCE, providing a base to launch into which ever specialties you prefer.


How Does It Work?
This all sounds great, but how do we analyze a program for which we have no code?  There are many ways to observe how a program interacts with the rest of your system, such as  file and registry access (which can be helpful when reverse engineering), but these techniques still leave you with a black box - you don't know what is going on under the hood. In order to understand how we can analyze the internal workings of a program, some understanding of the compilation process is needed. When you compile your source code, there are three major steps that occur: translation of the source code into assembly code, assembly, and linking.

First, the source code is translated into assembly code by the compiler. Assembly is a very low-level programming language; it is composed of many simple instructions which deal directly with memory addresses and CPU registers. For instance, if you assign the number 1 to an integer variable in your source code, the resulting assembly code may look something like:
 

mov 0xffffffb4,0x1

which moves the number 1 into 0xffffffb4, the memory address assigned to that particular variable. No matter what programming language you are using (C/C++, Delphi, VB, etc), all compiled languages must be first translated into assembly before being converted into the final binary program.

Next, an assembler translates the assembly code into machine-readable code; there is (usually) a one-to-one translation between the assembly and machine code. The final stage is performed by a linker, whose job it is to add in any library functions required by the program.  The final result is a file that contains binary instructions which can be executed by the processor.

The point of all this is that since all programs are translated into assembly code, and assembly code can be translated directly into binary 1s and 0s, we can translate any binary program back into its assembly code through the aptly named process of disassembly. If you understand assembly code, you can follow the instructions to understand what the program is doing, and even translate it into a higher-level language such as C. Note that some languages can be automatically translated directly back into their original source code, or decompiled. While this process works well for some languages, it is generally very complex and imprecise for most programming languages, particularly C/C++. I encourage you to look into some of the ongoing decompiler projects, however, this paper will be focused only on disassembly.

Opposition to RCE


It is important to realize that for various reasons, people may not want you to reverse engineer their programs, and as such, they may implement encryption or advanced protection techniques which make it extremely hard to analyze the original assembly code. We will certainly not be covering these techniques in this paper, but it is good to keep in mind if you come across a disassembled program that doesn't seem to make any sense.

A second issue is the legality of RCE. Many EULAs prohibit reverse engineering, but this still may not make it necessarily illegal; like many digital laws, it is still somewhat undefined. However, I will quote the following from Exploiting Software:
 

These agreements [EULAs] usually contain language that strictly prohibits reverse engineering.  However, these agreements may or may not hold up in court [Kaner and Pels, 1998].

The Uniform Computer Information Transactions Act (UCITA) poses strong restrictions on reverse engineering and may be used to help "click through" EULA's stand-up in court. Some states have adopted the UCITA (Maryland and Virginia as of this writing [February 2004]), which strongly affects your ability to reverse engineer legally.


Normally, there is no need to fear RE-restrictive laws, unless you plan to publicize your work. One exception would be cracking, or using reverse engineering to circumvent an application's registration scheme, which is very illegal. All programs we will be working with in this paper are original, so there is no question of legality; however, it is very important to keep this in mind if you begin work on someone else's programs.

What Do I Need?
 

In short, tools and knowledge. Obviously, you must be able to read assembly code, however, it is not enough to just understand assembly instructions. You must also know how assembly instructions interact with areas of memory (particularly the stack), and what the CPU registers are used for. Knowledge of the high-level programming language that the application was written in can be very helpful, although it is not necessary. You should also understand specific system functions for the OS platform you are dealing with (such as Linux syscalls or the Windows API).

There are many tools available to the reverse engineer, much of them designed for specific purposes. However, there are two indispensable tools: the disassembler and the debugger. As its name implies, a disassembler disassembles a program's binary 1s and 0s into readable assembly code. A debugger can disassemble the binary instructions as well, but also allows you to run the code inside of the debugger; this gives you the distinct advantage of being able to observe the effect each instruction in real time, and allows you to better understand the program flow. The most popular debugger for Linux is the GNU debugger (gdb), which is also available for Windows; however, there are other very powerful debuggers for the Windows platform as well, such as SoftIce and OllyDbg. We will be using gdb in both Linux and Windows later in this paper.

Assembly Basics

Assembly language is specific to a processor's architecture - for example, a SPARC processor will use a different set of assembly instructions than a CPU using the x86 architecture, which will differ from the assembly instructions used when programming a PIC microcontroller. Since the most common architecture is x86, that is the instruction set we will be dealing with here. Before delving into the actual assembly instructions however, let's take a look at the CPU registers and process memory.

CPU Registers

A processor takes data and instructions that are stored in memory and performs whatever calculations are required, then writes the output back into memory as applicable. However, the CPU needs a place to store the data it retrieves from memory while it calculates; this is where the registers come in. Registers are small segments of memory inside the CPU that are used for temporarily storing data; some have specific functions, others are just used for general data storage. In a 32-bit processor, each register can hold 32 bits of data; in a 64-bit processor, the registers can hold 64 bits of data. This paper will assume the classic 32-bit registers are being used, but even if you have a 64-bit CPU, as long as it is backwards compatible with 32-bit applications, all of the following information is still applicable.

There are many registers used by a processor, but we are concerned primarily with a group of registers called the general purpose registers. The general purpose registers are composed of:


EAX
EBX
ECX
EDX
ESI
EDI
ESP
EBP
EIP

The EAX register is called the accumulator, and is commonly used to hold the results of a calculation. If a function returns a value, this value will be placed in the EAX register so that the code that called the function can access the return value.

EBX is a pointer to the data segment, and ECX is normally used to count the number of iterations in a loop; EDX is used as an I/O pointer. It is important to note that while these are the suggested functions of the EAX, EBX, ECX and EDX registers, they are not restricted to these uses, with a few exceptions. For example, EAX can be used to hold data regardless of whether or not that data is the result of some calculation; however, if a function returns a value, that value will always be stored in the EAX register.

ESI and EDI are used to specify source and destination addresses respectively; they are most often used when copying strings from one memory address to another.


ESP is a stack register, called a stack pointer, that points to the top of the stack; EBP is also a stack register (called the base pointer), used to reference local variables and function arguments on the stack. The exact purpose and usage of the ESP and EBP registers will be clarified in the following sections.

EIP is the instruction pointer register - it controls program execution by pointing to the address of the next instruction to be executed. For example, if your program calls a function that is located at the address of 0x08ffff1d, the value stored in EIP will be changed to that address so that the CPU knows where to go in order to execute the first instruction of that function. Note that there is no way to directly control the value stored in EIP.


The 'E' at the beginning of each register name stands for Extended. When a register is referred to by its extended name, it indicates that all 32 bits of the register are being addressed.  An interesting thing about registers is that they can be broken down into smaller subsets of themselves; the first sixteen bits of each register can be referenced by simply removing the 'E' from the name. For instance, if you wanted to only manipulate the first sixteen bits of the EAX register, you would refer to it as the AX register. Additionally, registers AX through DX can be further broken down into two eight bit parts. So, if you wanted to manipulate only the first eight bits (bits 0-7) of the AX register, you would refer to the register as AL; if you wanted to manipulate the last eight bits (bits 8-15) of the AX register, you would refer to the register as AH ('L' standing for Low and 'H' standing for High).
 

Process Memory and the Stack

Often, a process will need to deal with more data than there are available registers. To remedy this, each process running in memory has what is referred to as a stack. The stack is simply an area of memory which the process uses to store data such as local variables, command line/function arguments, and return addresses. Before examining the stack in detail, let's take a look at how a process is generally arranged in memory:
 

High Memory Addresses (0xFFFFFFFF)
---------------------- <-----Bottom of the stack
|                     |
|                     |   |
|         Stack       |   | Stack grows down
|                     |   v
|                     |
|---------------------| <----Top of the stack (ESP points here)
|                     |
|                     |
|                     |
|                     |
|                     |
|---------------------|  <----Top of the heap
|                     |
|                     |    ^
|       Heap          |    | Heap grows up
|                     |    |
|                     |
|---------------------| <-----Bottom of the heap
|                     |
|    Instructions     |
|                     |
|                     |
-----------------------
Low Memory Addresses (0x00000000)


As you can see, there are three main sections of memory:

1. Stack Section - Where the stack is located, stores local variables and function arguments.

2. Data Section - Where the heap is located, stores static and dynamic variables.

3. Code Section - Where the actual program instructions are located.

The stack section starts at the high memory addresses and grows downwards, towards the lower memory addresses; conversely, the data section (heap) starts at the lower memory addresses and grows upwards, towards the high memory addresses. Therefore, the stack and the heap grow
towards each other as more variables are placed in each of those sections.

Essential Assembly Instructions

Instruction Example          Explanation
push push eax Pushes the value stored in EAX onto the stack
pop pop eax Pops a value off of the stack and stores it in EAX
call call 0x08ffff01 Calls a function located at 0x08ffff01
mov mov eax,0x1 Moves the value of 1 into the EAX register
sub sub eax,0x1 Subtracts 1 from the value in the EAX register
add add eax,0x1 Adds 1 to the value in the EAX register
inc inc eax Increases the value stored in EAX by one
dec dec eax Decreases the value stored in EAX by one
cmp cmp eax,edx Compare values in EAX and EDX; if equal set the zero flag* to 1
test test eax,edx Performs an AND operation on the values in EAX and EDX; if the result is zero, sets the zero flag to 1
jmp jmp 0x08ffff01 Jump to the instruction located at 0x08ffff01
jnz jnz 0x08ffff01 Jump if the zero flag is set to 1
jne jne 0x08ffff01 Jump to 0x08ffff01 if a comparison is not equal
and and eax,ebx Performs a bitwise AND operation on the values stored in EAX and EBX; the result is saved in EAX
or or eax,ebx Performs a bitwise OR operation on the values stored in EAX and EBX; the result is saved in EAX
xor xor eax,eax Performs a bitwise XOR operation on the values stored in EAX and EBX; the result is saved in EAX
leave leave Remove data from the stack before returning
ret ret Return to a parent function
nop nop No operation (a 'do nothing' instruction)

*The zero flag (ZF) is a 1 bit indicator which records the result of a cmp or test instruction

Each instruction performs one specific task, and can deal directly with registers, memory addresses, and the contents thereof. It is easiest to understand exactly what these functions are used for when seen in the context of a simple hello world program, which we will do a little bit later.

Assembly syntax

There are two types of syntax used in assembly code: Intel and AT&T.  Each display thesame instructions, just a little bit differently (in the above examples I have used Intel syntax).  The primary difference is that the source and destination operands are flip-flopped. Look at the differences in how the syntaxes display the instruction to move the number 1 into the EAX register:

Intel Syntax: mov eax, 0x1

AT&T Syntax: mov $0x1,%eax

Besides the source (the number 1) and the destination (the EAX register) being reversed, the AT&T syntax also adds a percent sign in front of all register names and a dollar sign in front of hexadecimal numbers. Regardless of syntax however, it is still the same instruction.

You should be familiar with both syntaxes, as different disassemblers may use either one
or the other syntax when disassembling a program. For my following examples I will be using the Intel syntax since it is a little easier to understand; however, the GNU debugger (gdb), which we will be using later in this paper, uses AT&T syntax. As such, I will be supplying both the AT&T and Intel versions of the sample programs in order to give exposure to both syntaxes. For more information on the differences between AT&T and Intel syntaxes, see the gnu.org link in the references section at the end of this paper.


The Stack in Detail

The stack is a Last In, First Out (LIFO) data structure. Imagine that you are stacking plates; the first plate you put on the stack will be on the bottom; the second plate will be on top of the first plate, and the third plate will be on top of the second. When you start taking plates off of the stack, the third plate will come off first, then the second, and finally, the first. The stack section in memory operates the same way: data can be placed on the stack, but if you place three pieces of data on the stack, you will first have to remove the last two in order to access the first piece of data.

There are two types of stack operations: push and pop. When you want to place data onto the stack, you "push" it; when you want to remove data from the stack, you "pop" it. So, if you push the numbers 1, 2 and 3 in order onto the stack, when you pop the stack, you will get the number three; pop it again, and you will get the number two; pop it a third time and you will get the number one. To help visualize this, after pushing the numbers, the stack would look like:


-----------
|   1     |
-----------
|   2     |
-----------
|   3     |
----------- <---ESP

If we then pop the stack, it will look like:

-----------
|   1     |
-----------
|   2     |
----------- <---ESP

If we push the number 4 onto the top of the stack, it will look like:

-----------
|   1     |
-----------
|   2     |
-----------
|   4     |
----------- <---ESP

Don't be confused by the arrangement of the "top" and "bottom" of the stack; remember that the stack grows downwards, so data at the bottom of the stack (in this case, the number 1) is actually at the highest memory address, and the top of the stack (the number 4) is at a lower memory address. This is analogous to stacking plates on the ceiling.

Recall that the ESP register always points to the top of the stack. This means that whenever you
push data onto the stack, the address stored in ESP is decremented by the number of bytes placed onto the stack; when you pop the stack, ESP is incremented by the number of bytes removed from the stack.

Function Arguments and Local Variables
 

The stack is used to store a function's arguments and local variables; to understand how assembly instructions reference these variables, let's see how that data is arranged on the stack. Take a look at the following function and what the resulting stack layout would be:

int myFunction(int var1, int var2, int var3)
{
    char buffer1;
    char buffer2;
    char buffer3;
}

----------------------- <-----Bottom of the stack (top of memory)
|    var3             |
|---------------------|
|    var2             |
|---------------------|
|    var1             |
|---------------------|
|    Return Address   |
|---------------------|
|    Saved EBP Value  |
|---------------------| <----EBP Points here
|    buffer1          |
|---------------------|
|    buffer2          |
|---------------------|
|    buffer3          |
----------------------- <----ESP (top of the stack,                               low memory addresses)

For the moment, we will ignore the return address and saved EBP value, and concentrate on how the arguments and variables get placed onto the stack. Before a function is called, all of its arguments must first be placed on the stack. These arguments are pushed onto the stack in reverse order; that is, in our example, var3 would be pushed first, var2 second, and finally var1:

push var3
push var2
push var1
call myFunction

The call instruction will automatically place the return value onto the stack, and the saved EBP value is pushed immediately afterwards by myFunction (again, we are ignoring these values for now - more on them later). Then, the local variables are pushed onto the stack in the order which they are declared;  first buffer1, then buffer2, and lastly buffer3. When you look at the assembly code of a disassembled program however, you won't have nice names for variables like var1 or buffer1; instead they will be indicated by memory addresses, or as offsets from EBP (recall that the purpose of EBP is to reference variables on the stack). Since the function arguments are located at higher memory addresses than the address pointed to by EBP, they will be referenced as positive offsets from EBP (example: 'ebp+8'); local variables, being located at lower memory addresses, will be referenced as negative offsets from EBP (example: 'ebp-4'). So, whenever you see something referenced as an offset from EBP, you know that you are dealing with a local variable.

Return Addresses and the Prologue


Besides storing data and function arguments, the stack is also used for storing critical values when calling functions. Recall that the EIP always points to the next instruction to be executed; however, the EIP has no way of storing old instruction addresses, so when a function returns, the EIP needs a way to determine where to return to. Whenever a function is called, the memory address of the next instruction in the calling function is pushed onto the stack. When the called function finishes, this address is popped off the stack and placed into the EIP register so that the CPU can return to the next instruction in the calling function. Take the following pseudocode as an example:
 

functiona()
    var x = 1
    call functionb()
    x=0
return

When functiona calls functionb, the memory address that contains the 'x=0' assignment is pushed onto the stack. When functionb finishes, that address is popped off the stack and placed into the EIP, so the processor then knows that the next instruction it has to perform is to set the variable x equal to zero.

In addition, the value of the EBP register needs to be saved and appropriately changed when a
new function is called, such as in our above example. By now you may be wondering why the EBP is used at all; why not just reference variables from the stack pointer? The base pointer is used because as data is added to and removed from the stack, the position of the stack pointer (ESP) will be constantly changing, making it difficult to use it as a reference point for locating stack variables. However, it is impractical to use the same EBP value for every function, especially in more complex programs where you have functions inside of functions inside of functions, ad infinitum. But, just like the EIP, when a function finishes and returns control to its parent function, that parent function will need to have its original EBP value restored into the EBP register so that it can continue to reference its own variables and arguments. And, just like the EIP value, the calling function's EBP value is also placed on the stack.


However, the EBP value is not pushed onto the stack automatically; this job is up to the child
function, and the process of doing so is called the prologue. Basically what the prologue does is save the parent function's EBP value onto the stack, then gives the child function its own EBP value.  Finally, the prologue allocates enough room on the stack to hold all of the local variables. The resulting
  assembly code looks like this:

push ebp
mov ebp, esp
sub esp, 0x24

Let's take this one line at a time, shall we. The first instruction is very simple; it pushes the value in EBP (i.e., the EBP value of the calling function) onto the stack. The second instruction copies the value in ESP into the EBP register (thus giving the child function its own EBP value). Finally, the third instruction decrements the stack pointer by 36 bytes (0x24 in hexadecimal); the actual value that is subtracted from ESP will of course depend on the size and number of local variables present in the function. But what is the second instruction really doing? Why copy the stack pointer value into EBP?  To see why, look again at our sample stack layout; note the steps that have been added, and which parts of the stack are affected by them. Make particular note of where the EBP value is pointing to as well:

        ----------------------- <--Bottom of the stack (top of memory)
        |        var3         |
        |---------------------|
        |        var2         | Step 1: Arguments pushed onto the stack.
        |---------------------|
        |        var1         |
        |---------------------|
        |    Return Address   | Step 2 The call instruction pushes the return address onto the stack.

        |---------------------| 
        | Saved EBP Value     | Step 3: The prologue saves the EBP value onto the stack.
EBP --> |---------------------| 
        |        buffer1      | Step 4: The prologue allocates space on the stack for local variables by decrementing the value of ESP.
        |---------------------|
        |        buffer2      | 
        |---------------------|
        |        buffer3      |
        ----------------------- <----ESP (top of the low memory addresses)


However, when the second instruction (mov ebp, esp) is executed, only steps one through three have been performed - no space has been allocated on the stack for local variables yet. So when the ESP value is copied into the EBP register, the stack actually looks like this:

        ----------------------- <-----Bottom of the stack (top of memory)
        |        var3         |
        |---------------------|
        |        var2         |
        |---------------------|
        |        var1         |
        |---------------------|
        | Return Address      |
        |---------------------|
        | Saved EBP Value     |
        ----------------------- <----ESP (top of the stack, low memory addresses)

Note that ESP is pointing exactly where the EBP needs to be. This makes setting the new EBP value simple; before allocating space for the local variables (step four), simply copy the value of ESP into
EBP.

Some Minor Details...

The above examples have been portrayed as layouts of the program's stack; in reality, they are really just sections of the stack known as stack frames. Since each function has its own arguments and variables, each function has its own frame. A function will clean up its frame before returning, but if you have functions called inside of other functions, you will have multiple frames on the stack. For instance, if functiona() calls functionb() which calls functionc(), an overall view of that program's stack would look like:


        ----------------------- <-----Bottom of the stack (top of memory)
        | functiona() Frame   |
        |---------------------|
        | functionb() Frame   |
        |---------------------|
        | functionc() Frame   |
        ----------------------- <----Top of the stack (low memory addresses)


Reverse Engineering a Program

In this last section, we will be writing a simple hello world program in C, compiling it, then analyzing the disassembled binary. The code will be compiled with gcc and disassembled using gdb; if you are using Windows, you can get Dev-C++ from bloodshed.net which is a nice IDE that comes with all the gcc utilities, including gdb. Bear in mind that if you compile the source code yourself, your assembly code may be slightly different from mine due to variations in the different versions of gcc (I am using gcc v3.3.5 on Linux and v3.4.2 on Windows - they both produce identical assembly instructions). Also, your memory addresses probably won't match mine, but this is normal as they will  be different when compiled on different systems. Finally, we will examine the disassembly of a slightly more complex program and walk through reverse engineering it.

Using GDB

As stated earlier, gdb is both a debugger and a disassembler. In the following examples, we will be using gdb as a disassembler to perform a static analysis of our code. Gdb has many commands, but for our purposes there are just a few we will be using:


Command Example Explanation
file file helloworld Open the specified program in gdb. The program name can also be specified on the command line when starting gdb ($gdb helloworld).
disassemble  disassemble main Disassemble the specified function in the program.Gdb will display the function's assembly instructions on screen.
x x/20s 0x80403001 Examine the contents of 20 addresses as strings starting at memory address 0x80403001. If you want to view the contents in hexadecimal, replace the 's' with an 'x'.


Hello World

We will first use gdb to analyze a binary compiled from the following source code:


int main(int argc, char *argv[])
{
printf("Hello World!\n");
return 0;
}

Save this program as helloworld.c and compile it with 'gcc -o helloworld helloworld.c'; run the resulting binary and it should print "Hello World!" on the screen and exit. So far so good, now let's take a look at the assembly code:

heff@TPad:~/Programming$ gdb helloworld
GNU gdb 6.3-debian
Copyright 2004 Free Software Foundation, Inc.
GDB is free software, covered by the GNU General Public License, and you are
welcome to change it and/or distribute copies of it under certain conditions.
Type "show copying" to see the conditions.
There is absolutely no warranty for GDB. Type "show warranty" for details.
This GDB was configured as "i386-linux"...Using host libthread_db library "/lib/libthread_db.so.1".
(gdb) disassemble main
Dump of assembler code for function main:
0x08048384 <main+0>: push %ebp
0x08048385 <main+1>: mov %esp,%ebp
0x08048387 <main+3>: sub $0x8,%esp
0x0804838a <main+6>: and $0xfffffff0,%esp
0x0804838d <main+9>: mov $0x0,%eax
0x08048392 <main+14>: sub %eax,%esp
0x08048394 <main+16>: movl $0x80484c4,(%esp)
0x0804839b <main+23>: call 0x80482b0 <_init+56>
0x080483a0 <main+28>: mov $0x0,%eax
0x080483a5 <main+33>: leave
0x080483a6 <main+34>: ret
End of assembler dump.

Let's look at each instruction, keeping in mind that this disassembly is in the AT&T syntax (source on the left, destination on the right):

0x08048384 <main+0>: push %ebp
0x08048385 <main+1>: mov %esp,%ebp
0x08048387 <main+3>: sub $0x8,%esp

These three instructions should be familiar; they are the function's prologue. The ' push %ebp' instruction saves the current EBP value onto the stack; ' mov %esp,%ebp' creates the new EBP value by copying ESP into EBP; then eight bytes of space is created on the stack for local variables using the 'sub $0x8,%esp' instruction.

0x0804838a <main+6>: and $0xfffffff0,%esp
0x0804838d <main+9>: mov $0x0,%eax
0x08048392 <main+14>: sub %eax,%esp


These three instructions are used to clean up any stray bits and prepare ESP and the stack at the beginning of the program; they are present only in a program's main() function, but not any subsequent functions. The first command zeros out the last byte of the value in ESP; the next two commands put the value 0 into the EAX register, then subtracts the EAX register (aka, zero) from the stack pointer.

0x08048394 <main+16>: movl $0x80484c4,(%esp)

This instruction places the memory address 0x080484c4 onto the stack - the compiler just chose to use a different way of placing the memory address onto the stack than the standard push instruction. Note the parenthesis around %esp - this indicates a pointer. So, the mov command (AT&T syntax always uses 'movl' instead of 'mov', but they are the same instructions) is actually placing the memory address into the address pointed to by the ESP register, not directly into the ESP register itself. Perhaps you noticed that in the prologue, eight bytes were reserved on the stack for local variables, even though no variables are defined in our source code. That was necessary in order to place the memory address on the stack in this manner. If those eight bytes had not been allocated, ESP would still be pointing to the same place as EBP, and the saved EBP value would be been overwritten with the 0x080484c4 address (why the compiler uses this instead of a push instruction I don't know - that's up to the gcc developers  :).

0x0804839b <main+23>: call 0x80482b0 <_init+56>

This is a call to a function at the address 0x08482b0. Since we have only one function that is called from our code, this must be the call to printf(). There was a push instruction (or the equivalent thereof) immediately before calling printf(), so that push must have placed an argument for printf() onto the stack. Our call to printf() only has one argument: the string to print. This can be double checked by examining the contents of 0x080484c4 (the address pushed onto the stack) by issuing the command:

(gdb)x/s 0x08048384
0x8048384 <_IO_stdin_used+4>: "Hello World!\n"
(gdb)

So, this is indeed our call to printf(), and our single argument, the "Hello World!\n" string, wasappropriately placed on the stack just before it was called.

0x080483a0 <main+28>: mov $0x0,%eax

Remember that the EAX register holds any value that is returned by a function, and our main() function returns zero. So this instruction is placing the value 0 into EAX in preparation for a return.

0x080483a5 <main+33>: leave

The leave instruction cleans up the stack by removing all local variables from the stack and popping the saved EBP value off the stack into the EBP register, restoring it to its original value.

0x080483a6 <main+34>: ret

The ret instruction pops the top value off of the stack and places it into the EIP register. Since all data through he saved EBP value has been removed by the leave instruction, the top most piece of data on the stack is the saved EIP value; thus, the leave and ret instructions enable the function to properly return. Since these last three instructions (main+28 through main+34) prepare the function to return and clean up data placed on the stack by the prologue, they are known as the function's epilogue.

Here is the same disassembly, but this time printed in the Intel syntax, and commented for an easier feel of how the program flows:


0x8048384 push ebp <--- Save the EBP value on the stack
0x8048385 mov ebp,esp <--- Create a new EBP value for this function
0x8048387 sub esp,0x8 <---Allocate 8 bytes on the stack for local variables
0x804838a and esp,0xfffffff0 <---Clear the last byte of the ESP register
0x804838d mov eax,0x0 <---Place a zero in the EAX register
0x8048392 sub esp,eax <---Subtract EAX (0) from the value in ESP
0x8048394 mov DWORD PTR [esp],0x80484c4 <---Place our argument for the printf() (at address 0x08048384) onto the stack
0x804839b call 0x80482b0 <_init+56> <---Call printf()
0x80483a0 mov eax,0x0 <---Put our return value (0) into EAX
0x80483a5 leave <---Clean up the local variables and restore the EBP value
0x80483a6 ret <---Pop the saved EIP value back into the EIP register

As you can see, they are all the same instructions, just formatted a little differently; note also how the Intel syntax indicates a pointer reference as opposed to the AT&T syntax.

Disassembling Without The Source

Next, we will examine a program for which we have no source code, called helloworld2. We will attempt to reconstruct the original source code as closely as possible, and to understand how the
program operates. Let's start out by running the program to see what it does:

$./helloworld2
Hello World!
$

So far, it appears no different than our first program. We know that it prints out a string to stdout, so it probably uses the printf() function. If we are disassembling this in Linux, we can use the strings command to look for the "Hello World!" string and anything else that may be interesting:

$strings helloworld2
/lib/ld-linux.so.2
_Jv_RegisterClasses
__gmon_start__
libc.so.6
printf
_IO_stdin_used
__libc_start_main
GLIBC_2.0
PTRh@
[^_]
Hello World!
Goodbye World!

We see our "Hello World!" string, but there is also a "printf" string (indicating that the program does indeed use printf), and another interesting string, "Goodbye World!". Now, let's look at the main() function in gdb:

(gdb) disassemble main
Dump of assembler code for function main:
0x080483af <main+0>: push %ebp
0x080483b0 <main+1>: mov %esp,%ebp
0x080483b2 <main+3>: sub $0x8,%esp
0x080483b5 <main+6>: and $0xfffffff0,%esp
0x080483b8 <main+9>: mov $0x0,%eax
0x080483bd <main+14>: sub %eax,%esp
0x080483bf <main+16>: movl $0x1,0x804961c
0x080483c9 <main+26>: call 0x8048384 <myprint>
0x080483ce <main+31>: mov $0x0,%eax
0x080483d3 <main+36>: leave
0x080483d4 <main+37>: ret

Here we see the same prologue as before between main+0 and main+14. However, at main+16 we see that the number 1 is being moved into the memory address at 0x0804961c. This memory address is referenced directly, not as an offset from EBP, indicating that it is a global, not local, variable. Since the number 1 is being moved into it, it is safe to assume that this is an integer variable as well; we will call it var1. Next is a call to a function named 'myprint', which takes no arguments. Immediately afterwards we see the epilogue where 0 is moved into EAX, and leave and ret are called. So we now know that the main function simply sets a global integer variable to 1, calls a second function, then returns zero. We can reconstruct the main() function's source code to read:

int var1; /* The global integer variable */

int main()

{
    var1 = 1;
    myprint();
    return 0;
}

Next, let's examine the myprint() function:

(gdb) disassemble myprint
Dump of assembler code for function myprint:
0x08048384 <myprint+0>: push %ebp
0x08048385 <myprint+1>: mov %esp,%ebp
0x08048387 <myprint+3>: sub $0x8,%esp
0x0804838a <myprint+6>: cmpl $0x1,0x804961c
0x08048391 <myprint+13>:jne 0x80483a1 <myprint+29>
0x08048393 <myprint+15>:movl $0x80484f4,(%esp)
0x0804839a <myprint+22>:call 0x80482b0 <_init+56>
0x0804839f <myprint+27>:jmp 0x80483ad <myprint+41>
0x080483a1 <myprint+29>:movl $0x8048502,(%esp)
0x080483a8 <myprint+36>:call 0x80482b0 <_init+56>
0x080483ad <myprint+41>:leave
0x080483ae <myprint+42>:ret

We see that after the prologue, at myprint+6, there is a comparison operation. It is comparing the value stored in 0x0804961c (var1, the global variable we saw in the main() function) with the number 1. Immediately afterwards is a jne instruction. So, if var1 is not equal to 1, the the program will jump down to myprint+29, but if it is equal to 1 (which we know it is, because it was set to 1 in the main() function), it will execute the next instruction at myprint+15. Since we know that the jump will not be taken, let's look at what happens at myprint+15.

Myprint+15 pushes the memory address of 0x080484f4 onto the stack (again, using the mov instruction instead of push, but achieving the same end result), then calls a function that is located at 0x080482b0. This means that the function at 0x080482b0 is passed one argument; let's take a look at what that argument is by examining what is stored at the address 0x080484f4:

(gdb)x/s 0x080484f4
0x80484f4 <_IO_stdin_used+4>: "Hello World!\n"

This is our "Hello World!" string, and since we know that printf() is being used to print it to stdout, then the function at 0x080482b0 must be printf(). After the call to printf(), the program jumps down to myprint+41, which begins the function's epilogue. Since no value is placed in EAX before returning, and we know that the main() function does not examine EAX or place it anywhere in memory after calling the myprint() function, we can surmise that this function doesn't return a value.

But let's now look at what would happen if var1, for some reason, did not equal one. The jne instruction specifies that the program would jump down to myprint+29, which places a memory address (0x08048502) onto the stack in the same manner as before, then calls a function at 0x080482b0 - the printf() function. This means that either way printf() is called, it is just provided with a different argument. Taking a look at the contents of 0x08048502, we see that this alternate argument is the "Goodbye World!" string that we saw with the strings command earlier:


(gdb)x/s 0x08048502
0x08048502 <_IO_stdin_used+18>:"Goodbye World!\n"

We now know enough about the myprint() function to reconstruct its original source code as well:

void myprint()
{
    if(var1 == 1){
        printf("Hello World!\n");
    } else {
        printf("Goodbye World!\n");
    }
}

While there is no real purpose of the if-else statement (since var1 will always be equal to zero), I wanted to include it in order to show what a conditional statement looked like in assembly code. It is very important that you are able to recognize and understand conditional statements in assembly, as more complex comparisons (such as long case/switch statements) will be more difficult to follow.

Conclusion


This paper covered necessary background information and provided some simplistic examples in order to introduce the basic concepts of RCE. You should now have a good grasp of how to read and interpret disassembled code, identify variables and functions, and translate the assembly code back into a high-level language. In most cases however, you will be working with larger programs that are muchmore difficult to analyze; you may also be only interested in a particular part of the program, or you may want to examine all instances of a specific function. In the next paper, we will introduce some new tools and debugging techniques, as well as cover some more advanced RCE methods in order to deal with such situations.

References

Wikipedia: http://en.wikipedia.org/wiki/Reverse_engineering

Exploiting Software: http://www.informit.com/articles/article.asp?p=353553&seqNum=2&rl=1

AT&T vs Intel - http://www.gnu.org/software/binutils/manual/gas-2.9.1/html_chapter/as_16.html

Dev-C++ - http://bloodshed.net/devcpp.html

'Hacking' 카테고리의 다른 글

W32DASM Disassembler  (0) 2009.01.24
Intro to Reverse Engineering-Part 2  (0) 2009.01.24
ASProtect 1.23 RC4 - 1.3.08.24  (1) 2009.01.24
Gunz Original Files  (0) 2009.01.20
Common Hacking Tools  (0) 2009.01.20
Posted by CEOinIRVINE
l

############################################

stolen bytes가 있는 버전에 대한 해법입니다.

############################################


대상 : 입문용+

타겟 : Web Stream Recorder v1.0 Beta 3 (http://www.sytexis.com/) or here

도구 : Soft-Ice 4.05 B334

       Ice-Dump

       Pe-Editor 1.7

       ImportRec & Revergine 1.6 final

       Hiew 6.x (핵스 에디터)

환경 : Win 98 SE


 이번에 살펴볼 것은 ASProtect 1.23 RC4 - 1.3.08.24 입니다. 가장 최근 버전이죠. 이 버전의 가장 큰 어려움은 stolen bytes 를 찾는 것입니다. 사실 stolen bytes 는 예전 copywrite님이 올리신 '새로운 형태의 Asprotect' 라는 글에서 예견되었던 것입니다. 다만 그 문서의 타겟이 되었던 프로그램의 경우 stolen bytes 가 지워지지 않아, iceDump 의 LastBranch를 통해 찾아갈 수 있었습니다. 하지만 지금의 경우는 조금 다릅니다. 즉 stolen bytes가 OEP로 점프된 이후에는 junk code 들로 인해 코드가 변경되기 때문에 알 수가 없습니다. 그럼 이제 stolen bytes 에 대해 알아보죠.


원래 프로그램은 통상,
 

55              PUSH EBP
8BEC            MOV EBP,ESP
6AFF            PUSH FFFFFFFF
6800000000      PUSH 00000000  ; needs updating
some codes.........


 이런식으로 시작됩니다. 그런데 asprotect의 경우 이러한 시작부분을 미리 실행시킨 후 some codes 부분으로 바로 점프해옵니다. 또한 위 코드 중 push 00000000 부분에서 00000000 는 프로그램마다 다른 값이 들어가므로, 이것을 아는 것이 중요합니다. 즉 stolen bytes를 모른체로 덤프를 해봤자 소용이 없음을 뜻하죠. 또한 사실 새로운 형태의 asprotect의 경우에도 이러한 stolen bytes만 밝혀내면 예전과 동일한 방식으로 언팩킹이 가능합니다. 그럼 실제적인 작업을 시작해보죠.


1. 우선은 OEP를 찾아야 합니다. 이 OEP는 기존의 방법대로 /tracex를 이용해서 찾을 수 있습니다. 다만 새로운 버전의 경우 auto tracer trick(ATT)가 여러번 있어, 여러번 리턴을 해줘야 하는 번거로움이 있습니다. 이 ATT라는 것은 사실 별 문제가 되지 않습니다. 그것들의 루틴을 살펴보면, 바로 리턴되는 것이 특징이죠. 귀찮을 뿐이지 문제가 되진 않습니다. 하지만 /tracex를 사용할 경우 시간이 오래 걸립니다. 언팩킹에서 이러한 작업은 상당히 지루한 것이죠. 특히나 다시 덤프해야 할 때 정말 짜증납니다.

그래서 우린 copywrite 님의 빠른 OEP 접근법을 사용할 겁니다. 자 시작해보죠. 우선 다음과 같이 중단점을 설정하고,

bpx createfilea do "dd esp+38"

그리고 나서 프로그램을 실행시킨 후 데이터 윈도창의 주소가 asprotect 루틴이 나올 때까지 F5를 눌러줍시다. 그러고 나면,


EAX=0068FCE9   EBX=0003676B   ECX=01015E18   EDX=0003676B   ESI=0003676B        

EDI=FFFFFFFF   EBP=0068FCC0   ESP=0068FC80   EIP=BFF77B5B   o d I S z a P c     

CS=016F   DS=0177   SS=0177   ES=0177   FS=34CF   GS=0000                       

--------------------------------------------------dword-------------PROT---(0)--

0177:0068FCB8 01015E18  01003CBB  0068FDF4  01003D6A      .^...<....h.j=..      

0177:0068FCC8 000015A6  0068FF68  01003F4B  0068FDF4      ....h.h.K?....h.      

0177:0068FCD8 00FF0000  00FD0000  01004138  00000000      ........8A......      

0177:0068FCE8 5C3A4390  474F5250  204D4152  454C4946      .C:\PROGRAM FILE      

0177:0068FCF8 59535C53  49584554  4F532053  41575446      S\SYTEXIS SOFTWA      

0177:0068FD08 575C4552  53204245  41455254  4552204D      RE\WEB STREAM RE      

0177:0068FD18 44524F43  575C5245  43455253  4544524F      CORDER\WSRECORDE      

-----KERNEL32!GetFullPathNameA+0046--------------------------------------PROT32-

016F:BFF77B56  E94C500000          JMP       BFF7CBA7                           

KERNEL32!CreateFileA                                                            

016F:BFF77B5B  57                  PUSH      EDI                                

016F:BFF77B5C  6827010000          PUSH      00000127                           

016F:BFF77B61  2BD2                SUB       EDX,EDX                            

016F:BFF77B63  684320FABF          PUSH      BFFA2043                           

016F:BFF77B68  64FF32              PUSH      DWORD PTR FS:[EDX]                 

016F:BFF77B6B  648922              MOV       FS:[EDX],ESP                       

016F:BFF77B6E  8B7C2414            MOV       EDI,[ESP+14]                       

016F:BFF77B72  2BC0                SUB       EAX,EAX                            

016F:BFF77B74  8D48FF              LEA       ECX,[EAX-01]                       

016F:BFF77B77  F2AE                REPNZ SCASB                                  

016F:BFF77B79  8B4C2420            MOV       ECX,[ESP+20]                       

016F:BFF77B7D  E305                JECXZ     BFF77B84                           

016F:BFF77B7F  8A01                MOV       AL,[ECX]                           

016F:BFF77B81  8A410B              MOV       AL,[ECX+0B]                        

016F:BFF77B84  648F02              POP       DWORD PTR FS:[EDX]                 

016F:BFF77B87  83C408              ADD       ESP,08                             

016F:BFF77B8A  5F                  POP       EDI                                

016F:BFF77B8B  E978790000          JMP       BFF7F508                           

KERNEL32!SetFileAttributesA                                                     

016F:BFF77B90  2BD2                SUB       EDX,EDX                            

016F:BFF77B92  68EB1FFABF          PUSH      BFFA1FEB                           

016F:BFF77B97  64FF32              PUSH      DWORD PTR FS:[EDX]                 

016F:BFF77B9A  648922              MOV       FS:[EDX],ESP                       

016F:BFF77B9D  8B4C240C            MOV       ECX,[ESP+0C]                       

016F:BFF77BA1  E302                JECXZ     BFF77BA5                           

------------------------------------KERNEL32!_FREQASM+6B56----------------------

WINICE: Load32  Obj=0001 Add=016F:BFE11000 Len=0000A000 Mod=IMM32               

WINICE: Load32  Obj=0002 Add=0177:BFE1B000 Len=00001000 Mod=IMM32               

WINICE: Load32  Obj=0003 Add=0177:BFE1C000 Len=00001000 Mod=IMM32               

WINICE: Load32  Obj=0004 Add=0177:BFE1D000 Len=00005000 Mod=IMM32               

WINICE: Load32  Obj=0005 Add=0177:BFE22000 Len=00001000 Mod=IMM32               

Break due to BPX KERNEL32!CreateFileA  DO "dd esp+38"                           

Break due to BPX KERNEL32!CreateFileA  DO "dd esp+38"                           

:/screendump c:\dump\wsr_1.txt                                                  


Invalid command                                                         Wsrecord


그리고 나서 데이터 창에 나타난 주소가 실행되는 순간을 잡아봅시다. 그전에 다른 중단점은 모두 지워 버리구요.

bpr 1015E18 1015E18+2 rw if eip==1015E18 do "d esp"

그리고 다시 F5 하고 데이터 창을 봅시다. 그러면 400000 이라는 값이 들어가 있을 겁니다.


EAX=00444886   EBX=01004138   ECX=01019A1C   EDX=0068FF68   ESI=00FD0000        

EDI=00FF0000   EBP=0068FE08   ESP=0068FDD8   EIP=01015E18   o d I s Z a P c     

CS=016F   DS=0177   SS=0177   ES=0177   FS=34CF   GS=0000                       

--------------------------------------------------dword-------------PROT---(0)--

0177:0068FDD8 00400000  D58A0195  0068FE1C  00FF0000      ..@.......h.....      

0177:0068FDE8 00FD0000  01004138  01019A1C  01015E18      ....8A.......^..      

0177:0068FDF8 00400000  00444886  D58A0195  0068FE1C      ..@..HD.......h.      

0177:0068FE08 0068FE10  01003A48  00444476  00000000      ..h.H:..vDD.....      

0177:0068FE18 0044486E  00000000  8193BC10  0068FF78      nHD.........x.h.      

0177:0068FE28 0068FE3C  00580000  8193BC70  8193BC30      <.h...X.p...0...      

0177:0068FE38 00401000  BFF8B6E6  00000000  8193BC10      ..@.............      

-------------------------------------------------------------------------PROT32-

016F:01015E18  E80D000000          CALL      01015E2A                           

016F:01015E1D  91                  XCHG      EAX,ECX                            

016F:01015E1E  F6F7                DIV       BH                                 

016F:01015E20  64CD82              INT       82                                 

016F:01015E23  93                  XCHG      EAX,EBX                            

016F:01015E24  D0C9                ROR       CL,1                               

016F:01015E26  CE                  INTO                                         

016F:01015E27  EF                  OUT       DX,EAX                             

016F:01015E28  FC                  CLD                                          

016F:01015E29  858BD858E80C        TEST      [EBX+0CE858D8],ECX                 

016F:01015E2F  0000                ADD       [EAX],AL                           

016F:01015E31  00943D32830039      ADD       [EDI+EBP+39008332],DL              

016F:01015E38  7EDF                JLE       01015E19                           

016F:01015E3A  2CF5                SUB       AL,F5                              

016F:01015E3C  8AFB                MOV       BH,BL                              

016F:01015E3E  6856173319          PUSH      19331756                           

016F:01015E43  58                  POP       EAX                                

016F:01015E44  5A                  POP       EDX                                

016F:01015E45  0FBFF9              MOVSX     EDI,CX                             

016F:01015E48  81C288150000        ADD       EDX,00001588                       

016F:01015E4E  66BF9238            MOV       DI,3892                            

016F:01015E52  682B050000          PUSH      0000052B                           

016F:01015E57  81EBD5D3A77B        SUB       EBX,7BA7D3D5                       

016F:01015E5D  5E                  POP       ESI                                

016F:01015E5E  0F8912000000        JNS       01015E76                           

016F:01015E64  0F890C000000        JNS       01015E76                           

016F:01015E6A  E907000000          JMP       01015E76                           

--------------------------------------------------------------------------------

Break due to BPX KERNEL32!CreateFileA  DO "dd esp+38"                           

Break due to BPX KERNEL32!CreateFileA  DO "dd esp+38"                           

:/screendump c:\dump\wsr_1.txt                                                  

:bc *                                                                           

:bpr 1015e18 1015e18+2 rw if eip==1015e18                                       

Break due to BPR #0177:01015E18 #0177:01015E1A RW IF (EIP==0x1015E18)           

:d esp                                                                          

:/screendump c:\dump\wsr_2.txt                                                  


Invalid command                                                         Wsrecord


그리고 나서,

bpm esp

다시 F5 하면 ,


EAX=5A007EB5   EBX=00400000   ECX=4605585B   EDX=01015F0E   ESI=00000000        

EDI=4605585B   EBP=0068FE08   ESP=0068FDDC   EIP=01015F13   o d I s z A p c     

CS=016F   DS=0177   SS=0177   ES=0177   FS=34CF   GS=0000                       

--------------------------------------------------dword-------------PROT---(0)--

0177:0068FDD8 00400000  D58A0195  0068FE1C  00FF0000      ..@.......h.....      

0177:0068FDE8 00FD0000  01004138  01019A1C  01015E18      ....8A.......^..      

0177:0068FDF8 00400000  00444886  D58A0195  0068FE1C      ..@..HD.......h.      

0177:0068FE08 0068FE10  01003A48  00444476  00000000      ..h.H:..vDD.....      

0177:0068FE18 0044486E  00000000  8193BC10  0068FF78      nHD.........x.h.      

0177:0068FE28 0068FE3C  00580000  8193BC70  8193BC30      <.h...X.p...0...      

0177:0068FE38 00401000  BFF8B6E6  00000000  8193BC10      ..@.............      

-------------------------------------------------------------------------PROT32-

016F:01015F12  5B                  POP       EBX                                

016F:01015F13  58                  POP       EAX                                

016F:01015F14  05469F54A7          ADD       EAX,A7549F46                       

016F:01015F19  5C                  POP       ESP                                

016F:01015F1A  EB44                JMP       01015F60                           

016F:01015F1C  EB01                JMP       01015F1F                           

016F:01015F1E  9A51579CFCBF00      CALL      00BF:FC9C5751                      

016F:01015F25  0000                ADD       [EAX],AL                           

016F:01015F27  00B900000000        ADD       [ECX+00000000],BH                  

016F:01015F2D  F3AA                REPZ STOSB                                   

016F:01015F2F  9D                  POPFD                                        

016F:01015F30  5F                  POP       EDI                                

016F:01015F31  59                  POP       ECX                                

016F:01015F32  C3                  RET                                          

016F:01015F33  55                  PUSH      EBP                                

016F:01015F34  8BEC                MOV       EBP,ESP                            

016F:01015F36  53                  PUSH      EBX                                

016F:01015F37  56                  PUSH      ESI                                

016F:01015F38  8B750C              MOV       ESI,[EBP+0C]                       

016F:01015F3B  8B5D08              MOV       EBX,[EBP+08]                       

016F:01015F3E  EB11                JMP       01015F51                           

016F:01015F40  0FB703              MOVZX     EAX,WORD PTR [EBX]                 

016F:01015F43  03C6                ADD       EAX,ESI                            

016F:01015F45  83C302              ADD       EBX,02                             

016F:01015F48  8BD0                MOV       EDX,EAX                            

016F:01015F4A  8BC6                MOV       EAX,ESI                            

016F:01015F4C  E80C000000          CALL      01015F5D                           

--------------------------------------------------------------------------------

:/screendump c:\dump\wsr_2.txt                                                  

:bl                                                                             

00)   BPR #0177:01015E18 #0177:01015E1A RW IF (EIP==0x1015E18)                  

:bc *                                                                           

:bpm esp                                                                        

Break due to BPMB #0177:0068FDD8 RW DR3                                         

:bc *                                                                           

:/screendump c:\dump\wsr_3.txt                                                  


Invalid command                                                         Wsrecord


여기에 중단점이 걸립니다.

여기서 바로 OEP로 가시려면 무수한 00 가 나올 때까지 코드창을 밑으로 내려봅시다. 그러면 아마도,


push 00000000

ret    

0000

0000

0000

.......


이런식으로 나올 겁니다. 그러면 push 00000000 에 중단점을 걸고 넘어가시면 되겠습니다. 하지만 우리의 경우 stolen bytes를 찾아야 하므로 F8을 눌러 진행합시다. 그러면 아래의 루틴이 나올건데요.


EAX=01016212   EBX=01017418   ECX=01016212   EDX=010162A4   ESI=01016212        

EDI=4605585B   EBP=0068FE0C   ESP=0068FE04   EIP=01016194   o d I s z a P c     

CS=016F   DS=0177   SS=0177   ES=0177   FS=4297   GS=0000   DS:01017418=009C    

--------------------------------------------------dword-------------PROT---(0)--

0177:0068FDD8 00400000  D58A0195  0068FE1C  00FF0000      ..@.......h.....      

0177:0068FDE8 00FD0000  01004138  01019A1C  0101606C      ....8A......l`..      

0177:0068FDF8 00400000  00444886  010161A5  00000000      ..@..HD..a......      

0177:0068FE08 00000323  00B5807E  01016211  01017412      #...~....b...t..      

0177:0068FE18 01016212  00000000  8193A3A0  0068FF78      .b..........x.h.      

0177:0068FE28 0068FE3C  00580000  8193A400  8193A3C0      <.h...X.........      

0177:0068FE38 00401000  BFF8B6E6  00000000  8193A3A0      ..@.............      

-------------------------------------------------------------------------PROT32-

016F:01016186  C3                  RET                                          

016F:01016187  55                  PUSH      EBP                                

016F:01016188  8BEC                MOV       EBP,ESP                            

016F:0101618A  53                  PUSH      EBX                                

016F:0101618B  56                  PUSH      ESI                                

016F:0101618C  8B750C              MOV       ESI,[EBP+0C]                       

016F:0101618F  8B5D08              MOV       EBX,[EBP+08]                       

016F:01016192  EB11                JMP       010161A5                           

016F:01016194  0FB703              MOVZX     EAX,WORD PTR [EBX]                 

016F:01016197  03C6                ADD       EAX,ESI                            

016F:01016199  83C302              ADD       EBX,02                             

016F:0101619C  8BD0                MOV       EDX,EAX                            

016F:0101619E  8BC6                MOV       EAX,ESI                            

016F:010161A0  E80C000000          CALL      010161B1                           

016F:010161A5  66833B00            CMP       WORD PTR [EBX],00                  

016F:010161A9  75E9                JNZ       01016194                           

016F:010161AB  5E                  POP       ESI                                

016F:010161AC  5B                  POP       EBX                                

016F:010161AD  5D                  POP       EBP                                

016F:010161AE  C20800              RET       0008                               

016F:010161B1  0102                ADD       [EDX],EAX                          

016F:010161B3  C3                  RET                                          

016F:010161B4  03C3                ADD       EAX,EBX                            

016F:010161B6  BB23030000          MOV       EBX,00000323                       

016F:010161BB  0BDB                OR        EBX,EBX                            

016F:010161BD  7507                JNZ       010161C6                           

016F:010161BF  8944241C            MOV       [ESP+1C],EAX                       

--------------------------------------------------------------------------------

:/screendump c:\dump\wsr_2.txt                                                  

:bc *                                                                           

:bpm esp                                                                        

Break due to BPMB #0177:0068FDD8 RW DR3                                         

:bc *                                                                           

:/screendump c:\dump\wsr_3.txt                                                  

:bl                                                                             

:/screendump c:\dump\wsr_4.txt                                                  


Invalid command                                                         Wsrecord


저기서 jnz 다음의 명령에 브뽀를 걸어 반복루틴을 벗어납니다. 그리고 리턴후 도착해서 몇 번의 스텝인을 하다보면,


EAX=0101600A   EBX=00580000   ECX=8193BC30   EDX=8193BC70   ESI=8193BC10        

EDI=00000000   EBP=0068FF78   ESP=0068FE38   EIP=0101601E   o d I s z a P c     

CS=016F   DS=0177   SS=0177   ES=0177   FS=34CF   GS=0000                       

--------------------------------------------------dword-------------PROT---(0)--

0177:0068FDD8 00400000  D58A0195  0068FE1C  00FF0000      ..@.......h.....      

0177:0068FDE8 00FD0000  01004138  01019A1C  01015E18      ....8A.......^..      

0177:0068FDF8 00400000  00444886  01015F51  00000000      ..@..HD.Q_......      

0177:0068FE08 00000323  00B57E2A  01015FBD  010171BE      #...*~..._...q..      

0177:0068FE18 01015FBE  00000000  8193BC10  0068FF78      ._..........x.h.      

0177:0068FE28 0068FE3C  00580000  8193BC70  0101600A      <.h...X.p....`..      

0177:0068FE38 00401000  BFF8B6E6  00000000  8193BC10      ..@.............      

-------------------------------------------------------------------------PROT32-

016F:0101601E  EB01                JMP       01016021                (JUMP )    

016F:01016020  9A8D83D86F4883      CALL      8348:6FD8838D                      

016F:01016027  2EEB01              JMP       0101602B                           

016F:0101602A  0F81E888DA50        JNO       51DBE918                           

016F:01016030  CC                  INT       3                                  

016F:01016031  58                  POP       EAX                                

016F:01016032  6A60                PUSH      60                                 

016F:01016034  6830694200          PUSH      00426930                           

016F:01016039  2EEB01              JMP       0101603D                           

016F:0101603C  9A2EEB02CD2057      CALL      5720:CD02EB2E                      

016F:01016043  EB08                JMP       0101604D                           

016F:01016045  C9                  LEAVE                                        

016F:01016046  1F                  POP       DS                                 

016F:01016047  0D0BC91F0D          OR        EAX,0D1FC90B                       

016F:0101604C  0B6681              OR        ESP,[ESI-7F]                       

016F:0101604F  2D56600101          SUB       EAX,01016056                       

016F:01016054  DF8B                ESC                                          

016F:01016056  CA8D9A              RETF      9A8D                               

016F:01016059  6845600101          PUSH      01016045                           

016F:0101605E  5F                  POP       EDI                                

016F:0101605F  26EB01              JMP       01016063                           

016F:01016062  F083EC21            LOCK SUB  ESP,21                             

016F:01016066  EB02                JMP       0101606A                           

016F:01016068  CD20                INT       20 VXDCall 1D24,648D               

016F:0101606E  F2EB01              REPNZ JMP 01016072                           

016F:01016071  F289442400          REPNZ MOV [ESP+00],EAX                       

016F:01016076  EB01                JMP       01016079                           

--------------------------------------------------------------------------------

:bpm esp                                                                        

Break due to BPMB #0177:0068FDD8 RW DR3                                         

:bc *                                                                           

:/screendump c:\dump\wsr_3.txt                                                  

Break due to BPX #016F:01015F57                                                 

:bc *                                                                           

:.                                                                              

:/screendump c:\dump\wsr_stolen.txt                                             


Invalid command                                                         Wsrecord


위처럼 stolen bytes를 발견하게 됩니다. 이 값들을 잘 적어둡시다. 사실 이러한 stolen bytes를 발견하는 것은 코드하나하나를 집중해서 바라보아야 합니다. 그리고 나서 OEP로 가는 도중엔 다음과 같은 루틴이 존재하게 됩니다.


EAX=00401000   EBX=00580000   ECX=8193BC30   EDX=8193BC70   ESI=8193BC10        

EDI=00000000   EBP=0068FF78   ESP=0068FE34   EIP=01016191   o d I s z a p c     

CS=016F   DS=0177   SS=0177   ES=0177   FS=34CF   GS=0000   DS:01016049=0040BE15

--------------------------------------------------dword-------------PROT---(0)--

0177:0068FDD8 00400000  D58A0195  0068FE1C  00FF0000      ..@.......h.....      

0177:0068FDE8 00FD0000  01004138  01019A1C  01015E18      ....8A.......^..      

0177:0068FDF8 00400000  00444886  01015F51  00000000      ..@..HD.Q_......      

0177:0068FE08 00000323  00B57E2A  B62FE226  00580000      #...*~..&./...X.      

0177:0068FE18 01016045  8193BC70  8193BC30  8193BC10      E`..p...0.......      

0177:0068FE28 0040BE15  00401000  00000000  00426930      ..@...@.....0iB.      

0177:0068FE38 00000060  BFF8B6E6  00000000  8193BC10      `...............      

-------------------------------------------------------------------------PROT32-

016F:01016188  8F442700            POP       DWORD PTR [EDI+00]                 

016F:0101618C  58                  POP       EAX                                

016F:0101618D  5F                  POP       EDI                                

016F:0101618E  EB01                JMP       01016191                           

016F:01016190  E8FF354960          CALL      614A9794                           

016F:01016191  FF3549600101        PUSH      DWORD PTR [01016049]               

016F:01016197  685C384100          PUSH      0041385C                           

016F:0101619C  64A100000000        MOV       EAX,FS:[00000000]                  

016F:010161A2  2EEB01              JMP       010161A6                           

016F:010161A5  9A8D6424EDF3EB      CALL      EBF3:ED24648D                      

016F:010161AC  02CD                ADD       CL,CH                              

016F:010161AE  208D643C782B        AND       [EBP+2B783C64],CL                  

016F:010161B4  E783                OUT       83,EAX                             

016F:010161B6  EC                  IN        AL,DX                              

016F:010161B7  6966812DC16101      IMUL      ESP,[ESI-7F],0161C12D              

016F:010161BE  01C0                ADD       EAX,EAX                            

016F:010161C0  D1E6                SHL       ESI,1                              

016F:010161C2  BC01F05066          MOV       ESP,6650F001                       

016F:010161C7  8135D061010179FEEB7BXOR       DWORD PTR [010161D0],7BEBFE79      

016F:010161D1  3320                XOR       ESP,[EAX]                          

016F:010161D3  8F442400            POP       DWORD PTR [ESP+00]                 

016F:010161D7  8B442410            MOV       EAX,[ESP+10]                       

016F:010161DB  896C2410            MOV       [ESP+10],EBP                       

016F:010161DF  8D6C2410            LEA       EBP,[ESP+10]                       

016F:010161E3  2BE0                SUB       ESP,EAX                            

016F:010161E5  2EEB01              JMP       010161E9                           

016F:010161E8  9A8D6424EDF3EB      CALL      EBF3:ED24648D                      

--------------------------------------------------------------------------------

:.                                                                              

:.                                                                              

:.                                                                              

:.                                                                              

:.                                                                              

:.                                                                              

:.                                                                              

:/screendump c:\dump\wsr_oep_1.txt                                              


Invalid command                                                         Wsrecord


EAX=0040BE15   EBX=00580000   ECX=8193BC30   EDX=8193BC70   ESI=8193BC10        

EDI=00000000   EBP=0068FE38   ESP=0068FDB8   EIP=010162AD   o d I S z a p C     

CS=016F   DS=0177   SS=0177   ES=0177   FS=34CF   GS=0000                       

--------------------------------------------------dword-------------PROT---(0)--

0177:0068FDB4 01000B37  00000000  00000000  8193BC10      7...............      

0177:0068FDC4 00580000  0068FDD8  01000B4D  19331756      ..X...h.M...V.3.      

0177:0068FDD4 073ED94C  00400000  D58A0195  0068FE1C      L.>...@.......h.      

0177:0068FDE4 00FF0000  00FD0000  01004138  01019A1C      ........8A......      

0177:0068FDF4 01015E18  00400000  00444886  01015F51      .^....@..HD.Q_..      

0177:0068FE04 00000000  00000323  00B57E2A  B62FE226      ....#...*~..&./.      

0177:0068FE14 00580000  01016045  8193BC70  0068FDBC      ..X.E`..p.....h.      

-------------------------------------------------------------------------PROT32-

016F:0101628E  8D6424ED            LEA       ESP,[ESP-13]                       

016F:01016292  F3EB02              REPZ JMP  01016297                           

016F:01016295  CD20                INT       20 VXDCall 783C,648D               

016F:0101629B  2BE7                SUB       ESP,EDI                            

016F:0101629D  83EC69              SUB       ESP,69                             

016F:010162A0  66812DA9620101C0D1  SUB       WORD PTR [010162A9],D1C0           

016F:010162A9  26EB01              JMP       010162AD                           

016F:010162AC  F050                LOCK PUSH EAX                                

016F:010162AD  50                  PUSH      EAX                                

016F:010162AE  668135B862010179FE  XOR       WORD PTR [010162B8],FE79           

016F:010162B7  EB7B                JMP       01016334                           

016F:010162B9  3320                XOR       ESP,[EAX]                          

016F:010162BB  8F442400            POP       DWORD PTR [ESP+00]                 

016F:010162BF  8B45FC              MOV       EAX,[EBP-04]                       

016F:010162C2  C745FCFFFFFFFF      MOV       DWORD PTR [EBP-04],FFFFFFFF        

016F:010162C9  8945F8              MOV       [EBP-08],EAX                       

016F:010162CC  8D45F0              LEA       EAX,[EBP-10]                       

016F:010162CF  64A300000000        MOV       FS:[00000000],EAX                  

016F:010162D5  64EB01              JMP       010162D9                           

016F:010162D8  69EB01696862        IMUL      EBP,EBX,62686901                   

016F:010162DE  D84000              FADD      REAL4 PTR [EAX+00]                 

016F:010162E1  681C5F0101          PUSH      01015F1C                           

016F:010162E6  C3                  RET                                          

016F:010162E7  0000                ADD       [EAX],AL                           

016F:010162E9  0000                ADD       [EAX],AL                           

016F:010162EB  0000                ADD       [EAX],AL                           

016F:010162ED  0000                ADD       [EAX],AL                           

--------------------------------------------------------------------------------

:.                                                                              

:d eax                                                                          

:.                                                                              

:d esp                                                                          

:.                                                                              

:.                                                                              

:.                                                                              

:/screendump c:\dump\wsr_oep_2.txt                                              


Invalid command                                                         Wsrecord


EAX=0068FE28   EBX=00580000   ECX=8193BC30   EDX=8193BC70   ESI=8193BC10        

EDI=00000000   EBP=0068FE38   ESP=0068FDB8   EIP=010162DC   o d I S z a p c     

CS=016F   DS=0177   SS=0177   ES=0177   FS=34CF   GS=0000                       

--------------------------------------------------dword-------------PROT---(0)--

0177:0068FDB4 0040BE15  0040BE15  00000000  8193BC10      ..@...@.........      

0177:0068FDC4 00580000  0068FDD8  01000B4D  19331756      ..X...h.M...V.3.      

0177:0068FDD4 073ED94C  00400000  D58A0195  0068FE1C      L.>...@.......h.      

0177:0068FDE4 00FF0000  00FD0000  01004138  01019A1C      ........8A......      

0177:0068FDF4 01015E18  00400000  00444886  01015F51      .^....@..HD.Q_..      

0177:0068FE04 00000000  00000323  00B57E2A  B62FE226      ....#...*~..&./.      

0177:0068FE14 00580000  01016045  8193BC70  0068FDBC      ..X.E`..p.....h.      

-------------------------------------------------------------------------PROT32-

016F:010162A0  66812DA9620101C0D1  SUB       WORD PTR [010162A9],D1C0           

016F:010162A9  26EB01              JMP       010162AD                           

016F:010162AC  F050                LOCK PUSH EAX                                

016F:010162AE  668135B862010179FE  XOR       WORD PTR [010162B8],FE79           

016F:010162B7  EB02                JMP       010162BB                           

016F:010162B9  CD20                INT       20 VXDCall 0024,448F               

016F:010162BF  8B45FC              MOV       EAX,[EBP-04]                       

016F:010162C2  C745FCFFFFFFFF      MOV       DWORD PTR [EBP-04],FFFFFFFF        

016F:010162C9  8945F8              MOV       [EBP-08],EAX                       

016F:010162CC  8D45F0              LEA       EAX,[EBP-10]                       

016F:010162CF  64A300000000        MOV       FS:[00000000],EAX                  

016F:010162D5  64EB01              JMP       010162D9                           

016F:010162D8  69EB01696862        IMUL      EBP,EBX,62686901                   

016F:010162DC  6862D84000          PUSH      0040D862                           

016F:010162E1  681C5F0101          PUSH      01015F1C                           

016F:010162E6  C3                  RET                                          

016F:010162E7  0000                ADD       [EAX],AL                           

016F:010162E9  0000                ADD       [EAX],AL                           

016F:010162EB  0000                ADD       [EAX],AL                           

016F:010162ED  0000                ADD       [EAX],AL                           

016F:010162EF  0000                ADD       [EAX],AL                           

016F:010162F1  0000                ADD       [EAX],AL                           

016F:010162F3  0000                ADD       [EAX],AL                           

016F:010162F5  0000                ADD       [EAX],AL                           

016F:010162F7  0000                ADD       [EAX],AL                           

016F:010162F9  0000                ADD       [EAX],AL                           

016F:010162FB  0000                ADD       [EAX],AL                           

--------------------------------------------------------------------------------

:d eax                                                                          

:.                                                                              

:d esp                                                                          

:.                                                                              

:.                                                                              

:.                                                                              

:/screendump c:\dump\wsr_oep_2.txt                                              

:/screendump c:\dump\wsr_oep_3.txt                                              


Invalid command                                                         Wsrecord


EAX=0068FE28   EBX=00580000   ECX=8193BC30   EDX=8193BC70   ESI=8193BC10        

EDI=00000000   EBP=0068FE38   ESP=0068FDB8   EIP=0040D862   o d I S z a p c     

CS=016F   DS=0177   SS=0177   ES=0177   FS=34CF   GS=0000                       

--------------------------------------------------dword-------------PROT---(0)--

0177:0068FDB8 0040BE15  00000000  8193BC10  00580000      ..@...........X.      

0177:0068FDC8 0068FDD8  01000B4D  19331756  073ED94C      ..h.M...V.3.L.>.      

0177:0068FDD8 00400000  D58A0195  0068FE1C  00FF0000      ..@.......h.....      

0177:0068FDE8 00FD0000  01004138  01019A1C  01015E18      ....8A.......^..      

0177:0068FDF8 00400000  00444886  01015F51  00000000      ..@..HD.Q_......      

0177:0068FE08 00000323  00B57E2A  B62FE226  00580000      #...*~..&./...X.      

0177:0068FE18 01016045  8193BC70  0068FDBC  0068FF68      E`..p.....h.h.h.      

-------------------------------------------------------------------------PROT32-

016F:0040D85C  64A300000000        MOV       FS:[00000000],EAX                  

016F:0040D862  C3                  RET                                          

016F:0040D863  8B4DF0              MOV       ECX,[EBP-10]                       

016F:0040D866  64890D00000000      MOV       FS:[00000000],ECX                  

016F:0040D86D  59                  POP       ECX                                

016F:0040D86E  5F                  POP       EDI                                

016F:0040D86F  5E                  POP       ESI                                

016F:0040D870  5B                  POP       EBX                                

016F:0040D871  C9                  LEAVE                                        

016F:0040D872  51                  PUSH      ECX                                

016F:0040D873  C3                  RET                                          

016F:0040D874  8B4604              MOV       EAX,[ESI+04]                       

016F:0040D877  85C0                TEST      EAX,EAX                            

016F:0040D879  7444                JZ        0040D8BF                           

016F:0040D87B  8D5008              LEA       EDX,[EAX+08]                       

016F:0040D87E  803A00              CMP       BYTE PTR [EDX],00                  

016F:0040D881  743C                JZ        0040D8BF                           

016F:0040D883  8B4F04              MOV       ECX,[EDI+04]                       

016F:0040D886  3BC1                CMP       EAX,ECX                            

016F:0040D888  7410                JZ        0040D89A                           

016F:0040D88A  83C108              ADD       ECX,08                             

016F:0040D88D  51                  PUSH      ECX                                

016F:0040D88E  52                  PUSH      EDX                                

016F:0040D88F  E8BC0D0000          CALL      0040E650                           

016F:0040D894  85C0                TEST      EAX,EAX                            

016F:0040D896  59                  POP       ECX                                

016F:0040D897  59                  POP       ECX                                

------------------------------------WSRECORDER!+C85C----------------------------

:.                                                                              

:/screendump c:\dump\wsr_oep_2.txt                                              

:/screendump c:\dump\wsr_oep_3.txt                                              

:d esp                                                                          

:.                                                                              

:d esp                                                                          

:d esp                                                                          

:/screendump c:\dump\wsr_oep_4.txt                                              


Invalid command                                                         Wsrecord


EAX=0068FE28   EBX=00580000   ECX=8193BC30   EDX=8193BC70   ESI=8193BC10        

EDI=00000000   EBP=0068FE38   ESP=0068FDBC   EIP=0040BE15   o d I S z a p c     

CS=016F   DS=0177   SS=0177   ES=0177   FS=34CF   GS=0000                       

--------------------------------------------------dword-------------PROT---(0)--

0177:0068FDB8 0040BE15  00000000  8193BC10  00580000      ..@...........X.      

0177:0068FDC8 0068FDD8  01000B4D  19331756  073ED94C      ..h.M...V.3.L.>.      

0177:0068FDD8 00400000  D58A0195  0068FE1C  00FF0000      ..@.......h.....      

0177:0068FDE8 00FD0000  01004138  01019A1C  01015E18      ....8A.......^..      

0177:0068FDF8 00400000  00444886  01015F51  00000000      ..@..HD.Q_......      

0177:0068FE08 00000323  00B57E2A  B62FE226  00580000      #...*~..&./...X.      

0177:0068FE18 01016045  8193BC70  0068FDBC  0068FF68      E`..p.....h.h.h.      

-------------------------------------------------------------------------PROT32-

016F:0040BDFC  68FF000000          PUSH      000000FF                           

016F:0040BE01  E866FCFFFF          CALL      0040BA6C                           

016F:0040BE06  59                  POP       ECX                                

016F:0040BE07  59                  POP       ECX                                

016F:0040BE08  C3                  RET                                          

016F:0040BE09  0000                ADD       [EAX],AL                           

016F:0040BE0B  0000                ADD       [EAX],AL                           

016F:0040BE0D  0000                ADD       [EAX],AL                           

016F:0040BE0F  00E8                ADD       AL,CH                              

016F:0040BE11  131A                ADC       EBX,[EDX]                          

016F:0040BE13  0000                ADD       [EAX],AL                           

016F:0040BE15  BF94000000          MOV       EDI,00000094                       

016F:0040BE1A  8BC7                MOV       EAX,EDI                            

016F:0040BE1C  E8CFF7FFFF          CALL      0040B5F0                           

016F:0040BE21  8965E8              MOV       [EBP-18],ESP                       

016F:0040BE24  8BF4                MOV       ESI,ESP                            

016F:0040BE26  893E                MOV       [ESI],EDI                          

016F:0040BE28  56                  PUSH      ESI                                

016F:0040BE29  FF159C224200        CALL      [0042229C]                         

016F:0040BE2F  8B4E10              MOV       ECX,[ESI+10]                       

016F:0040BE32  890DECFA4200        MOV       [0042FAEC],ECX                     

016F:0040BE38  8B4604              MOV       EAX,[ESI+04]                       

016F:0040BE3B  A3F8FA4200          MOV       [0042FAF8],EAX                     

016F:0040BE40  8B5608              MOV       EDX,[ESI+08]                       

016F:0040BE43  8915FCFA4200        MOV       [0042FAFC],EDX                     

016F:0040BE49  8B760C              MOV       ESI,[ESI+0C]                       

016F:0040BE4C  81E6FF7F0000        AND       ESI,00007FFF                       

------------------------------------WSRECORDER!+ADFC----------------------------

:/screendump c:\dump\wsr_oep_2.txt                                              

:/screendump c:\dump\wsr_oep_3.txt                                              

:d esp                                                                          

:.                                                                              

:d esp                                                                          

:d esp                                                                          

:/screendump c:\dump\wsr_oep_4.txt                                              

:/screendump c:\dump\wsr_oep_5.txt                                              


Invalid command                                                         Wsrecord


바로 위의 부분이 대망의 OEP입니다. 하지만 이곳은 소위 말하는 fake OEP입니다. 따라서 덤프를 하기전에 우리가 실제 OEP로 eip를 옮깁시다.


r eip eip-7


왜 eip-7 인지는 stolen bytes의 수를 세어보면 알 수 있습니다. 따라서 실제 OEP는 40BE15 - 7 = 40BE0E 가 되겠습니다. 덤프를 하실까요!


/dump 400000 58000 c:\dump\wsr_dump.exe


로 하시면 되겠습니다. 그리고 당근 PE editor를 열어 OEP와 색션을 수정해주셔야겠죠. 그리고 중요한 것은 덤프한 파일엔 stolen bytes가 없으므로 직접 심어줘야 한다는 것입니다. 전 Hiew를 사용해서 수정했습니다.


2. 이제 IAT를 복구해봅시다. Import Reconstruct를 가동하시고 OEP를 BE0E에 넣고 IAT search를 하신후, show invalid를 눌러 trace level1, trace asprotect 1.22를 해줍시다. 그러면 아마도 하나의 미해결 임포를 제외하고 다 풀릴 겁니다. 이제 미해결 임포트가 뭔지 봐야겠죠.

faults on 에 명령을 주시고 실행하면 아마 오류가 날겁니다. 그러면 R 키를 누른후, u *esp해서 봅시다. 어디서 오류가 나나요? 아마도 OEP 밑부분의 명령어 중


016F:0040BE29  FF159C224200        CALL      [0042229C]                         


여기에서 에러가 뜰겁니다. 그러면 프로그램을 다시 실행시켜서 저기에 무엇이 있나보죠. [0042229C] = 01010CB0 입니다. 이곳으로 가보시면 아래처럼 나올 겁니다.


EAX=0040BE21   EBX=00580000   ECX=8193BC30   EDX=8193BC70   ESI=0068FD28        

EDI=00000094   EBP=0068FD1C   ESP=0068FD08   EIP=01010CB8   o d I s z a p c     

CS=016F   DS=0177   SS=0177   ES=0177   FS=34CF   GS=0000                       

-----KERNEL32!GetVersionExA+0008------------------dword-------------PROT---(0)--

0177:BFF917B2 8B08758B  009C3D06  0E740000  0000943D      .u...=....t.=...      

0177:BFF917C2 33077400  00F6E9C0  04BF0000  8D000000      .t.3............      

0177:BFF917D2 8950F845  46C7047E  00000A08  0C46C700      E.P.~..F......F.      

0177:BFF917E2 040A08AE  011046C7  68000000  BFF79450      .....F.....hP...      

0177:BFF917F2 00000268  00116880  D3E80001  85FFFDFB      h....h..........      

0177:BFF91802 816675C0  00009C3E  8D287500  7D89FC45      .uf.>....u(.E..}      

0177:BFF91812 F47D8DF4  FF335057  98685757  FFBFF794      ..}.WP3.WWh.....      

-------------------------------------------------------------------------PROT32-

016F:01010CB0  55                  PUSH      EBP                                

016F:01010CB1  8BEC                MOV       EBP,ESP                            

016F:01010CB3  83EC0C              SUB       ESP,0C                             

016F:01010CB6  56                  PUSH      ESI                                

016F:01010CB7  57                  PUSH      EDI                                

016F:01010CB8  E9F50AF8BE          JMP       BFF917B2                (JUMP )    

016F:01010CBD  0000                ADD       [EAX],AL                           

016F:01010CBF  000E                ADD       [ESI],CL                           

016F:01010CC1  0000                ADD       [EAX],AL                           

016F:01010CC3  00E9                ADD       CL,CH                              

016F:01010CC5  C4E4                LES       ESP,ESP                            

016F:01010CC7  F8                  CLC                                          

016F:01010CC8  BE3700000E          MOV       ESI,0E000037                       

016F:01010CCD  0000                ADD       [EAX],AL                           

016F:01010CCF  0055E9              ADD       [EBP-17],DL                        

016F:01010CD2  56                  PUSH      ESI                                

016F:01010CD3  15F7BE0000          ADC       EAX,0000BEF7                       

016F:01010CD8  0E                  PUSH      CS                                 

016F:01010CD9  0000                ADD       [EAX],AL                           

016F:01010CDB  00E9                ADD       CL,CH                              

016F:01010CDD  18D6                SBB       DH,DL                              

016F:01010CDF  F7BE3700000E        IDIV      DWORD PTR [ESI+0E000037]           

016F:01010CE5  0000                ADD       [EAX],AL                           

016F:01010CE7  006808              ADD       [EAX+08],CH                        

016F:01010CEA  44                  INC       ESP                                

016F:01010CEB  F7BFC300000E        IDIV      DWORD PTR [EDI+0E0000C3]           

016F:01010CF1  0000                ADD       [EAX],AL                           

--------------------------------------------------------------------------------

:.                                                                              

:d esp                                                                          

:d esp                                                                          

:/screendump c:\dump\wsr_oep_4.txt                                              

:/screendump c:\dump\wsr_oep_5.txt                                              

:/screendump c:\dump\wsr_api_1.txt                                              

:d bff917b2                                                                     

:/screendump c:\dump\wsr_api_1.txt                                              


Invalid command                                                         Wsrecord


위에서 볼 수 있듯이 BFF917B2 로 점프하는 것을 알 수 있습니다. BFFxxxxx 은 DLL의 영역입니다. 과연 이 주소가 어디에 속하는지 데이터창으로 봅시다. 그랬더니 데이터 창에 GetVersionExA+008 이라고 나옴을 볼 수 있습니다. 위의 녹색부분에 해당하는 코드 수는 정확히 8바이트입니다. 즉 asprotect가 GetVersionExA의 8바이트를 미리 실행하고 해당 함수로 점프를 하는군요. 즉 마치 OEP의 stolen bytes같은 것이지요. 머 어차피 자동으로 복구할 것이므로 상관없습니다. 다시 Import Recontruct를 띄우시고, 해당 미해결 임포트를 더블클릭 후 해당함수를 클릭해 줍시다. 이제 더 이상의 미해결 임포트는 없습니다. 기쁜 마음으로 실행해 보세요. 잘 되죠~~~~


p.s : 임포트 복구는 별다른 문제가 없었기에, 또한 제가 복구하면서 IAT tree를 저장하지 않았기에, 귀찮니즘으로 인해 첨부하지 않습니다. 혹시라도 임포트 복구가 안되는 분 계시면 올려드리도록 하겠습니다.


p.s : 이 자리를 빌어 copywrite 님에게 깊은 감사를 드립니다. 사실 저도 이번에 asprotect의 코드를 일일이 스텝인하면서 혈압이 급상승함을 느낀 적이 한두 번이 아니었습니다. 그 수많은 SEH 트릭에 좌절하며, 소아로 풀어낸다는 것이 불가능할 것으로만 여겼습니다. 하지만 copywrite님의 도움을 받아 이렇게 손쉽게 해내는군요. 예전에 copywrite님이 asprotect에 심취하셔서 같이 루틴을 파해해보자고 했을 때 그러지 못한 것이 못내 아쉽고 미안할 따름입니다. 아무튼 아직까지 소아로 풀어낸 public tutorial은 보지 못했기에 더욱 뜻 깊은 것 같습니다. 다시 한번 감사의 뜻을 전하며...


p.s : 혹시 위의 과정들에 대한 의미를 파악하실 분은 제 홈페이지의 게시판을 참조하시기 바랍니다. 또한 이것 이외의 정보를 얻고 싶으신 분들은 개인적으로 메일을 주십시요. 결국은 그 자료들이란게 직접 해보지 않는 이상 도움이 전혀 안될 자료들이지만, 분명 길잡이가 되어줄 수 있으리라 생각합니다.


'Hacking' 카테고리의 다른 글

Intro to Reverse Engineering-Part 2  (0) 2009.01.24
Intro to Reverse Engineering - No Assembly Required  (0) 2009.01.24
Gunz Original Files  (0) 2009.01.20
Common Hacking Tools  (0) 2009.01.20
IDA PRO beginner tutorial  (0) 2009.01.11
Posted by CEOinIRVINE
l

Gunz Original Files

Hacking 2009. 1. 20. 04:40

'Hacking' 카테고리의 다른 글

Intro to Reverse Engineering - No Assembly Required  (0) 2009.01.24
ASProtect 1.23 RC4 - 1.3.08.24  (1) 2009.01.24
Common Hacking Tools  (0) 2009.01.20
IDA PRO beginner tutorial  (0) 2009.01.11
1.2.3.bmp  (0) 2009.01.10
Posted by CEOinIRVINE
l