'IDS'에 해당되는 글 4건

  1. 2011.11.30 Blocked DOMAINS / IP address for spreading malicous files (Chat.EXE, Chat.DLL) by CEOinIRVINE
  2. 2010.03.04 BASE 2010.3.3. Wed by CEOinIRVINE 1
  3. 2010.03.04 Snort IDS Installation by CEOinIRVINE
  4. 2008.10.10 Snort Installation on CentOS 4.6 by CEOinIRVINE

navy.scvhosts.com:443
navy.conimes.com:443
mail.lovexfree.com:443
ncw.winlogon.net:443
gold.MrBonus.com:443
shoes.sellClassics.com:443

[ATTACKER IP]src IP : 222.122.198.0/24

'Hacking' 카테고리의 다른 글

Security Advisory  (1) 2011.12.05
Web Penetration Testings  (0) 2011.12.04
Virus Pattern (Trend Micro)  (0) 2011.11.29
Informix SQL Injection Cheat Sheet  (0) 2011.11.08
DB2 SQL Injection Cheat Sheet  (0) 2011.11.08
Posted by CEOinIRVINE
l

BASE 2010.3.3. Wed

Hacking 2010. 3. 4. 09:03

BASE is a graphical interface written in PHP used to display the logs generated by the Snort IDS and sent into the database. It stands for Basic Analysis and Security Engine.
You can find the BASE website here: http://base.secureideas.net/


1. DOWNLOAD BASE:

Download the latest version.

We now have to uncompress the files and put them in the correct folder:

#tar -xvf base-1.4.4.tar.gz
#mv /home/user/Desktop/base-1.4.4 /var/www/base/


2. CONFIGURE BASE:

We need ADOdb (Active Data Objects Data Base) for BASE. AdOdb is in fact a database abstraction library for PHP.
Informations about ADOdb can be found here: http://adodb.sourceforge.net/

Download "ADOdb for PHP": http://adodb.sourceforge.net/#download
Again we now have to uncompress the files and put them in the correct folder:

#tar -xvf adodb504.tgz
#mv /home/user/Desktop/adodb /var/www/base
There are two ways to configure BASE:
Either you use a wizard or you change the config file by yourself.

A) Using the wizard

#chown -R www-data /var/www/base/
The change above will be needed to let the web server user (www-data) write in the BASE directory. Open a web browser and select the BASE directory:
http://localhost/base

Here you are entering a wizard:

Step 0: Check if everything is okay to begin the wizard.

Tutorial setup BASE settings Basic Analysis Security Engine Snort

Step 1: Language and path to ADOdb: /var/www/base/adodb/ .

Tutorial setup BASE step 1  Basic Analysis Security Engine Snort

Step 2: MySQL settings.

Tutorial setup BASE step 2  Basic Analysis Security Engine Snort

Step 3: BASE authentification settings.

Tutorial setup BASE step 3  Basic Analysis Security Engine Snort

Step 4: Create the MySQL database and tables (click on Create BASE AG).

Tutorial setup BASE step 4  Basic Analysis Security Engine Snort

B) Change the config file

It's not mandatory to use the wizard, you can do everything manually.
The first thing to do is to set the file base_conf.php.dist.
Open base_config.php.dist in the BASE directory and change the lines as shown below.

$DBlib_path="./adodb";

$DBtype="mysql";

$alert_dbname = snort;
$alert_host = localhost;
$alert_port = "";
$alert_user = snortuser;
$alert_password = snortpassword;

$archive_dbname = snort;
$archive_host = localhost;
$archive_port = "";
$archive_user = snortuser;
$archive_password = snortpassword;
Then you must rename the file from base_conf.php.dist to base_conf.php

#mv /var/www/base/base_conf.php.dist /var/www/base/base_conf.php
Second thing to do is to import the BASE MySQL tables into the snort database:

# mysql -u root -p snort < /var/www/base/sql/create_base_tbls_mysql.sql


3. CONNECT TO BASE:

Just access the BASE web link:
http://localhost/base
You will be prompted for a new password for the admin user.


4. BASE GRAPHS:

First we have to install the graphics library php5-gd for handling graphics directly from PHP scripts.

# apt-get install php5-gd
Then restart the apache webserver:

# /etc/init.d/apache2 restart
Second thing to do is to download three php PEAR libraries.
PEAR stands for "PHP Extension and Application Repository".

To download and install the librairies easily, the best thing to do is to install the php-pear package:

# apt-get install php-pear
Then we have to install the following packages:
Image_Graph, Image_color and Image_Canvas.

#pear install --force Image_Color
#pear install --force Image_Canvas
#pear install --force Image_Graph
Since there are some dependencies, you need to install the scripts in the order above.
Now, you have access to the graphs ...

Here are two typical error messages:

1 - Php5-gd is not installed:

PHP ERROR: PHP build incomplete: the prerequisite GD support required to generate graphs was not build into PHP. Please recompile PHP with the necessary library (--with-gd).

BASE  Basic Analysis Security Engine Snort PHP ERROR: PHP build incomplete
2 - Php-pear and/or its extensions are not installed correctly:

Error loading the Graphing library:
Check your Pear::Image_Graph installation!
Image_Graph can be found here:at http://pear.veggerby.dk/. Without this library no graphing operations can be performed.


BASE  Basic Analysis Security Engine Snort Image_Graph can be found here:at http://pear.veggerby.dk/


5. BASE OPTIONAL SETTINGS:

To customize the BASE tool, edit /var/www/base/base_config.php

There are two useful settings to activate:

A/Enabling DNS resolution

$resolve_IP= 1;
B/ Enabling colored alerts
Strangely, it seems that when you use the wizard procedure, the lines concerning the colored alerts are lost.
So if you used the manual install procedure, just active the $colored_alerts variable, or (ie: you used the wizard procedure) copy the lines below in your base_config.php file.

/**
* This option is used to set if BASE will use colored results
* based on the priority of alerts
* 0 : no
* 1 : yes
*/
$colored_alerts = 1;

// Red, yellow, orange, gray, white, blue
$priority_colors = array ('FF0000','FFFF00','FF9900','999999','FFFFFF','006600');

'Hacking' 카테고리의 다른 글

Computer Security Consulting  (0) 2010.04.02
Update Snort  (0) 2010.03.04
Snort IDS Installation  (0) 2010.03.04
TMAC V5 R3 MAC CHANGE  (0) 2009.11.20
d3d9 coding  (0) 2009.11.05
Posted by CEOinIRVINE
l

Snort IDS Installation

Hacking 2010. 3. 4. 08:59
2010.3.3.Wed

Download Snort and uncompress it.

#tar -xvf snort-2.8.3.3.tar.gz
Create two directory, one to store the configuration files, the other one to store the Snort rules.

#mkdir /etc/snort
#mkdir /etc/snort/rules
Copy the Snort configuration files inside the /etc/snort/ directory.

#cp snort_inline-2.8.3.3/etc/* /etc/snort/
Copy two files inside our new /etc/snort/rules directory:
- classification.config: defines URLs for the references found in the rules.
- reference.config: includes information for prioritizing rules.

#cp snort-2.8.3.3/etc/classification.config /etc/snort_inline/rules/
#cp snort-2.8.3.3/etc/reference.config /etc/snort_inline/rules/
Create a user called snort to launch Snort:

#useradd snort -d /var/log/snort -s /bin/false -c SNORT_IDS
Create a log directory owned by the snort user:

#mkdir /var/log/snort
#chown -R snort /var/log/snort
You need first to use the "configure" command to check the dependancies and prepare Snort to be compiled for MySQL.

#cd snort_inline-2.8.3.3
#./configure --with-mysql
If you installed all the dependencies correcty, the "configure" command must end without any error!
If you have an error message, See below.

Then we compile and install Snort.

#make
#checkinstall
See the CheckInstall page for more details about this command.
Below the output on our test system:

checkinstall 1.6.0, Copyright 2002 Felipe Eduardo Sanchez Diaz Duran
This software is released under the GNU GPL.

*****************************************
**** Debian package creation selected ***
*****************************************

This package will be built according to these values:

0 - Maintainer: [ root@ubuntu ]
1 - Summary: [ Package created with checkinstall 1.6.0 ]
2 - Name: [ snort ]
3 - Version: [ 2.6.1.3 ]
4 - Release: [ 1 ]
5 - License: [ GPL ]
6 - Group: [ checkinstall ]
7 - Architecture: [ i386 ]
8 - Source location: [ snort-2.6.1.3 ]
9 - Alternate source location: [ ]
10 - Requires: [ ]

Error messages you can get after the "./configure --with-mysql" command:

Build-essential is not installed

root@ubuntu:/home/po/Desktop/snort-2.6.1.3# ./configure --with-mysql
checking for a BSD-compatible install... /usr/bin/install -c
checking whether build environment is sane... yes
checking for gawk... no
checking for mawk... mawk
checking whether make sets $(MAKE)... no
checking whether to enable maintainer-specific portions of Makefiles... no
checking for style of include used by make... none
checking for gcc... no
checking for cc... no
checking for cl... no
configure: error: no acceptable C compiler found in $PATH
See `config.log' for more details.


Libnet1-dev is not installed

ERROR! Libpcap library/headers not found, go get it from
http://www.tcpdump.org
or use the --with-libpcap-* options, if you have it installed
in unusual place


Libpcap0.8-dev is not installed

ERROR! Libpcap library/headers not found, go get it from
http://www.tcpdump.org
or use the --with-libpcap-* options, if you have it installed
in unusual place


Libpcre3-dev is not installed

ERROR! Libpcre header not found, go get it from
http://www.pcre.org


Libmysqlclient12-dev is not installed

**********************************************
ERROR: unable to find mysql headers (mysql.h)
checked in the following places
/usr/include
/usr/include/mysql
/usr/local/include
/usr/local/include/mysql
**********************************************


2 - CONFIGURE THE SQL DATABASE

Add a password for the MySQL root user:

#mysqladmin -u root password new_root_password
Create the MySQL database and tables in order to receive the Snort logs:

#mysql -u root -p
>create database snort;
Since it is dangerous to access the database with the root user, we need to create a user who has only permissions on the snort database:

>grant all on snort.* to snortuser@localhost identified by 'snortpassword';
reload mysql privileges:

>flush privileges;
>exit;
Now we have to create the tables inside the snort database:
By chance the tables are already created and we just have to find and import them into the Sql server:

Packaged installation

Find the tables: dpkg -L snort-mysql
We are looking for the create_mysql.gz file, it is normally located in the /usr/share/doc/snort-mysql folder.
Then we have to unzip the file:

#gzip –d /usr/share/doc/snort-mysql/create_mysql.gz
Import the MySql tables:

#mysql -u root -p snort < /usr/share/doc/snort-mysql/create_mysql
Manual installation

#mysql -u root -p snort < schemas/create_mysql


3 - CONFIGURE SNORT FOR SQL

We now have to forward the logs into the MySql database:
This is already done by installing the snort-mysql package, we just need only to configure the username and password to access the snort database.
In the /etc/snort/snort.conf file, we have to change the line between (#DBSTART#) and (#DBEND#):

output database: log, mysql, user=snortuser password=snortpassword dbname=snort host=localhost
Always in the same file, uncomment the following lines:

ruletype redalert
{
type alert
output alert_syslog: LOG_AUTH LOG ALERT
output database: log, mysql, user=snortuser password=snortpassword dbname=snort host=localhost
}
Let's start Snort !!

snort –u snort –c /etc/snort/snort.conf
It means that Snort is started under the snort user and will load the config stored in the /etc/snort/snort.conf file. For security reasons it's always better to run programs without the root user.

If you see the Snort banner, it means that Snort is correctly loaded, if not, carefully read the error message.

We have to add a line inside the /etc/crontab file to start Snort automatically after a reboot:

@reboot root snort -u snort -c /etc/snort/snort.conf >> /dev/null
The first part of the tutorial is over!
This means Snort should be installed along with the programs needed to support it. Now we will need to read the logs generated by Snort and forwarded into the Mysql database. For this we will use the BASE php script and follow its tutorial.

'Hacking' 카테고리의 다른 글

Update Snort  (0) 2010.03.04
BASE 2010.3.3. Wed  (1) 2010.03.04
TMAC V5 R3 MAC CHANGE  (0) 2009.11.20
d3d9 coding  (0) 2009.11.05
Hacking  (0) 2009.10.28
Posted by CEOinIRVINE
l

Snort Installation on CentOS 4.6

IT 2008. 10. 10. 08:20


php test : download http://shat.net/php/nqt/nqt.php.txt.
copy this file under /var/www/html
visit http://yourwebsite

if you see network query tool window and execute some command over there, your php works fine.


cd /root
mkdir snortinstall


!!!DO THE FOLLOWING AS ROOT!!!
download your snort
wget http://www.snort.org/dl/snort-2.8.3.1.tar.gz
install PCRE from source
wget http://downloads.sourceforge.net/pcre/pcre-7.8.tar.gz?modtime=1220617433&big_mirror=0
 
tar xvzf pcre-7.8.tar.gz
cd pcre-7.8
./configure
make
make install

cd back to your snortinstall dir
tar xvzf snort-2.8.3.1.tar.gz
cd snort-2.8.3.1
./configure --with-mysql --enable-dynamicplugin --with-libpcap-libraries=/usr/lib64 --with-libpcre-libraries=/usr/lib64 --with-libnet-libraries=/usr/lib64 --enable-stream4udp --enable-dynamicplugin LDFLAGS='-L/usr/lib64 -L/usr/lib64 -L/usr/lib64 -L/usr/lib64/mysql'

make
make install


groupadd snort
useradd -g snort snort -s /sbin/nologin


mkdir /etc/snort
mkdir /etc/snort/rules
mkdir /var/log/snort

cd /etc
cp * /etc/snort
wget http://www.snort.org/pub-bin/downloads.cgi/Download/vrt_pr/snortrules-pr-
2.4.tar.gz
or just download my previous uploaded snortrules-snapshot-2.8.tar.gz


tar xvzf snortrules-pr-2.4.tar.gz
or tar xvzf snortrules-snapshot-2.8.tar.gz


cd to rules and do the following command
cp -R * /etc/snort/rules


Modify your snort.conf file


edit snort.conf under /etc/snort by using vi or any other editor

change followings

var HOME NET 10.0.0.0/8 (for example)
var EXTERNAL_NET !$HOME_NET

var RULE_PATH ../rules to var RULE_PATH /etc/snort/rules

add or edit as followings
preprocessor stream5_global: max_tcp 8192, track_tcp yes, \
                             track_udp yes
preprocessor stream5_tcp: policy windows, use_static_footprint_sizes, \
                                                  ports client 21 23 25 42 53 80 135 136 137 139 143 110 111 445 465 513 691 1433 1521 2100 2301 3128 3306 8000 8080 8180 8888
preprocessor stream5_udp: ignore_any_rules


also, you need to tell snort to log to MySQL

output database: log, mysql, user=snort password=<the password you gave it>
dbname=snort host=localhost


cd /etc/init.d
wget http://internetsecurityguru.com/snortinit/snort/index.html
mv index.html snort
chmod 755 snot
chkconfig snort on

mysql -p
passwd:
(default: whatever password you wawnt to give it, remember what you assign.)


mysql
mysql> SET PASSWORD FOR root@localhost=PASSWORD('password');
>Query OK, 0 rows affected (0.25 sec)
mysql> create database snort;
>Query OK, 1 row affected (0.01 sec)
mysql> grant INSERT,SELECT on root.* to snort@localhost;
>Query OK, 0 rows affected (0.02 sec)
mysql> SET PASSWORD FOR snort@localhost=PASSWORD('password_from_snort.conf');
>Query OK, 0 rows affected (0.25 sec)
mysql> grant CREATE, INSERT, SELECT, DELETE, UPDATE on snort.* to snort@localhost;
>Query OK, 0 rows affected (0.02 sec)
mysql> grant CREATE, INSERT, SELECT, DELETE, UPDATE on snort.* to snort;
>Query OK, 0 rows affected (0.02 sec)
mysql> exit
>Bye

mysql -u root -p < ~/snortinstall/snort-2.4.3/schemas/create_mysql snort
Enter password: the mysql root password
mysql -p
>Enter password:
mysql> SHOW DATABASES;
(You should see the following)
+------------+
| Database
+------------+
| mysql
| Snort
| test
+------------+
3 rows in set (0.00 sec)

mysql> use snort
>Database changed
mysql> SHOW TABLES;
+------------------+
| Tables_in_snort
+------------------+
| data
| detail
| encoding
| event
| icmphdr
| iphdr
| opt
| reference
| reference_system
| schema
| sensor
| sig_class
| sig_reference
| signature
| tcphdr
| udphdr
+------------------+
16 rows
exit;


BASE-Install

yum install php-gd
It will ask you the following, choose Y
Transaction Listing:
Install: php-gd.i386 0:4.3.10-3.2
Is this ok [y/N]: y

download adodb
wget http://downloads.sourceforge.net/adodb/adodb505.tgz?modtime=1215766049&big_mirror=0

adodb505.tga

download attached above base file


cd /etc/sysconfig/
edit the iptables file
add the line “-A RH-Firewall-1-INPUT -m state --state NEW -m tcp -p tcp --dport 443 -j
ACCEPT
And delete the lines:
-A RH-Firewall-1-INPUT -p 50 -j ACCEPT
-A RH-Firewall-1-INPUT -p 51 -j ACCEPT
-A RH-Firewall-1-INPUT -p udp --dport 5353 -d 224.0.0.251 -j ACCEPT
-A RH-Firewall-1-INPUT -p udp -m udp --dport 631 -j ACCEPT
-A RH-Firewall-1-INPUT -m state --state NEW -m tcp -p tcp --dport 80 -j ACCEPT
Then change the line :
-A RH-Firewall-1-INPUT -p icmp --icmp-type any -j ACCEPT
To :
-A RH-Firewall-1-INPUT -p icmp --icmp-type any -j REJECT
Then you will only be able to get to the site with HTTPS:// the reason you want to do this
is so you do not trigger more alerts from you reading alerts, and if something is able to be
encrypted then I usually do.
Then execute the command “service iptables restart” and you will see something like tee following:
[root@snort conf]# service iptables restart
Flushing firewall rules: [ OK ]
Setting chains to policy ACCEPT: filter [ OK ]
Unloading iptables modules: [ OK ]
Applying iptables firewall rules: [ OK ]
Then it will look like this when you do an “iptables –L”


Installing Adodb:
Go back to your download directory (~/snortinstall)
cp adodb462.tgz /var/www/
cd /var/www/
tar -xvzf adodb462.tgz
rm –rf adodb462.tgz

Go back to your download directory (~/snortinstall)
cp base-1.2.5.tar.gz /var/www/html
cd /var/www/html
tar xvzf base-1.2.5.tar.gz
rm -rf base-1.2.5.tar.gz
mv base-1.2.5 base

cd /var/www/html/base
cp base_conf.php.dist base_conf.php

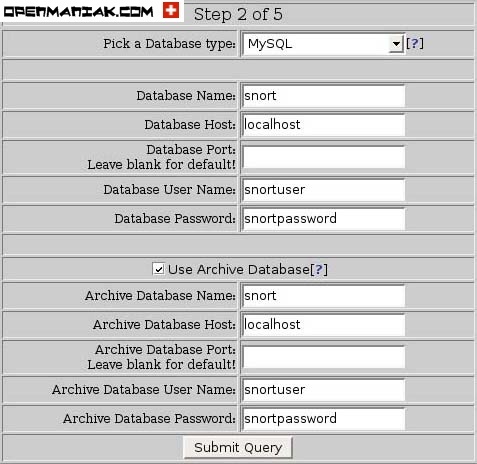
edit the "base_conf.php" file and insert the following perimeters


$BASE_urlpath = "/base";
$DBlib_path = "/var/www/adodb/ ";
$DBtype = "mysql";
$alert_dbname = "snort";
$alert_host = "localhost";
$alert_port = "";
$alert_user = "snort";
$alert_password = "password_from_snort_conf";
/* Archive DB connection parameters */
$archive_exists = 0; # Set this to 1 if you have an archive DB


Now, go to a browser and access your sensor.
NOW: “chkconfig snort on” to make snort starts with the system
then type service snort start. It should give you an OK
https://<ip.address>/base
This will bring up the initial BASE startup banner.
Securing APACHE and the BASE directory:
mkdir /var/www/passwords
/usr/bin/htpasswd -c /var/www/passwords/passwords base
(base will be the username you will use to get into this directory, along with the password
you choose)
It will ask you to enter the password you want for this user, this is what you will have to
type when you want to view your BASE page
Edit the httpd.conf (/etc/httpd/conf). I put it under the section that has:
<Directory />
Options FollowSymLinks
AllowOverride None
</Directory>
These are the lines you must add to password protect the BASE console, add it to
the httpd.conf file in /etc/httpd/conf/:

<Directory "/var/www/html/base">
AuthType Basic
AuthName "SnortIDS"
AuthUserFile /var/www/passwords/passwords
Require user base
</Directory>
Since you have removed the port 80 entry in the iptables script you will have to go to the
console on port 443, using HTTPS:/<ip_address>/base
Save the file and restart Apache by typing “service httpd restart” to make the password
changes effective.
After you’re done
Login as root and check everything important to see if it is running.
To check you can execute “ps –ef |grep <SERVICE>” where service is snort. httpd, or
mysql.
Or use “ps –ef |grep httpd && ps –ef |grep mysql && ps –ef |grep Snort”


or visit http://www.howtoforge.com/intrusion_detection_base_snort


'IT' 카테고리의 다른 글

Snort Configuration [1]  (0) 2008.10.14
Snort Location  (0) 2008.10.14
Apple's Brick: A Radical New Laptop?  (0) 2008.10.07
Samsung's Superior Series 6 LCD TV  (0) 2008.10.05
Tech Addicts  (0) 2008.10.04
Posted by CEOinIRVINE
l